Quick Candy Sorting Machine

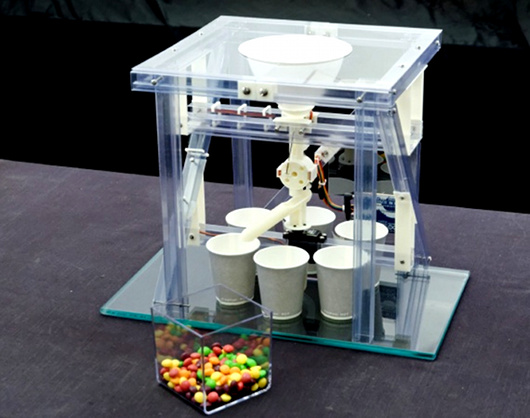
OCD. Sometimes things just get to you, like those pesky bags of randomly assorted candies. [Torsten] decided to build a sorting machine capable of sorting Skittles or M&Ms into separate cups by color at around 80 pieces per minute. It’s a great implementation, using an Arduino Duo. He based the code on the principles of a finite-state machine, in order to make it as quick as possible.

It works as you would expect: When a candy piece is loaded, the color is determined using an RGB sensor. A 360-degree servo is used to move the chute to the proper position, and interestingly, the system preemptively releases the candy before the chute is in position in order to maximize the speed. If you watch closely, you can see this behavior in the video (embedded after the break).

[Torsten] includes a complete bill of materials, if you’d like to try it for yourself. He also included a list of possible improvements.

Continue reading “Quick Candy Sorting Machine”

A Clock Built From Scraps

IMG_0409

Who doesn’t love a good surplus store? [Tyler Bletsch] just finished up this awesome clock hack by re-purposing a scrapped medical circuit board.

Ax-Man Surplus in Minneapolis has all kinds of goodies and it’s been around a long time (here’s a hack from the ’90s that source from the store). One day while digging through their inventory, [Tyler] found a bunch of scrap circuit boards with 7-segment displays. At $2 a pop, he decided to risk it to tinker with.

He quickly identified the main chip on the board to be a common LED driver (MAX7221) and began reverse engineering the board by tracing the circuit. He actually has a brilliant guide on his website about how to make circuit tracing way easier. From there it was just a matter of loading a MAX7221 library onto a ATtiny44, adding a 16MHz crystal, and since there’s an extra 2 digits available on the display… a temperature sensor too!

It’s a great little hack, and as it turned out, there wasn’t anything wrong with the boards, except for a minor typo in the company’s name. Hooray for reusing scrapped parts!

3D Scanner Using A Sharp Infrared Sensor

[Fernando] sent in a tip about a pet project he’s been working on. It’s an interesting take on a 3D scanner. He used a stepper motor to rotate the object being scanned, and an Arduino for control, but the real novelty is the way he used the sensor. [Fernando] mounted a Sharp GP2D120X on vertical surface, and used a second stepper motor to raise the sensor during the scan. As you can see in the videos (embedded after the break), this results in the scan being put together in an ascending spiral.

The Sharp sensor is cheap and decent, but you’re obviously not going to get amazing accuracy. Still, using the average of several measurements, he ends up with a decent result. Happily, [Fernando] has released the code, and it should be easy enough to repurpose it with a more accurate sensor. It would be interesting to see a laser-based sensor paired with this code.

Continue reading “3D Scanner Using A Sharp Infrared Sensor”

Fubarino Contest: Persistence Of Vision Clock

propellerck5

The best part of these contests is that we get people to actually show off what they’ve been working on! Check out the POV clock which was sent in by [Taciuc]. He doesn’t have a webpage for it, but he did send a video which you can see after the break.

The project is a home-etched PCB with a long row or surface mount LEDs. The board is spun by a stepper motor which takes a little while to stabilize. But once it does it’s a twirling package of awesomeness. A PIC 16F628 drives the device, with a separate RTC chip to keep time. There’s also an IR receiver to facilitate user control. Our URL is displayed on the clock face itself and we think it’s always shown. But there is an easter egg in the code itself. If you try to dump the firmware from the chip you’ll see our web address in the hex output. Here’s his project archive if you want to the HEX, ASM and DipTrace schematic.


This is an entry in the Fubarino Contest for a chance at one of the 20 Fubarino SD boards which Microchip has put up as prizes!

Continue reading “Fubarino Contest: Persistence Of Vision Clock”

An Opensource Arduino Guitar Pedal

If you’re a guitarist, or know a guitarist, you probably know just how many guitar effects there are out there — but what if you could design your own effects?

[J Rodriguez] has just released his opensource Arduino guitar pedal shield, dubbed the pedalSHIELD. He designed it as a platform to learn about digital signal processing, effects, and synthesizers — without needing an in-depth knowledge of electronics or programming. It allows you to design your own effects in C/C++, or download from his own library online. Some of the downloadable presets include an octave pedal, reverb pedals, delay pedals, and even distortion pedals!

The pedal features three programmable potentiometers, two main switches, and the foot pedal switch. The shield plugs directly into an Arduino Due, and you can find all the schematics here and the parts list here. It was completely designed in KiCad which is an open source electronics CAD design suite.

Take a listen after the break to hear the pedal in action!

Continue reading “An Opensource Arduino Guitar Pedal”

NESPoise – A Nice Looking NES Clone

[Dave] tipped us about the latest project he just finished: a posable, desktop NES clone arcade machine. This idea came to be when its creator gathered a few bits and pieces he had lying around: an NES Retro Entertainment System (Retrobit RES, found for less than $25) and an arcade stick with its buttons. [Dave] then bought a 7″ car DVD screen (less than $40) and started a first standard arcade-looking design with OpenSCAD. As the first draft was relatively boring, he let it mature for a bit until he got another idea, shown in the picture above.

The final result is made of 3D printed PLA and varnished luaun plywood which gives the console a VCS style retro look. Many hours were required to 3D print the different parts using a Makerbot Replicator 2. [Dave] disassembled his Retrobit RES to layout its parts inside the case and  also replaced the original voltage regulator with a 7805 on a big heatsink. This may be one of the best ‘nintendo’ hacks we have received over the years, but there have been others that also take cartridges.

Full-size Lego Car Can Hit 30km/h!

[Steve Sammartino] is a Melbourne entrepreneur, and he had an idea: could it be possible to design and make a functional full-size Lego car?

He sent out a single tweet to try to crowd fund the project:

Anyone interested in investing $500-$1000 in a project which is awesome & a world first tweet me. Need about 20 participants…

Not one, not two, but forty Australians pledged money to start this crazy idea dubbed the #SuperAwesomeMicroProject. With the money raised, [Steve] and [Raul Oaida] purchased over 500,000 Lego pieces and began the build in Romania, where [Raul] lives.

Now before you get too excited, the car is not “fully” made out of Lego. It features real tires and some select load bearing elements. That being said, the entire engine is made completely out of Lego. It features four orbital engines utilizing a total of 256 pistons. The top speed they tested it to was about 20-30km/h — it might go faster, but they didn’t want to risk a catastrophic failure.

Since its completion (it took nearly 18 months to build), it’s been shipped back to a secret location in Melbourne, but the team has made an excellent video showcasing the project. Stick around after the break to see your childhood dreams come to life.

Continue reading “Full-size Lego Car Can Hit 30km/h!”