Crowdsourcing Plastic Model Kits

laser

Flexiscale, the company that crowdsources and crowdfunds model kits, made a showing at the World Maker Faire. We’ve seen their work before, but this time we got to touch base with [Chris Thorpe] and get a handle on the future of user-requested model kits.

Right now there are over one hundred proposals for what Flexiscale should do next. They’re mostly narrow gauge railroad locomotives and rolling stock, but [Chris] tells me they’re looking to branch out into larger projects including American locomotives as well as planes, ships, and buildings. This is a really, really cool project, and if you’re into models at all, you should at least be aware of what Flexiscale is trying to do.

If you have an idea of what Flexiscale should do next, write up a proposal. I made one for the PRR GG1 electric locomotive, and if enough people support it, [Chris] will scan an engine and make a kit.

Adding Automatic Power-On To A Linksys NAS

auto-power-up-for-linksys-NAS

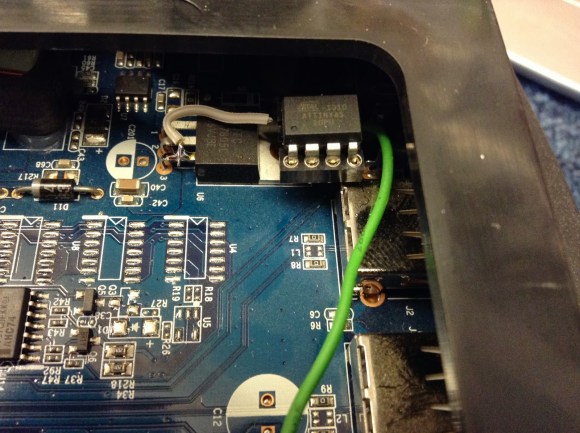
We feel [Jim’s] pain in having to physically press the power button to boot his Network Attached Storage device after a power outage. If you live in an area with frequent brief but annoying power blinks it wouldn’t take long to brew up your own solution. Here you can see the ATtiny45 that he added for the auto-boot.

Aside from having to go upstairs in order to reboot the machine there is also a compulsory disk check that his Linksys NAS200 performs before files are available on the network. You can see that he used an 8-pin socket which lets him remove the chip for programming. The socket gets a ground connection from the shielding of the USB port, it pulls 5V off of the linear regulator right next to it, and the green wire connects to the power button’s conductor.

The sketch compiled for the chip starts a ten second timer are power up. When the timer goes off it pulls the pin low and then high, simulating a button press. In hobby electronics it’s a common problem that we have to invent issues to use as the next project. So it’s nice to see a real life application like this one.

Electric BMX Has Pedals That Can’t Be Pedalled

electric-bmx

We don’t mind it that there’s no chain connected to these pedals. At least there’s still somewhere to put your feet and our legs are too long to comfortably pedal this size of bike anyway. As you can tell, the added hardware takes care of locomotion using an electric motor.

The first step in this project was to find a steel bike frame to make welding a bit easier than it would be for aluminum. From there the paint was sanded at the attachment points and mounting brackets were fabricated from some angle iron. The rear mount houses a 500W 30A AC motor which uses a chain to drive the rear wheel. A specialty hub was found which allows the added sprocket to be installed on the left side of the rear wheel. Some threading issues prompted [Michael Monaghan] to come up with a method of adding a slot to lock the part in place.

Near the front fork the second mounting bracket holds the batteries; a pair of sealed lead-acid units. The speed control mounts on the top where the rider has easy access to it. The finished bike can get up to thirty miles per hour with a range of up to twenty miles between charges.

If you want your own electric bike on the cheap you can try building one from a salvaged washing machine motor.

Automatic Bluetooth Module Programmer

automatic-bluetooth-programming

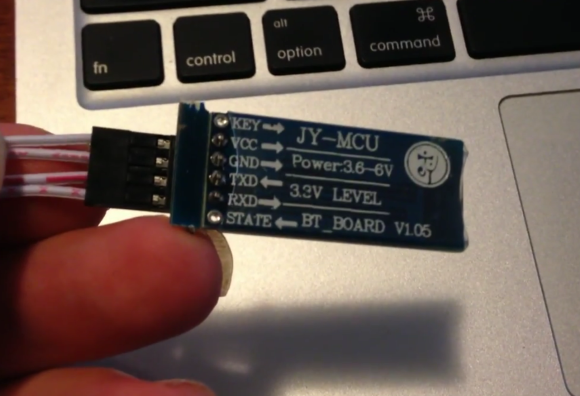
Before we dive in don’t be confused by the title. This doesn’t flash firmware to the device. But it does automate the process of setting up the Bluetooth to serial module for use in your projects.

We’re often confused by the lack of a standard way of describing these inexpensive modules. We would look at this can call it an HC-05, but we’re not sure if that’s right or not. [James Daniel] calls it a JY-MCU board. If you have a handle on the differences (or lack of) please let us know in the comments. Either way we know that these boards can be frustrating to work with. They can be found with a wide variety of different firmwares, which can make the configuration process a bit different for each.

[James’] solution connects the device to an Arduino running a sketch that he wrote. Connect the device, launch the terminal monitor in the Arduino IDE, then give it your desired settings. The sketch will poll the Bluetooth module to see what speed it is set to run at. It will then establish which firmware version the board is running, displaying this info in the terminal. It then uses that information to program the board with your desired settings.

In this case [James] is using one of the modules to drive his 3D printer without being tethered to his laptop.

Continue reading “Automatic Bluetooth Module Programmer”

Backlit PCB Panel As Wall Art

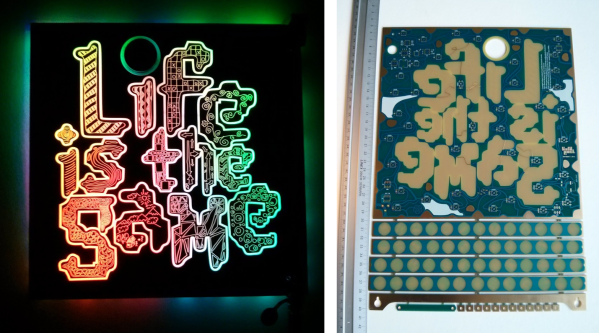
For his buddy’s wedding [Saar Drimer] wanted a one-of-a-kind gift, and what’s more unique than a piece of art? He set out to design something that would speak to his geeky game-loving friend. This full-panel PCB is what he came up with. It’s a wall hanging that uses addressable LEDs and a PCB for the enclosure and as a diffuser.

On the right you can see the panel as it was delivered to him. He used routed slots to separate the main body of the enclosure from the four side pieces and the mounting bracket. This design lets him snap off the parts and solder them in place. The only thing you need to add to it is a pair of screws (well, and the components that make it light up).

We’re shocked by how well the PCB works as a diffuser. The substrate is translucent when not covered with silk screen or the copper layers. The outline of the letters uses that, as well as circular areas along the side pieces. The letters themselves are copper fills that have artistic patterns removed from them. This really adds to the visual appeal when the piece is illuminated by 42 WS2812B LEDs. The video below shows the piece in action. It really takes PCB as art to the next level

Continue reading “Backlit PCB Panel As Wall Art”

Safety Warning: Arduino GSM Shield May Cause Fires

Be careful with those Arduino GSM cards. As [James] reports, they may turn into fire starters. One person has reported a small explosion and fire already on the Arduino forums.
Now before we go any further – You may be asking yourself who the heck [James] is, and what gives him the ability to second guess the Arduino team. Well, here is [James’] blog disclaimer:  “James is a Senior Technical Expert for Technology and Applications at KEMET Electronics, a capacitor manufacturer. The content of this post are his and in no way reflects opinions of his employer.”

Senior Technical Expert?  That’s a good enough reason for us to believe him.

[James] states the problem is a tantalum capacitor used to decouple the GSM radio power supply from the main Arduino supply.
Tantalum capacitors are great for their low ESR properties. However, they have a well known downside of getting very hot, or even exploding when stressed. It’s not the Tantalum Anode that is burning. The Manganese Dioxide used as a cathode in some Tantalum capacitors is the culprit. Continue reading “Safety Warning: Arduino GSM Shield May Cause Fires”

Priceless Paintings – Scanned And Printed In 3D

painting

When we think of works by Van Gogh and Rembrandt, most of us remember a picture, but we aren’t accustomed to seeing the actual painting. [Tim Zaman], a scientist at Delft University of Technology in the Netherlands, realized that the material presence of the paint conveys meaning as well. He wanted to create a lifelike reproduction in full dimension and color. While a common laser-based technique could have been used for depth mapping, resolution is dependent on the width of the line or dot, and the camera cannot capture color data simultaneously with this method. In his thesis, [Tim] goes into great detail on a hybrid imaging technique involving two cameras and a projector. He and his team eventually used two 40-megapixel Nikon cameras in conjunction with a fringe projector to capture a topographical map with in-plane resolution of  50 μm, and depth resolution of 9.2 μm.

We can’t find a lot of information on the printing process they used, other than references to high-resolution 3D printers by Océ (a Canon company). That said, [Tim] has provided a plethora of images of some of the reproductions, and we have to say they look amazing. The inclusion of depth information takes this a big step further than that gigapixel scanning setup we saw recently.

Check out the BBC interview with Tim, as well as time lapse videos of the scanning and printing process after the break.

Continue reading “Priceless Paintings – Scanned And Printed In 3D”