Taming STM32 Discovery Boards For Regular Use

taming-discovery-boards

We think [Karl Lunt] has a point when he says that the STM32 Discovery Boards are cool and inexpensive, yet not hobby friendly. But it’s nothing that a little big of creativity can’t solve. Above are pictured three of the hacks he used to tame the Discovery boards.

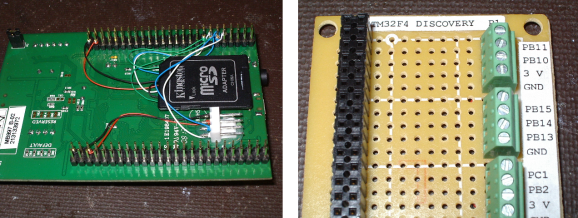
The first is the addition of a microSD card adapter. He soldered wirewrap wire to each of the contacts on the adapter. He recommends a low iron setting to make sure you don’t melt the plastic adapter housing. He then used double stick foam tape to adhere it to the bottom of the dev board. The other ends of the wire are wrapped around the appropriate pins on the dual-row pin header. Similarly, the UART3 connections are broken out from the pin headers to that white quick connect socket. This lets him access serial data without having to solve the USB issues that were vexing him.

Finally, he made his own daughter board to break out the dual row headers into screw terminals. We’ve been hit with problems interfacing hardware with the board’s native connections — jumpering to IDE cables just never worked reliably. This breakout board not only makes it simple, but organizes the pins into groups based on their alternate functions.

Do you remember seeing the hacksaw version of this Discovery board which gives you two dev boards for the price of one?

A Full-auto Gauss Gun Probably Won’t Hurt Much

While it may only be able to shoot a few cans right now, we certainly wouldn’t want to be in front of [Jason]’s fully automatic Gauss gun capable of firing 15 steel bolts from its magazine in less than two seconds.

The bolts are fired from the gun with a linear motor. [Jason] is using eight coils along the length of his barrel, each one controlled by an IGBT. These are powered by two 22 Volt 3600mAh LiPo battery packs.

As for the mechanical portion of the build, the bolts fired from this gun are actually 6.5mm nails, cut off and sharpened. These are chambered from a spring-loaded magazine, with each new bolt put into the breech with a small solenoid retracting for an instant. The frame is constructed from a square aluminum tube with additional pieces cut with a hacksaw and bent with an impromptu bench vise brake. If ever there was a person deserving of a bench top shear/brake, [Jason] is the man.

The muzzle velocity of these bolts is about 40 m/s, with a muzzle energy that’s about 3% of a .22 LR round. Not deadly, but more than enough for picking off a few cans and bottles in a garage. You can see the video of this futuristic Gauss machine gun below.

Continue reading “A Full-auto Gauss Gun Probably Won’t Hurt Much”

Retrotechtacular: Singing Bird Automata

retrotechtacular-birdsong-automata

Our cats were both sleeping near the computer and these videos were driving them nuts. To our ears these birdsongs sound pretty good. They didn’t trick the cats into stalking mode, but they did spark an audible complaint. So the predators aren’t drooling but the mechanical engineers reading this should be. These automata combine the precision of a mechanical clock with a bellows and specialized whistle to recreate birdsong.

You’ve got to hear it for yourself to appreciate the variety produced by the mechanisms. The first video shows off the device seen on the left. This particular model is from the 1890’s and the demo gives a good look at the arms that open and block a passageway to alter the sound. After seeing that link — which was sent in by [Stefan] — we started searching around for more info on the devices. The one pictured to the right turned up. It’s from YouTube user [Singing Bird Boxes] who has many videos showcasing these types of devices. We picked this one because he tried to explain how each part of the mechanism works. These are still being made today, but there’s something magical about seeing one built during the steam age.

We’d like to make Retrotechtacular a weekly feature every Tuesday. Help us out by sending in links to projects that highlight old technology, instructional videos of yore, tours of museums or similar relics.

Continue reading “Retrotechtacular: Singing Bird Automata”

Leap Motion Controls Hexapod With Hand Signals

leap-motion-hexapod-hand-control

Moving your hand makes this hexapod dance like a stringless marionette. Okay, so there’s obviously one string which is actually a wire but you know what we mean. The device on the floor is a Leap Motion sensor which is monitoring [Queron Williams’] hand gestures. This is done using a Processing library which leverages the Leap Motion API.

Right now the hand signals only affect pitch, roll, and yaw of the hexapod’s body. But [Queron] does plan to add support for monitoring both hands to add more control. We look at the demo after the break and think this is getting pretty close to the manipulations shown by [Tom Cruise] in Minority Report. Add Google Glass for a Heads Up Display and you could have auxiliary controls rendered on the periphery.

While you’re looking at [Queron’s] project post click on his ‘hexapod’ tag to catch a glimpse the build process for the robot.

Continue reading “Leap Motion Controls Hexapod With Hand Signals”

Avalanche Pulse Generator Design

avalanche-pulse-generator

This avalanche pulse generator is a great way to test your mettle as an Electronics Engineer. The challenge is to truly understand how each part of the design works. We certainly got a failing grade when first studying the schematics more than a week ago. But we’re slowly beginning to understand what’s going on under the hood.

The concept of an avalanche transistor is some wicked voodoo from the analog side of the street which leverages a transistor’s breakdown voltage to achieve a predictable result. In laymen’s terms it (mis)uses a transistor to produce a really fast pulse. The write-up linked above references several previous avalanche pulse generator designs, but this one is a bit different in how it produces about 50V from a pair of AAA batteries using a multivibrator circuit.

Even if you have no idea what’s going on here you may be interested in the last few paragraphs where the circuit is measured using a cutting-edge Teledyne LeCroy Wavemaster 820Zi-A. That’s a 20 GHz scope with a 15.3″ screen which you’ll never ever own.

Replacing Knurled Thumb Screws

Screw

[Pete] bought himself an old South Bend lathe, but unfortunately some of the thumb screws were missing from this fine old machine. Originally, the lathe had knurled thumbscrews, and with a thumbscrew from Ace hardware the lathe itself was functional, but by no means looking its best. With a lathe you can make just about anything, so [Pete] decided he would make his own knurled thumbscrews and bring this lathe back to life.

Knurling is a diamond or linear pattern of indentations usually found on fancy metal knobs, flashlights, and other equipment that needs a good grip. While there are knurling tools for lathes, [Pete] decided to use his knurlmaster – a handheld device that looks like a pipe cutter – to cut a few knurls into a steel bar.

As for making this knurled bar into a proper thumbscrew, [Pete] shows us two methods: the first is tapping the knurled steel, putting in the right screw for the job, and securing the parts with Loctite. The second method involves cutting the threads on the lathe, an excellent example of how a lathe can make just about anything, even parts for itself.

Bench Equipment Tip: Screenshot Of Old Oscilloscopes

oscillocam-oscilloscope-camera-accessory

Here’s a quick tip on capturing the output of oscilloscopes that don’t have that native feature. [Paulo Renato] used a cookie tin as a camera cowl for capturing CRT oscilloscope screenshots.

We figure if you’ve got any kind of functioning oscilloscope you’re lucky. And although it’s nice to pull down the measurements to your PC on the newer models, the results [Paul] gets with this rig are still satisfactory. The plastic cookie box he used blocks out ambient light while holding the camera at a consistent focal length. He used some flat black spray paint to make sure the obnoxious yellow plastic didn’t interfere with the image, then drilled a hole which fits tightly around his camera lens.

You’ll need to monkey with the exposure settings to get the best image. But once you’ve got it dialed in it should be the same every time you want to take a picture of the screen.