Warming Seeds In An Outdoor Garden

resistor-string

Spring is almost here and with that the green thumbs out there are preparing for their summer gardens. It’s usually a good idea to get a jump on all your gardening activities by starting seeds indoors, but with this comes the problem of making sure juvenile plants get enough sunlight. Putting a few seeds on a window sill will keep seeds warm enough to start germinating, but that will drastically reduce the amount of sunlight available for any given day. The best solution is to make sure the seeds are kept warm outside, but for wont of a properly placed clothes dryer vent [Tim] decided to make a solar soil heater using junk he had lying around.

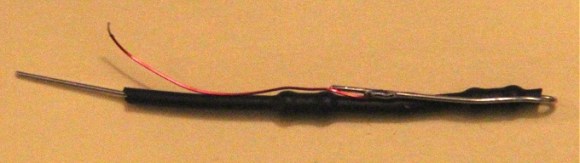
[Tim] constructed a simple heater cartridge using a few 5 and 10 Ω resistors. These were sealed inside a piece of copper pipe with heat shrink tubing and silicone. The solution to powering this heater cartridge, though, is an impressive display of thinking outside the box.

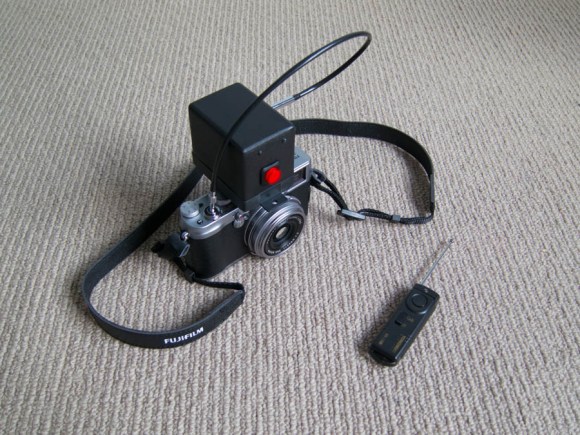
The cartridge is powered by a solar lantern – the same kind you’d find illuminating a garden path at night and recharging during the day. After inserting the cartridge in a hill of seeds, the heater provides a little bit of warmth to get the seeds through the night. During the day, the battery in the solar lantern recharges, providing just enough power to cycle through another night.

It works for [Tim] in his native New England, so we’re betting it’s good enough for just about any growing region.

DRM Chair Only Works 8 Times

chair

Download a song from iTunes, and you can only add that song to the music library of five other computers. Grab a copy of the latest Microsoft Office, and you’d better hope you won’t be upgrading your computer any time soon. Obviously DRM is a great tool for companies to make sure we only use software and data as intended, but outside planned obsolescence, there isn’t much in the way of DRM for physical objects.

This is where a team from the University of Art and Design in Lausanne, Switzerland comes in. They designed a chair that can only be sat upon eight times. After that, the chair falls apart necessitating the purchase of a new chair. Somewhere in the flat-pack furniture industry, someone is kicking themselves for not thinking of this sooner while another is wondering how they made a chair last so long.

The design of the chair is fairly simple; all the joints of the chair are cast in wax with a piece of nichrome wire embedded in the wax. An Arduino with a small switch keeps track of how many times the chair has been used, while a solenoid taps out how many uses are left in the chair every time the user gets up. When the internal counter reaches zero, a relay sends power through the nichrome wire, melting the wax, and returning the chair to its native dowel rod and wooden board form.

Melting wax wasn’t the team’s first choice to rapidly disassemble a chair; their first experiments used gunpowder. This idea nearly worked, but it was soon realized no one on the team wanted to sit on a primed and loaded chair. You can see the videos of the wax model failing after the break.

Continue reading “DRM Chair Only Works 8 Times”

Street Art Bot

Street Art Bot

For the Deconstruction decentralized hackathon, “The FABricators” from Fab Lab Tulsa built a Street Art Bot. The robot drives around and dispenses liquid chalk in a pattern to make sidewalk art.

The FABricators’ robot is based on an electric wheelchair platform. Attached to the base is the hardware for dispensing chalk, which is controlled over wifi. The operator drives the robot around the area to chalk, and chalk is deposited in the right pattern.

In order to ensure the art is chalked correctly, the robot’s software needs to know where the robot is at all times. This is done using a camera mounted above the area and a fiduciary marker that localizes the robot. The tracking is done using the reacTIVision library.

The robot was built to be expandable, and in the future they want to add multiple colors, or even multiple robots printing simultaneously.  After the break, check out a video overview of the project.

Continue reading “Street Art Bot”

RPi Printer Server For Your 3D Printer

OctoPrint

Want to run your 3D printer without your laptop attached? Looking to make your hackerspace printer network accessable? OctoPrint aims to make a 3D print server for the Raspberry Pi.

The open source Python project allows you to upload and manage GCODE files on the RPi. You can then select files that you want to print, and get basic statistics before running the printer. Information including temperature can be reported back via the UI, and arbitrary GCODE commands can be run for setup and testing.

Some other nifty features include streaming video to the UI so the print job can be watched remotely. Support for creating time-lapse videos is also available. Adding a wifi dongle and webcam to an RPi turns it into a fully featured print server.

The project uses the Flask web framework to serve the UI, and Tornadio with Socket.io to communicate with the UI asynchronously. You can pull the code from the project’s Github and try it out.

Thanks to [Camerin] for sending this in.

Building A Remote Control For A Cable Release Camera

wireless-shutter-for-mechanical-camera

A lot of the remote shutter and intervalometer hacks we see are simplified by the camera’s built-in Infrared or other shutter techniques. But this camera doesn’t have a simple way to electronically trigger the shutter. The Fuji x100 is a digital camera, but it uses a cable release mechanism. The box you see on top is [Andy’s] method of making a remote shutter release for it.

The solution for “remote” triggering is that black cable which physically attaches to the shutter button. Just depress the plunger at the opposite end and a picture will be snapped. This process is automated with the use of a hobby servo hidden inside the box. It’s driven by an Arduino which is also monitoring the receiver. You could use just about any remote thanks to the Arduino’s flexibility in interfacing with hardware (we would have gone with a Bluetooth module and our smartphone). [Andy] chose to use an RF remote and receiver for a different camera.

Hackerspace Intro: Workshop 88

hackerspace-intro-workshop-88

If you find yourself in the West suburbs of Chicago, IL with nothing to do you should head over to Workshop 88. [Andrew Morrison] shot some video at the last public meeting which includes a tour of the facilities. We’ve embedded it after the jump for your convenience.

The clip isn’t so much a tour as it is a POV experience. There’s no narrative and the people at the meeting seem to be oblivious that anyone’s recording video. This makes for a pretty interesting presentation, starting with a little rubbernecking at the projects being shown off at the meeting. From there we pass by a couple of members pulling a wire run through the ceiling of the machine shop. Next we see the electronics lab complete with a Makerbot and a very tidy component storage wall. [Andrew] makes a quick trip through the small music studio before heading back to the main room at the close of the segment.

Continue reading “Hackerspace Intro: Workshop 88”

High Contrast Laser Etching

high-contrast-laser-etching

The problem with laser etching dark materials is that the areas burnt away by the intense light don’t really stand out from the rest of the surface. [The 5th Fool] is taking a roundabout way of correcting this by topping his laser engravings with contrasting paint. The technique is still pretty simple and we think it looks great!

Basically he’s etching a layer of painter’s tape which becomes a stencil. But the surface it is masking also gets etched so the paint has an area below to the surface which it can fill in. We figure this will help with durability issues.

After etching the painters tape the design gets a few coatings of a high-contrast paint color and is left to dry. To remove the stencil, duct tape is applied to the entire area. This helps quite a bit in removing the tiny bits of tape from an intricate design.