Starting To Wrap Up Maker Faire

It’s almost a week since the NYC Maker Faire, and it’s about time for us to start wrapping up all the posts we’re doing on everything we’ve seen.

DSC_0216[Chris Mitchell], hackaday favorite from Cemetech did what he always does at Maker Faire: brought some stuff he’s doing with TI graphing calculators.

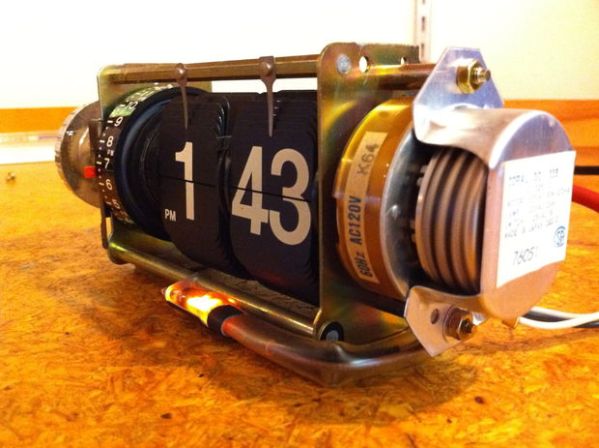
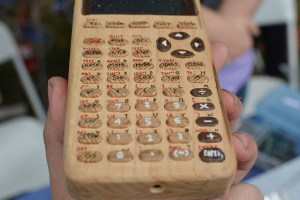
The TI-84 with GPS made a showing, as did the graphing calculator IRC client. By far the coolest looking calculator was the wooden casemod. It’s a TI-82 put into a (what feels and looks like) a maple enclosure. The buttons are painted on, and despite stuffing consumer electronics into a handmade case, it’s still reasonable portable.

DSC_0201There were more Hackaday fans at the faire, but I’m not sure if anyone can beat the guys from Protopalette. Wait. One guy could. Find me in public sometime and I’ll tell you about that.

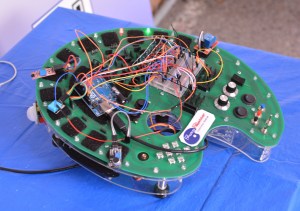
The Protopalette is a board with a bunch of lights, buttons, switches, sensors, knobs, servos, and buzzers for electronics prototyping. Think of it as a stylized version of the old ‘parts and springs and wire’ radio shack beginner electronic kits.

DSC_0160

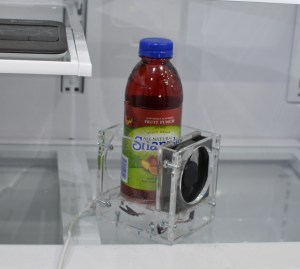
Some of the members of the hackerspace with the craziest group narrative, LVL1 in Louisville, made it to the faire. They’re working with GE to create a ‘maker module’ for appliances. It’s called Green Bean, and GE is actually building support for this into some of their fridges, washers, stoves and dishwashers.

There are a few modules already, like a scale that will send out a message when you’re out of milk. It’s an interesting system, and there are already a lot of appliances that support the system.

Pics below.

Continue reading “Starting To Wrap Up Maker Faire”

A collection of boards that make up the LED Jacket

A Very Bright LED Jacket

Last year, [Ytai] went to Burning Man for the first time. He was a bit inexperienced, and lacked the lumens to make him visible on the Playa. This year, he made up for it by building an extra bright LED Jacket.

The jacket consists of 48 LEDs, at 150 lumens each. Each RGB LED module was placed on its own PCB, and controlled by the tiny PIC12F1571 microcontroller. This microcontroller was a great fit since it has three PWM channels (one for each color) and costs 50 cents. Firmware on the PIC allows the boards to be daisy-chained together to reduce wiring. This was done by using a protocol similar to the popular WS2811 LEDs.

Assembling 50 of the boards presented a challenge. This was addressed by using surface mount components, a solder stencil from OSH Stencils, an electric skillet, and a good amount of patience. The final cost of each module was about $3.

With 50 of the boards assembled, a two layer jacket was sewn up. The electronics were sandwiched between these two fabric layers, which gave the jacket a clean look. A wrist mounted controller allows the wearer to select different patterns.

For a full rundown of the jacket, check out the video after the break.

Continue reading “A Very Bright LED Jacket”

THP Semifinalist: NSA Away

Back when we started The Hackaday Prize, security, big brother, and the NSA were making headlines every day. Since that time, there has been enough bread and circuses in the news to wipe the consequences of these leaks out of the public consciousness, but work is still being done by hackers and tinkerers the world over to give you the tools to protect your data.

NSA Away is one of these tools. The first part of the project is a standalone key generator that writes the same random bits to a pair of SD cards simultaneously. With their random number generator, this is perfect encryption. The only way to crack the one time pad the team is using for encryption is to 1) use parts of the pad more than once, 2) have a terrible RNG, or 3) do something really stupid like sell the one time pad in a store.

The other part of the build is an Android-based encryption device with a camera, keyboard, SD card reader, and a USB port. This device reads the ‘OTP SD cards’ and reads data with the camera using OCR and decrypts it on the screen. Provided the OTP doesn’t fall into the wrong hands, this is a perfectly secure way to transmit data to anyone.

As far as progress goes, the members of the team have a fully functional pad generator, writing random data to SD cards. This device can also output random bits to a computer as a USB HID device, should you want to transmit your pad over unsecured mediums.

It’s an impressive bit of work, especially in the RNG department. The team is using eight avalanche noise generators in the circuit description. This part of the build isn’t quite working yet, but that’s really not needed for a proof of concept.


SpaceWrencherThe project featured in this post is a quarterfinalist in The Hackaday Prize.

Intel Edison on a box

Running Golang On The Intel Edison

While most embedded development is still done in C and/or assembly, some people are working with more modern languages. The team over at Gobot has successfully managed to get Go running on the Intel Edison.

The Go programming language, which has been around for about five years, compiles to machine code like C. It has a number of modern features including concurrency, garbage collection, and packages.

We’ve looked at the Edison on Hackaday before, and even took a detailed look at the hardware. It features a Quark SoC, Bluetooth, and WiFi, which makes it well suited for connected devices.

Getting Go to work on the Edison hardware wasn’t particularly difficult, since it supports the Pentium instruction set and MMX. However, a library was needed to interface with the Edison’s peripherals. The Gobot team whipped up gobot-intel-iot, which makes it easy to work with GPIO, I2C, and PWM.

After the break, the team demos PWM on the Edison using Go.
Continue reading “Running Golang On The Intel Edison”

A Wrist-Mounted Flamethrower? Sure, Why Not?

There are three types of booths at Maker Faire. The first is the strange corporate booth, like Pepsi ‘revolutionizing fluid intake’ or some such nonsense. That one had the longest line of any booth, in case you’re wondering. The second type of booth is the people you would expect to be there – Atmel, TI, and Makerbot all came out in full force.

The third type of booth were a little hard to find. They’re the ‘show and tell’ spirit of Maker Faire, and [Stephen Hawes] was one of the best. Why? Wrist-mounted flamethrower, that’s why.

The flamethrower is fueled with a propane bottle originally meant for a camping stove, with a microcontroller and pot setup taking care of the height of the flame. Buttons underneath [Stephen]’s thumb takes care of the propane flow and tazer-based ignitor. The wrist measurement sensor can rescale to adjust the height of the flame to how far the wearer can move their wrist.

All in all, a great project for the Faire, although we did feel a little sorry for the NYC fire marshal that was assigned to [Stephen] for the entire faire. As an aside, we’re applauding [Stephen] for not referencing whatever comic book character has fire shooting out of his hand.

Exposed Flip Clock

Exposed Clock Is Flippin’ Cool

Some hacks are triumphs of cleverness, others…are just cool. [Super Cameraman’s] exposed retro flip clock tends toward the latter half of that spectrum—it may not be the most complex, but we’re relieved that for once there isn’t an Arduino crammed into the back of it.

You can buy pared down, exposed flip clocks at museums for an arm and a leg, or you can trudge through eBay and local thrift shops until you come across a cheapo clock radio. [Super Cameraman’s] clock cost him exactly $2, and is split into two sections: a clock side and a radio side. Prying off the knobs and popping open the case reveals all the shiny mechanisms and electronics, most of which he trashed. The radio and even the transformer were removed, leaving only the flip clock, which he re-wired directly to the plug—it seems these types of clocks run straight off 120VAC. Check out the video below.

Continue reading “Exposed Clock Is Flippin’ Cool”

Thermal Printer Brain Transplant

Thermal Printer Brain Transplant Is Two Hacks In One

You know how sometimes you just can’t resist collecting old hardware, so you promise yourself that you will get around to working on it some day? [Danny] actually followed through on one of those promises after discovering an old Radio Shack TRS-80 TP-10 thermal printer in one of his boxes of old gear. It looks similar to a receipt printer you might see printing receipts at any brick and mortar store today. The original printer worked well enough, but [Danny] wasn’t satisfied with its 32 character per line limitation. He also wanted to be able to print more complex graphics. To accomplish this goal, he realized he was going to have to give this printer a brain transplant.

First, [Danny] wanted to find new paper for the printer. He only had one half of a roll left and it was 30 years old. He quickly realized that he could buy thermal paper for fax machines, but it would be too wide at 8.5 inches. Luckily, he was able to use a neighbor’s saw to cut the paper down to the right size. After a test run, he knew he was in business. The new fax paper actually looked better than the old stuff.

The next step was to figure out exactly how this printer works. If he was going to replace the CPU, he was going to need to know exactly how it functioned. He started by looking at the PCB to determine the various primary functions of the printer. He needed to know which functions were controlled by which CPU pins. After some Google-Fu, [Danny] was able to find the original manual for the printer. He was lucky in that the manual contained the schematic for the circuit.

Once he knew how everything was hooked up, [Danny] realized that he would need to learn how the CPU controlled all of the various functions. A logic analyzer would make his work much easier, but he didn’t happen to have one lying around. [Danny] he did what any skilled hacker would do. He built his own!

He built the analyzer around an ATMega664. It can sample eight signals every three microseconds. He claims it will fill its 64k of memory in about one fifth of a second. He got his new analyzer hooked up to the printer and then got to work coding his own logic visualization software. This visualization would provide him with a window to the inner workings of the circuit.

Now that he was able to see exactly how the printer functioned, [Danny] knew he would be able to code new software into a bigger and badder CPU. He chose to use another ATMega microcontroller. After a fair bit of trial and error, [Danny] ended up with working firmware. The new firmware can print up to 80 characters per line, which is more than double the original amount. It is also capable of printing simple black and white graphics.

[Danny] has published the source code and schematics for all of his circuits and utilities. You can find them at the bottom of his project page. Also, be sure to catch the demonstration video below. Continue reading “Thermal Printer Brain Transplant Is Two Hacks In One”