The Gathering: Huge Success!

In case you haven’t heard, Hackaday put on a little shindig in downtown LA this past Tuesday. It was awesome.

And we had a few very awesome visitors: [Eliot], senior editor of Hackaday for the first five years made a showing, as did former co-editor [Jack Buffington]. Eminent LA-area hackers came out, including [charliex] of Null Space Labs, the guys from Deezmaker, and the long-haired hippie who can be found in a few NASA videos for the Curiosity rover.

Aside from the free drinks and the awesome people, there was some really cool tech on display. The mezzanine of the bar had a laser graffiti rig, and everyone who came received a super collectible NFC card that allowed them to vote on what Hackaday is doing for our next main event (the quadcopter option won but the vote was non-binding so we’ll keep you updated).

On a personal note, this was one of the few times I’ve interacted with Hackaday readers without the use of a keyboard. You guys are awesome. Thanks for coming out, and if you have any pics from the party, post a link to an album in the comments, or share your stories with us on Twitter via #HaDLAGoogle+, and/or Facebook.

Pics below. These were taken by [Edward de la Torre]

Continue reading “The Gathering: Huge Success!”

LIDAR With LEDs For Under $100

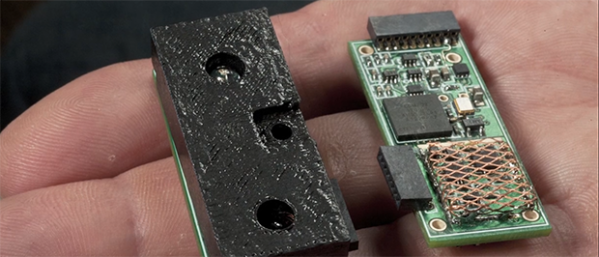
If you need some sort of distance sensor for your robot, drone, or other project, you have two options: a cheap ultrasonic sensor with limited range, or an expensive laser-based system that’s top of the line. LIDAR-Lite fills that gap by stuffing an entire LIDAR module onto a small board.

In traditional LIDAR systems, a laser is used to measure the time of flight for a light beam between the sensor and an object. The very accurate clock and laser module required for this system means LIDAR modules cost at least a few hundred dollars. LIDAR-Lite gets around these problems by blinking a LED with a ‘signature’ and looking for that signature’s return. This tech is packaged inside a SoC that reduces both the cost and size of a traditional laser-based LIDAR system.

As for the LIDAR-Lite specs, it can sense objects out to 40 meters with 5% 95% accuracy, communicates to any microcontroller over an I2C bus, and is small enough to fit inside any project.

Considering the existing solutions for distance measurement for robots and quadcopters, this sensor will certainly make for some very awesome projects.

Edit: One of the guys behind this posted a link to their spec sheet and a patent in the comments

AVR Barn Door Tracker For Astrophotography

zzjBarnDoorTracker

[ZigZagJoe’s] first foray into astrophotography is this impressive AVR barn door tracker, which steps up his night sky photo game without emptying his bank account. If you’ve never heard of astrophotography, you should skim over its Wikipedia page and/or the subreddit. The idea is to capture images otherwise undetectable by the human eye through longer exposures. Unfortunately, the big ball of rock we all inhabit has a tendency to rotate, which means you need to move the camera to keep the night sky framed up.

Most trackers require precision parts and fabrication, which was out of [ZigZagJoe’s] grasp. Instead, he found a solution with the Cloudbait Observatory model, which as best as we can tell looks vaguely similar to the tracker we featured last year. Unlike last year’s build—which uses an ATmega32u4 breakout board— [ZigZagJoe’s] tracker uses an ATTiny85 for the brains, running a pre-configured table that determines step rate against time.

Continue reading “AVR Barn Door Tracker For Astrophotography”

The Butt Lamp: Light From Where The Sun Don’t Shine

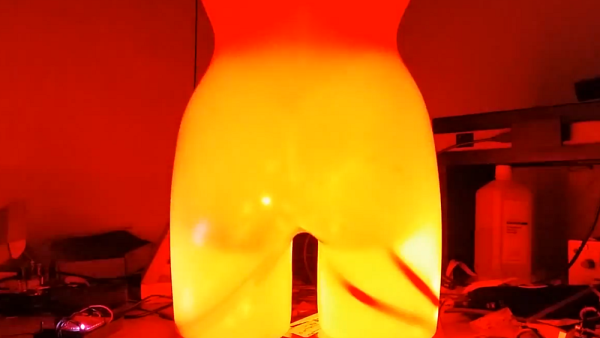
[Trent] is one of those guys who can make things happen. A friend of his gifted him a  mannequin derriere simply because he knew [Trent] would do something fun with it. “Something fun” turned out to be sound reactive LED butt. At first blush, this sounds like just another light organ. This butt has a few tricks up its …. sleeve which warrant a closer look. The light comes from some off the shelf 5050 style RGB LED strip. The controller is [Trent’s] own design. He started with the ever popular MSGEQ7 7 Band Graphic Equalizer Display Filter, a chip we’ve seen before. The MSGEQ7 performs all the band filtering and outputs 7 analog levels corresponding to the amplitude of the input signal in that band. The outputs are fed into an ATTiny84, which drives the RGB strip through transistors.

The ATTiny84 isn’t just running a PWM loop. At startup, it takes 10 samples from each frequency band. The 10 samples are then averaged, and used to create a noise filter. The noise filter helps to remove any ambient sound or distortions created by the microphone. Each band is then averaged and peak detected. The difference between the peak and the noise is the dynamic range for that band. The ATTiny84 remaps each analog sample to be an 8 bit value fitting within that dynamic range. The last step is to translate  the remapped signal values through a gamma lookup table. The gamma table was created to make the bright and dark colors stand out even more. [Trent] says the net result is that snare and kick drum sounds really pop compared to the rest of the music.

Without making this lamp the butt of too many jokes, we’d like to say we love what [Trent] has done. It’s definitely the last word in sound reactive lamps. Click through to see [Trent’s] PCB, and the Butt Lamp in action.

Continue reading “The Butt Lamp: Light From Where The Sun Don’t Shine”

Capacitance Measurement With The Arduino Uno

CapTestBoard1

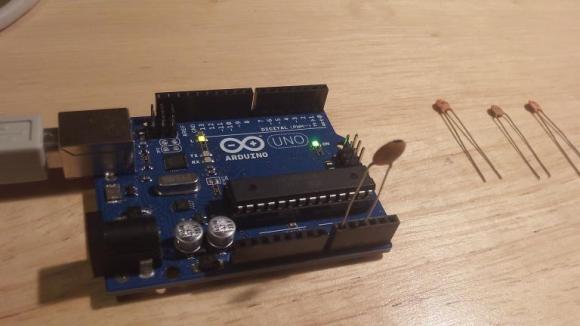
Have you ever found the need to measure the capacitance of a capacitor? No multimeter handy (for shame)? Well, as it turns out you can actually measure capacitance using your Arduino Uno, with no external components, and only ~20 lines of code.

[Jonathan Nethercott] does an excellent job explaining a capacitance test circuit which uses a reference capacitor to calculate the unknown capacitance. He further explains that, with the Arduino Uno, you can remove the reference capacitor from the circuit, and simply use the stray capacitance present in the board and microcontroller, which can be calculated. This results in the test circuit being as simple as plugging in your capacitor to pins A0 and A2. Continue reading “Capacitance Measurement With The Arduino Uno”

Sniffing And Decoding Bluetooth LE Advertising Packets And NRF24L01+ Comms. For Under $30

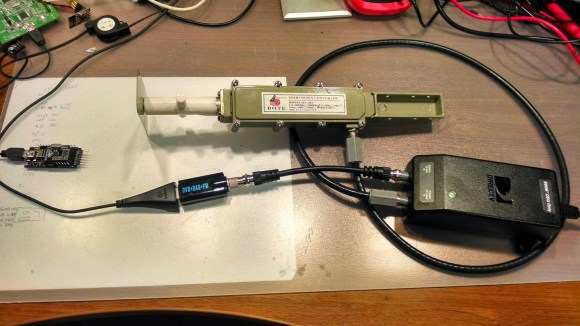
[Omri] just documented his journey to sniff and decode the protocol used by the popular NRF24L01+ transceiver off the air for very cheap. As he was designing a mesh network code and needed a way to monitor/debug the overall network performance, [Omri] decided to look for some RF hardware.

We’re sure that most of our readers are familiar with Software Defined Radio (SDR), which not so long ago became popular when some engineer discovered hidden registers inside Realtek RTL2832U chip, allowing many DVB-T dongles to be converted into RF listening devices. Unfortunately for [Omri], most of them have a maximum listening frequency of 2.2GHz, while the NRF24L01+ emits at 2.4GHz. The solution? Buy a 2.2-2.4GHz antenna from Aliexpress with a low-noise block downconverter (LNB), used for a Multichannel Multipoint Distribution Service (MMDS). The LNB therefore takes the 2.2-2.4GHz signal and downconverts it to around 400MHz, allowing any RTL-SDR-compatible DVB-T dongle to listen to the NRF communications. A program was then written to decode the RF signal and output the sniffed data in realtime.

GPS Engagement Ring Box

gpsEngagementRingBox

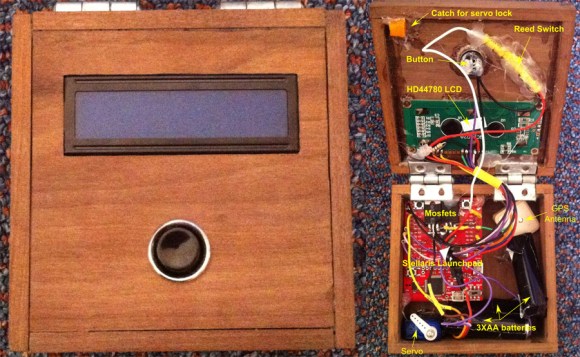
[James] got engaged recently, in part thanks to his clever GPS Engagement Ring Box, and he sent us a brief overview of how he brought this project to life. The exterior of the box is rather simple: one button and an LCD. Upon pressing the button, the LCD would indicate how far it needed to be taken to reach a pre-selected destination. After carrying it to the correct location, the box would open, revealing the ring (and a bit of electronics).

Inside is a GPS antenna and a Stellaris Launchpad, which are powered by three Energizer lithium batteries to ensure the box didn’t run out of juice during the walk. To keep the lid closed, [James] 3D printed a small latch and glued it to the top of the box, which is held in place by a micro servo. Once the box reaches its destination, the microcontroller tells the servo to swing out of the way, and the box can then open. As a failsafe, [James] added a reed switch to trigger an interrupt to open the box regardless of location. It seems this was a wise choice, because the GPS was a bit off and the box didn’t think it was in the correct place.

Swing by his blog for more information on the box’s construction and the wiring. We wish [James] the best and look forward seeing his future hacks; perhaps he’ll come up with some clever ones for the wedding like our friend Bill Porter.