GPS For A Graphing Calculator

GPS 
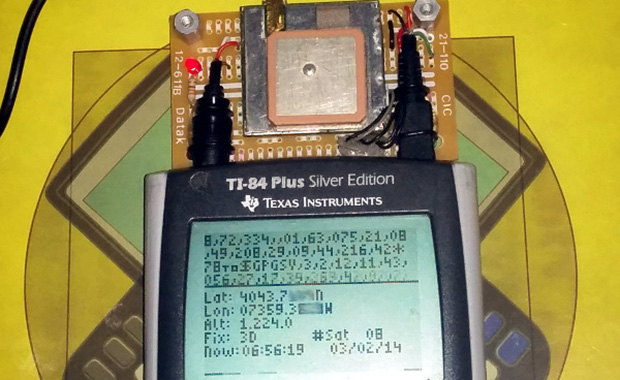
[Chris], graphing calculator hacker extrordinaire, has seen a few of his projects show up on the front page of Hackaday, mostly involving builds that turn graphing calculators like the TI-84 Plus shown above into something that copies a few features from a smartphone. His latest build, a hardware GPS module attached to the TI-84 Plus, is yet another feather in his cap of awesome and impractical addition to a classic piece of hardware.

There were two major technical challenges behind adding GPS to a graphing calculator. The first of these was powering a GPS sensor. Many a calculator modder has put a lot of work into documenting the USB port on the 84 Plus, revealing it is a USB OTG port, capable of serving as a host or device. It also supplies 5V of power to just about anything, burning through batteries as a result.

The next challenge was reading the data coming off the GPS sensor at 4800bps.The TI-84 Plus series of calculators have a series of interrupts that can fire at fractions of the 15MHz clock. By setting the timer up to fire every 197 clock ticks and dividing again by 16, [Chris] can read data at 4758.9bps. It’s close enough to get most of the data, and the checksum included in the NMEA protocol allows the software to discard bad messages.

Continue reading “GPS For A Graphing Calculator”

Retrotechtacular: Bakelite Plastics

retrotechtacular-bakelite-plastics

[ColdTurkey] sent in a really great video for this week’s Retrotechtacular. It’s a half-hour promo reel about Bakelite Plastic. There is so much to enjoy about this film, but we’ve been overlooking it because the first six minutes or so consist of an uncomfortably fake interview between a “Chemist” and “Reporter”. They are standing so close to each other that it’s violating our personal space. But endure or skip ahead and the rest of the video is gold.

Bakelite is an early plastic, and putting yourself in the time period it’s very easy to see the miracle of these materials. The dentures being molded above are made out of phenol formaldehyde resin (to us that sounds like something you don’t stick in your mouth but what do we know?). The plastic pellets take on the shape of the mold when heated — we don’t know if this where the name comes from or if it’s a variation on the name of the chemist who discovered the material: [Dr. Leo Baekeland]. This was the first synthetic plastic, and came at just the right time as it was heavily adopted for use in the electronics and the automotive industry. Both of which were forging new ground at the time.

Continue reading “Retrotechtacular: Bakelite Plastics”

A USB Connected Box-o-Encoders

picoscope-encoder

[Colin] loves his PicoScope, a USB based “headless” oscilloscope. While using it he found himself longing for a classic oscilloscope interface. Mouse clicks just weren’t a replacement for grabbing a dial and twisting it. To correct the situation he created his USB-Connected Box-o-Encoders. The box maps as a USB keyboard, so it will work with almost any program.

[Colin] started by finding encoders. There are plenty of choices – splined or flatted shaft, detents or no detents, panel, PCB, or chassis mount. He settled on an encoder from Bourns Inc. which uses an 18 spline shaft. His encoder also includes a push button switch for selection. With encoders down, knobs were next. [Colin] chose two distinct styles. The two knob styles aren’t just decorative. The user can tell which row of knobs they are on by touch alone. Electronics were made simple with the use of a Teensy++ 2.0. [Colin] used a ATUSBKey device running Teensy software, but says the Teensy would have been a much better choice in terms of size and simplicity.

Once everything was wired into the box, [Colin] found his encoders would “spin” when the knobs were turned. They are actually designed to be PCB mounted, and then screwed into a control panel. Attempts to tighten down the panel mounting nut resulted in a broken encoder. Rather than redesign with purely panel mounted encoders, [Colin] used a dab of epoxy to hold the encoder body in place.

Continue reading “A USB Connected Box-o-Encoders”

Manual Bitcoin Transactions

bitcoin

For something that’s used for such banal transactions like buying drugs and sending the Jamaican bobsled team to the Olympics, cryptocurrencies such as Bitcoin are actually very impressive pieces of software. It’s a very ingenious solution to the Two Generals Problem, and the fact it made a few Bitcoin early adopters very, very rich doesn’t hurt either. [Ken Shirriff] decided to take a look at the Bitcoin protocol by creating a Bitcoin address and transferring a small amount of bitcoin to that address, manually. It’s a great look at how the Bitcoin protocol actually works, and how ingenious this protocol actually is.

[Ken]’s first task was to create a Bitcoin address. This is a 256-bit private key is the basis for the Bitcoin wallet private key (after being encoded as ASCII characters), and as the 512-bit public key (after being sent through an elliptic curve algorithm). The 512-bit public key is then hashed with SHA-256 and RIPEM 160 to generate the 160-bit public key hash and the Bitcoin address.

After creating a bitcoin address and wallet, [Ken] set out on manually creating a transaction. The idea was to buy a few cents (USD) from Coinbase and send them to his manually created address. This involved creating a transaction according to the Bitcoin spec and signing the transaction. Signing each Bitcoin transaction is the key to Bitcoin’s security, and is done with a small bit of code written in the Bitcoin scripting language.

With everything written in Python, [Ken] was ready to send his transaction off into the Bitcoin network. This was done by finding a few peers on the Bitcoin network and sending off a few packets. After a little bit of mining on the network, [Ken]’s transaction went through, confirmed by a deposit into his Bitcoin wallet.

It’s an awesome writeup and impressive achievement to manually send a few Bitcoins from one wallet to another. More impressively, [Ken] provided some amazing insight into how the Bitcoin protocol works, and how much work went into its creation.

Weaponized Quadrotor Upgrades

Today we’re looking at a few fun hacks, although they are perhaps a bit ill-advised. What’s the craziest thing you could strap to a quadrotor? Rockets? Lasers? Turns out… they’ve both been done already.

First up is [Ramicaza’s] firework launching quadrotor. The drone is stabilized using the ArduPilot Mega 2.6, and it carries a pair of “rockets” which are ignited by a pair of steel elements. An ATtiny analyzes the auxiliary radio channel’s PWM signal which controls the relays that power the elements. He’s tested it high up in the sky, so he’s actually being pretty safe about it.

Next is [JLaservideo’s] laser quadrotor. He’s taken a RC controller of a cheap toy to add wireless capabilities to his Arduino Uno. He’s re-routed the original RC toy’s motor wires to an input on the Arduino which in turn activates a 5V relay that powers the 1W laser. It looks awesome thanks to the bright beam — we just really hope he’s wearing proper eye protection, as a laser of that power can do some serious damage to your retinas!

Stick around after the break to see both quadrotors in action!

Continue reading “Weaponized Quadrotor Upgrades”

Musician On A Budget MIDI Bass Pedals

bass_pedal1

Organ pedal boards have been around forever — they’re an easy way to multitask while playing the piano, organ, or even the guitar. [Ville] plays the electric guitar and wanted to give bass pedals a shot — the only problem is, the commercial versions are pretty pricey. So he decided to make his own temporary solution using an old MIDI keyboard he had lying around.

The beauty of this hack is it’s completely non-destructive — although you might find you like it so much you won’t want to take it apart! [Ville] started by marking out spacer keys using green cardboard. He then grouped together other sets of keys using tape and polystyrene sheets, which he recycled from a plastic waste bin. He then marked off each set of keys with the range of notes to program into the MIDI receiver — on a 49 key keyboard you get just a bit more than an octave of bass pedal keys! It’ll certainly do until you get your hands on a proper organ pedal unit.

From there it was just a matter of re-mapping the keys on the software end of things, and disabling the other unused keys. He offers a few different methods of doing this, including using VST plugins, and Pure Data — to which he’s provided a patch he made to simplify the process.

To see it in action, stick around after the break and hear [Ville] play One Hour Backwards on electric guitar.

Continue reading “Musician On A Budget MIDI Bass Pedals”

Decascrap: A Three Servo Decapod

IMG_2718

[Drewtoby] loves making robots. His latest project is a 10-legged bot called the Decascrap, which makes use of only 3 servos!

What we like most about this project is the leg mechanism [Drew] has cooked up. The legs are made of guitar picks hinged to what look like popsicle sticks. Each guitar pick has a hole punched in it which allows the servo rod to go through the legs. Strategically placed globs of hot glue on either side of each leg on the servo rod allows for the parallel motion during the actuation of the legs. A third servo tilts the bot back and forth as the legs are moved, allowing the bot to scuttle about.

Stick around after the break to see it tackle some rough terrain — well, actually it’s just a piece of uneven foam, but hey!

Continue reading “Decascrap: A Three Servo Decapod”