A Hexacopter With FPV

hexcopterRetrospective

[Robert’s] been hard at work becoming a hexacopter expert over the past two years, and he’s offered up a retrospective of his multi rotor build experience since he first clicked the “buy” button on Hobbyking. He’s come a long way from his first build, which used inexpensive carbon rods and 3D-printed parts for a frame, supported by scrap wood and hot glue. It met its end in his car; exposed to direct sunlight, the 3D-printed components melted.

The latest iteration—seen above on the right—is a complete redesign, with a laser-cut frame that dramatically reduced the overall weight and new “Donkey” motors off Hobbyking. It’s strong enough to lift a 1.6kg (3.5lbs) stuffed animal suspended from a rope! Most recently [Robert] has worked out streaming first-person video after fitting a camera to the hexacopter via a 3D-printed attachment and pairing the experience with Zeiss Cinemizer 3D glasses. He still has some bugs to work out, namely screws loosening from vibrations and adding a HUD to the display so he’ll know when the battery levels are low. You can see the poor teddy bear getting hanged along with some other videos, including the first-person video flight, after the break.

Continue reading “A Hexacopter With FPV”

DIY CNC Dust Collection Really Sucks!

CNCdust-main2

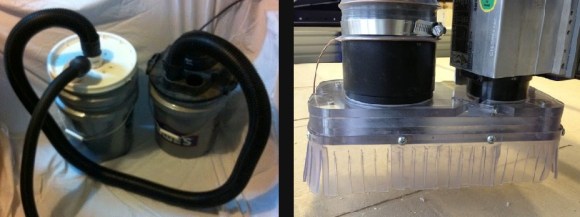
CNC Routers are great. If you’ve ever used one you know this but you also know that they will cover the machine and everything around it with a layer of dust. It is certainly possible to use a shop vac to suck up the dust coming from the router, however, the only problem with that is the shop vac’s filter will clog with dust and lose suction, defeating the intent of your vac system.

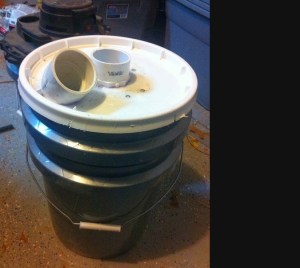
CNCdust-assembled2[Mike Douglas] was ready to step up his CNC game and decided to make his own dust separator. This design is extremely simple and only uses a couple 5 gallon buckets, a few PVC fittings and pieces of wood. To keep the cost down and the style up, the accompanying ‘shop-vac’ is also made from 5 gallon bucket with a vacuum lid. The project is well documented so head over to his site and check out the build process.

black

Continue reading “DIY CNC Dust Collection Really Sucks!”

Learning Assembly With A Web Based Assembler

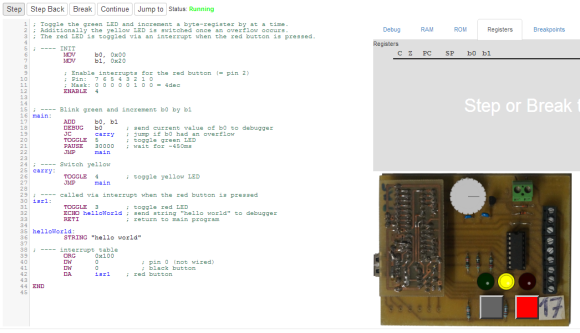
AssemblyOnlineVery few people know assembly. [Luto] seeks to make learning assembly just a little bit easier with his “fully functional web-based assembler development environment, including a real assembler, emulator and debugger.”

These days, you can be a microcontroller expert without knowing a thing about assembly. While you don’t NEED to know assembly, it actually can help you understand quite a bit about embedded programming and how your C code actually works. Writing a small part of your code in assembly can reduce code size and speed things up quite a bit. It also can result in some very cool projects, such as using Java to program microcontrollers.

With high quality example code, it is very easy to get started learning assembly. The emulator consists of a microcontroller with 32 registers, hooked up to three LEDs, two buttons, and a potentiometer. This is way better than painfully learning assembly on real hardware. Be sure to check out the online demo! Being able to step through each line of code and clearly see the result help make assembly easier to use and understand. It would be great to see this kind of tool widely adopted in engineering programs.

Have you used assembly in any of your projects? Let us know how it went and why you choose to use assembly

Hackaday At MakeDC

makedc

Last Wednesday, our Hackaday travels took us to the Washington, DC area for a visit to NOVA Labs near Dulles and a yet-to-be opened Metro stop. Also on our itinerary was a visit to MakeDC, an informal get together for people around the nation’s capitol to show off their latest projects and builds.

The highlight of the evening was a pair of talks from [Julian] and [Taylor] on a project they did for work: a social cooler, or a locked box holding cool drinks that will only open when enough people send a text to a certain number. We’ve got [Julian]’s talk on video, but despite our fancy new camera gear for this sorta thing, [Taylor]’s demo of what an Electric Imp can do was lost to the digital wastes.

Aside from [Julian]’s talk on APIs and [Taylor]’s talk on the Electric Imp, there were a few impromptu presentations from the attendees. One of the most thorough was the duo from Shiny & Jackal Cosplay, crafters of EVA foam and LEDs. Truth be told, Hackaday doesn’t see many of these ‘softer’, cosplay and prop making builds in the tip line, and that’s a shame; the amount of skill that goes into these costumes is at least as equal as a woodsmith that can build fine furniture using only hand tools.

Perhaps a little premature, but TechShop is opening a new location in Arlington, VA at the end of the month. The GM [Addam Hall] was there scoping out the hacks and letting the attendees know there’s going to be a huge, awesome shop that’s down town in Crystal City. Close enough to public transportation, anyway, because anyone who drives in DC is certifiable.

The last item of note isn’t a build yet, but it’s shaping up to be pretty cool. It’s BRWRY – pronounced, ‘brewery’ – and will be a semi-automated beer making machine. Robots and beer, what can’t you love?

We’d like to thank [Zach], [Julian], [Taylor], and all the other guys from iStrategyLabs for putting together a nice evening of hanging out, drinking beer, eating pizza, and talking about what you’ve built. We had a great time, and we’re looking forward to the next one, as well as any other similar get together in other cities.

Home Made Resin Based 3D Printer Is Incredible

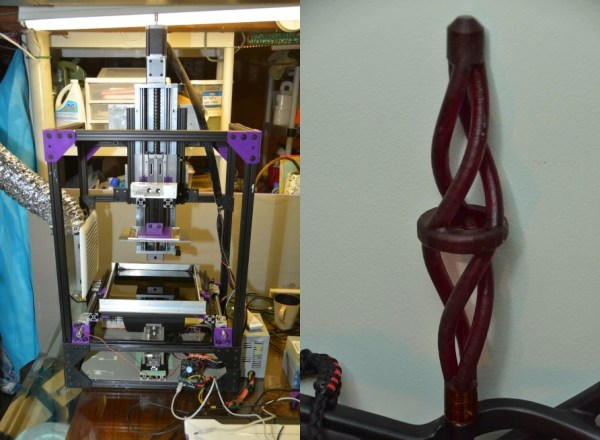
Resin based 3D printers (SLA) are the next big thing, and while they may seem daunting at first, in some ways they are actually simpler than FDM machines with less moving parts! Loosely following an Instructable, [Dan Beaven] has just finished putting together his own home-made 3D DLP Printer, and it’s bloody brilliant.

He owes a lot of thanks to [Tristram Budel] and his incredibly detailed Instructables guide on building  a 3D DLP printer, but [Dan] has also added quite a bit of his own flair to the build. Most notably is his method of separating layers from the vat of resin — most designs tilt the bed slightly to counter the suction forces, but his slides the vat back and forth along the Y-axis, which seems to work extremely well.

The printer is built out of 1″ T-slot aluminum and has a NEMA 17 motor that provides the Y-axis movement along two linear rods for the vat. The Z-axis stage uses a NEMA 23 motor and has a whopping 14″ of travel. Combined with a 104mm x 204mm build plate, this thing can print some decently sized parts!

Continue reading “Home Made Resin Based 3D Printer Is Incredible”

Bitbanging USB On Low Power ARMs

M0

With the Adafruit Trinket, the Digispark, and some very clever work with the smallest microcontroller Atmel offers, it looks like the ‘in’ thing to do for embedded software developers is to bitbang the USB protocol on hardware that shouldn’t support it. There are a lot of very small ARM chips out there without USB support, so it was only a matter of time before someone was able to bitbang USB on the ARM Cortex M0+.

The board above is based on an Energy Micro EFM32ZG, a very small 24-pin QFN device with up to 32 kB of Flash and 17 GPIOs. As with all the bitbanged USB hacks, the differential data lines are attached directly to the microcontroller. A 24 MHz crystal is needed, but the team behind the project is working on using the internal RC oscillator instead.

The code is portable with minimal changes between other manufacturer’s Cortex M0+ chips, and with a little work, this could become a very, very cheap USB-programmable ARM dev board, something the community could certainly use.

Drilling Into A Laptop: Extreme Hinge Repair

final-2

What is it with laptop companies spending millions on design and aesthetics… and then using a cheap hinge design that is almost guaranteed to break? After [Peter Zotov] spent hours trying to find a replacement online, he decided to take matters into his own hands with this slightly unorthodox hinge repair.

The problems lies in the design of the hinge mounting to the lid. First, they’re using a non-standard screw sizes, slightly larger than an M2. Second, it’s threaded into cast aluminum — and to make matters worse, it doesn’t even look like there is sufficient thread engagement! A good rule of thumb is about 2 times thread diameter for aluminum — 1-1.5 times for steel. And it’s not just ASUS doing this, we’ve seen numerous laptops of different brands where the hinge goes after a year or two — what happened to cyclic stress tests?

Anyway, [Peter] decided to drill out the existing threads to allow for larger bolts. He threw his precious laptop up onto his CNC mill (a drill press would do just fine), and popped larger holes straight through the lid. This allowed him to put three standard M2 screws in place with a nut and washer. We admit it’s not the most elegant solution, but it’s saved him from getting a new laptop just because of planned corporate obsolescence.