Blinkenschild, The RGB LED Display For Every Occasion

turd

One morning [overflo] decided to protest the European Parliament’s stance on equine rights of defecation, a cherished liberty dating back to the time of Charlemagne. The best way to do this is, of course, blinking lights. He calls his project Blinkenschild, and it’s one of the best portable LED displays we’ve seen.

The display is based around fifteen RGB-123 LED panels, each containing an 8×8 matrix of WS2811 LEDs. That’s 960 pixels, all controlled with a Teensy 3.1. Power is supplied by fifteen LiPo cells wired together in parallel giving him 6 Ah of battery life. Clunky, yes, but it’s small enough to fit in a backpack and that’s what [overflo] had sitting around anyway.

The animations for the display are generated by Glediator, an unfortunately not open source control app for LED matrices. Glediator sends data out over a serial port but not over IP or directly into a file. Not wanting to carry a laptop around with him, [overflo] created a virtual serial port and dumped the output of Glediator into a file so it could be played back stored on an SD card and controlled with an Android app. Very clever, and just the thing to raise awareness of horse and Internet concerns.

Video below.

UPDATE: Check out [overflo’s] clarification in the comments below.

Continue reading “Blinkenschild, The RGB LED Display For Every Occasion”

Raspberry Pi UPS Using Supercapacitors

What happens when you want to integrate a Raspberry Pi into some kind of project that gets turned on and off with mains voltage? Do you power the Pi separately, or make a UPS for it?

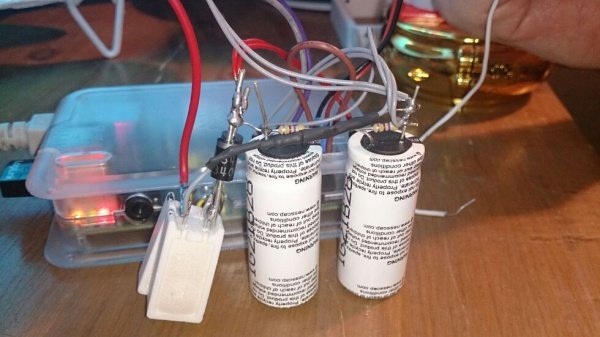
[Lutz Lisseck] decided he wanted to turn his ambient-lamp (Rundbuntplasma) on and off with only the main power switch in his Hackerpsace. He could build a traditional UPS using a battery pack (it’s only 5V after all!) but decided to take it a step further. He picked up a pair of 50F supercapacitors. This way his UPS would last longer than his Pi would! The caps store just enough power that when the main supply is cut, a GPIO notices, tells the Pi, and it begins a shutdown sequence lasting about 30 seconds.

While [Lutz] is using two 2.7V supercapacitors, he mentions it would be a lot cheaper to use a step-up converter instead of putting them in series — but he had the caps on hand so decided to use both.

If you need it to last a bit longer, you could make one with rechargeable batteries…

LightByte: Animated Shutters

lighrbright

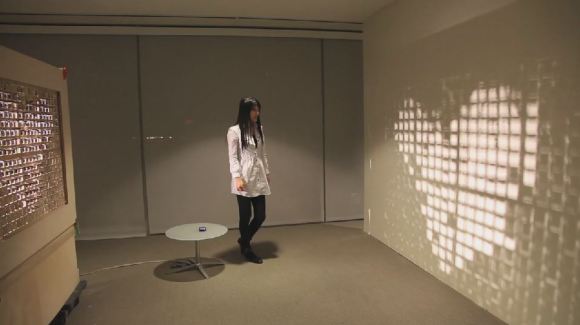
Here’s another interesting project to come out of the MIT Media Lab — it’s called LightByte, and it’s all about interacting with sunlight and shadows in a new, rather unorthodox way.

We suppose its technical name could be a massive interactive sun pixel facade, but that’s a bit too much of a mouthful. What you really want to know is how it works, and the answer is, a lot of servos. We weren’t able to find an exact number but the hardware behind LightByte includes well over 100 servos, and a matrix of Arduinos to control them. While that is quite impressive by itself, it gets better — it’s actually completely interactive; recognizing gestures, responding to text messages and emails, and you can even draw pictures with the included “wand”.

Continue reading “LightByte: Animated Shutters”

Some Tips About Tips

hackadayTipsaboutTips02

Gather, boys and girls, while we take a moment to talk about submitting projects via the Hackaday Tips Line. Come across something really cool that you think deserves a mention on our page? Let us know about it! Did you yourself make something really cool? Tell us about that, too! It doesn’t matter if it’s a project that’s been sitting on some dark corner of the Internet for a few years. If we haven’t seen it yet, we want to.

Don’t think your project is good enough for Hackaday? You’re probably too self-critical. We’re after hacks: it’s the idea that counts. Not polished? No problem. The only thing that needs to be complete is your description of the hack.

Stick with us after the jump; we’ve got plenty of tips about tips to help you out.

Continue reading “Some Tips About Tips”

Turning The Makerbot Into A Tattoo Machine

tattoo

ENSCI les Ateliers, the famous design school in Paris, had a “Public Domain Remix” and hackathon recently, with teams splitting up to remix public domain and other free-to-use IP in projects. Most of the teams came up with similar ideas, but one team went above and beyond the call of duty; they turned a 3D printer into a tattoo machine, capable of inking a real, live human test subject.

The build began by plotting a circle with a pen onto a piece of paper. This evolved into printing a tool holder for a tattoo machine graciously provided by an amateur tattoo artist. Tests with “artificial skin” (any one care to hazard a guess at what that is?) were promising, and the team moved on to a human guinea pig.

The biggest problem the team faced is that humans aren’t flat. They tried a few tricks to tighten the skin around the area to be tattooed – metal rings, elastics, and finally the inner tube from a scooter. In the end, the team was able to tattoo a small circle on the forearm of the test subject.

It’s an extremely simple and small tattoo, and scaling this build up to a sleeve would be difficult. A better solution would be to create a point cloud of an arm before going for a much larger tattoo.

Continue reading “Turning The Makerbot Into A Tattoo Machine”

Fail Of The Week: CPLDs That Release Blue Smoke

The card you see above is a floppy drive emulator for Macintosh. [Steve Chamberlain] has been hand assembling these and selling them in small runs, but is troubled by about a 4% burn-out rate for the CPLD which has the red ‘X’ on it. He settled into figure out what exactly is leading to this and it’s a real head-scratcher.

He does a very good job of trouble-shooting, starting with a list of all the possible things he thinks could be causing this: defective part, bad PCB, bad uC firmware, damage during assembly, solder short, tolerance issues, over-voltage on the DB connector, or bad VHDL design. He methodically eliminates these, first by swapping out the part and observing the exact same failure (pretty much eliminates assembly, solder short, etc.), then by measuring and scoping around the card.

The fascinating read doesn’t stop with the article. Make sure you work your way through the comments thread. [Steve] thinks he’s eliminated the idea of bad microcontroller code causing damage. He considers putting in-line resistors on the DB connector but we wonder if clamping diodes wouldn’t be a better choice (at least for testing purposes)? This begs the question, why is he observing a higher voltage on those I/O lines during power-up? As always, we want to hear your constructive comments below.


2013-09-05-Hackaday-Fail-tips-tileFail of the Week is a Hackaday column which runs every Wednesday. Help keep the fun rolling by writing about your past failures and sending us a link to the story — or sending in links to fail write ups you find in your Internet travels.

Peltier Mini-Fridge Preserves Chip Quik, Marriage

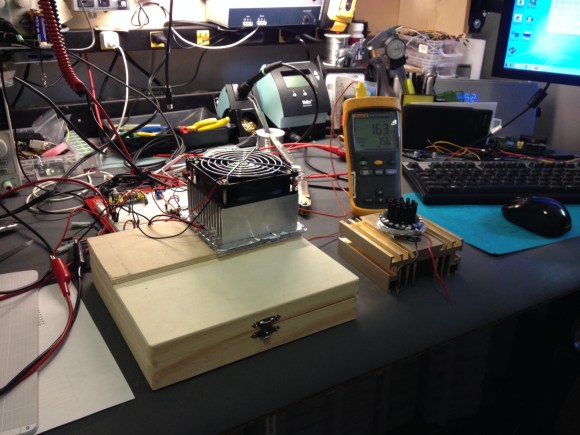
[Charles] uses Chip Quik to solder his SMD parts, and that stuff can keep for more than six months if it’s kept cool. His wife banned all non-food items from their refrigerator, so he had to think fast and came up with this Peltier effect Chip Quik cooler.

He first looked into that man cave essential, the mini-fridge, but they’re too expensive and use too much power. [Charles] got a nice wooden box from a hobby store and some reflective insulation from Lowe’s. He first tried using a couple of heat sinks but they weren’t going to cool things down enough. Once he got a Peltier cooling kit, he was in business. The temperature in his workshop averages 80°F, and he says the box gets down to 58°F. This is cold enough to keep his paste fresh.

[Charles] plans to use a PC power supply in the future rather than his bench supply. He estimates that his Peltier cooler uses 25-50% of the power that a mini-fridge would, and now his wife won’t overheat. Many great things can be accomplished with the Peltier effect from air conditioning to sous-vide cooking to LED rings. What have you used it for?