Augmented Reality With An FPGA


bruceinabox


[Julie Wang] has created an augmented reality system on a Field Programmable Gate Array (FPGA). Augmented reality is nothing new – heck, these days even your tablet can do it. [Julie] has taken a slightly different approach though. She’s not using a processor at all. Her entire system, from capture, to image processing, to VGA signal output, is all instantiated in a FPGA.

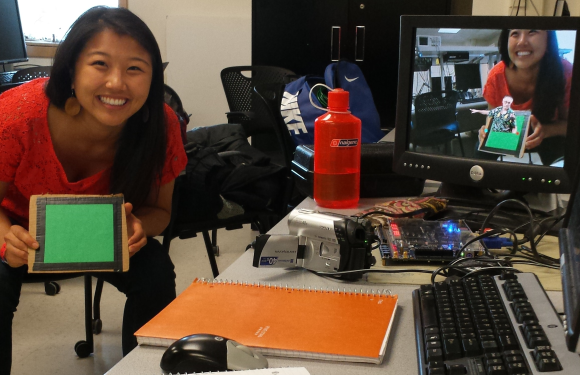
Using the system is as simple as holding up a green square of cardboard. Viewing the world through an old camcorder, [Julie’s] project detects and tracks the green square. It then adds a 3D image of Cornell’s McGraw Tower on top of the green. The tower moves with the cardboard, appearing to be there. [Julie] injected a bit of humor into the project through the option of substituting the tower for an image of her professor, [Bruce Land].

[Julie] started with an NTSC video signal. The video is captured by a DE2-115 board with an Altera Cyclone IV FPGA. Once the signal was inside the FPGA, [Julie’s] code performs a median filter. A color detector finds an area of green pixels which are passed to a corner follower and corner median filter. The tower or Bruce images are loaded from ROM and overlaid on the video stream, which is then output via VGA.

The amazing part is that there is no microprocessor involved in any of the processing. Logic and state machines control the show. Great work [Julie], we hope [Bruce] gives you an A!

Continue reading “Augmented Reality With An FPGA”

LED Clock Looks Cool AND Tells Time

LED Arduino Clock

Clocks have taken many forms of the years, starting with shadow clocks and sundials in Egypt around 3500 BC. Obviously, these could only tell the time while the sun was out. Water Clocks followed which could track time in the dark. Water Clocks are basically a bowl with a hole in the bottom. This bowl was set in a container filled with water. The water entered the bowl at a consistent rate and graduations on the inside of the bowl showed how much time had passed.

Mechanical clocks followed, as did quartz and the atomic clock. We have now entered a new era in time-telling, the Bamboo LED Clock. [Pascal] brings us this funky fresh chronometer all the way from Germany.

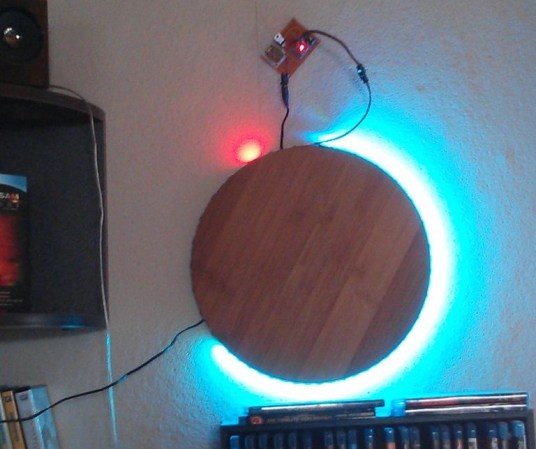
The front face is made from a bamboo pizza plate and gives the clock some modern minimalist pizzazz. A 1-meter long LED strip is attached to the circumference of the plate and contains 60 individually assignable RGB LED’s. An Arduino and Real Time Clock are responsible for the time keeping and coordination of the LED’s.

As you can see in the photo, 2 of the LED’s colors are used. The single red LED indicates the hour. The strip of blue LED’s show the minutes. If you’d like to build one of these [Pascal] has shared the Arduino code on his Instructables page.

Wall-Mounted Chess Set Lets You Stand And Play

wall mounted chess

Artwork on the wall is nice and all, but don’t you get bored with it sometimes? What if you could interact with it! That’s just what the [Artless Dodger] decided to do with this old  Fidelity Chess Challenger he converted to a wall-playable chess set!

The old Fidelity Chess Challenger is a fun electronic chess set that works by operating on press input. Simply move your piece, press down on its new square and then the computer knows where the piece is. The system is just begging to be hacked into a new form factor.

He’s built the new board from scratch using MDF, and then coated it with faux leather vinyl to give it a more polished look. He’s upgraded all the switches to momentary button switches and then re-soldered all of the connections. This was a bit of a challenge seeing as the original buttons looked like this:

Continue reading “Wall-Mounted Chess Set Lets You Stand And Play”

Wolverine's Claws

Pneumatic Wolverine Claws Are Quite Possibly The Best Thing Ever

With the new X-Men movie coming out soon, [Colin Furze] decided to make some real working props from the movies — starting with some bloody brilliant fully functional and retractable Wolverine claws.

We’ve seen Wolverine claws before, even electrified Wolverine claws, but never have we seen anyone take them to the level [Colin] has. He didn’t just want realistic Wolverine claws. He didn’t just want claws that could deploy. He wanted realistic claws that could both deploy, and retract — fast! And he wanted them to branch out just like the real deal.

He started brainstorming different ways of doing this. Motors, springs, geared racks, cables, pneumatic cylinders… nothing really fit the bill. Pneumatic power seemed the best option for performance, but the problem is he’d need a 12″ cylinder to sit behind his claws — it’d completely ruin the look — one of his main criteria for the project.

Continue reading “Pneumatic Wolverine Claws Are Quite Possibly The Best Thing Ever”

ISEE-3: Ready To Come Home

ISEE

The team working to reboot the ISEE-3 satellite hurtling towards an August encounter with Earth is hard at work. They’ve put up a crowdfunding page, and now that they’re completely funded (don’t stop donating, btw), they’re starting to go deeper into the waters that will allow them to capture a forgotten satellite.

The project put up a status report going over what they’ve accomplished so far, and what work has yet to be done. For a few months now, they knew both transmitters aboard the craft were operational, but they were not sending telemetry. The team has gone through the documentation, came up with a set of commands, and are currently en route to Arecibo to transmit those commands.

Two ground station transmitters are being constructed, one specifically built to be installed at Arecibo for this application. The other is a portable, self-contained 700 watt transmitter that will be used at the official ISEE-3 ground station in Morehead State University in Kentucky.

With transmitters taken care of and receiving handled by an SDR from Ettus Research, a lot of work has focused on the command and telemetry systems.  In 1978, the user interface for commands and telemetry was primitive to say the least. The team is now working on a system built-in Labview that’s much easier on the eyes than the vintage text terminal screens.

So far, signals from ISEE-3 are planned to be received at Arecibo, Morehead State, and Bochum observatory in Germany. This will give the team extremely good coverage for most of a day, and there are other ground stations in California that will extend the time the team is able to communicate with ISSE-3 each day by a few hours.

There’s still a lot of work to be done; the team really doesn’t know what systems are still operating, although most of them did make it 20 years with only one fault. In the next few days, we’ll all get to see if this satellite will be up to the task of coming back home to Earth. If everything goes to plan, ISEE-3 will be on track towards a 17 hour burn to put it on the correct trajectory some time in mid June.

mirobot

Introducing Mirobot, A DIY WiFi Robot For Children

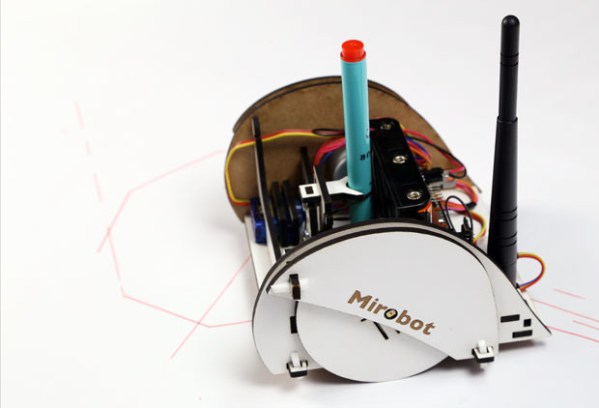
We’re quite sure that fathers parents people reading Hackaday wonder how to introduce their children acquaintances to the wonderful world of electronics. The Mirobot (Kickstarter link) might just be a good way to do so. As you may see in the picture above the Mirobot is a small WiFirobotics kit that children can build themselves to learn about technology, engineering and programming.

The laser cut chassis is assembled by snapping it together. All the electronics are left exposed to the outside so children may try to figure out which component does what. The robot is configured over your home WiFi via a Scratch-like visual programming tool. Everything (PCB, Arduino code, user interface) is open source.

The platform is based around the Arduino compatible ATMega328, two stepper motors, a Wifi module that can behave as a client or access point and 5 AA batteries. The campaign stretch goals include a collision detection sensor, line following functionality and finally a sound add-on.

Thanks [nickjohnson] for the tip.

A WiFi Home Power Meter

acFor his masters at Cornell, [Christopher McNally] designed a simple, non intrusive home power meter capable of doing everything a ‘smart meter’ can do – log power consumption throughout a home, and display a log of a home’s power consumption over WiFi. He’s even testing out some interesting ideas, like automatically detecting when specific devices turn on by reading the current data.

From [Chris]'[Jeramy] developed his system around the Arduino and a Ethernet shield, taking care of networking and choosing a micro, leaving him more time to develop the more interesting part of the project: sensing current. For this he used a small, clip-on current transducer. This sensor generates up to 10 VAC across a resistor, but the Arduino doesn’t play well with AC, requiring a small rectifier built around an op amp.

While the project works as a homebrew smart meter, [Jeramy] wasn’t able to automatically detect when certain devices were powered on. This is partly due to the fact that changes in current were only seen in magnitude and not waveform. Also, if two devices were powered on at the same time, the software would see that as a larger device that draws the sum of the current of two smaller devices. Still, [Jeramy] came up with a cheap way of metering power in any home, and the cost of his solution is cheaper than a lot of professional systems out there.

All the code, files, and design report are available on [Jeramy]’ git.