Robotic Scalextrics

scalectrics

At the Volkswagen factory there are two towers – AutoTürme – filled with gigantic robots lifting cars into parking spaces. It’s by far the most efficient way of putting a huge number of cars in a small footprint. Slot cars exist, so how about a completely overwrought yet entirely awesome robotic parking garage for 1:32 scale cars? (.es, Google translatrix)

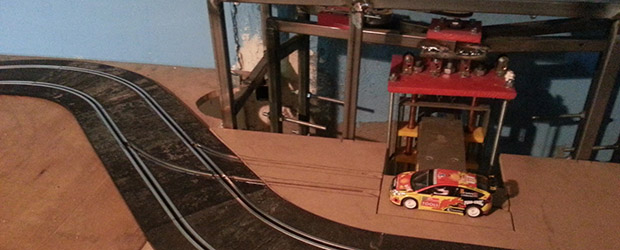
The project is built around several ‘racks’ to hold cars arranged around a central elevator. An Arduino takes care of moving all the motors and reading all the sensors, with the basic idea behind the project being the ability to select a car and have it appear in the pit of the track a few moments later.

Although this is just one small part of what is already a very impressive slot car track, it is however the most electronic. Other unique additions include a very unique cantilever/suspension bridge and the usual modeling techniques of creating a landscape with little more than cardboard and glue.

The best way to get a sense of how cool the parking garage is through the video. You can check that out below.

Continue reading “Robotic Scalextrics”

LEGO And Arduino Meet Han Solo

lego blaster gif

This full-size replica blaster from Star Wars, most iconically used by Han Solo and Princess Leia, has everything. Flashing LEDs, blaster noises, LEGO, and yes, even an Arduino. Not bad for [Baron von Brunk]’s first project to use an Arduino!

The blaster was based on electronics and LEGO that were lying around and was intended for use for Star Wars Day 2014. (May the Fourth be with you.) “Lying around” in this sense might be a bit of an understatement for [Baron von Brunk], as the design of the blaster required the use of the LEGO Digital Designer and 400 blocks, some of which are quite rare.

The electronics for the project are tied to a moving trigger mechanism (also made from LEGO). The trigger mechanism hits a momentary pushbutton which tells the Arduino to activate the LEDs and a separate 555 timer and sound recording/playback device which handles the classic blaster sounds. The whole thing is powered by a 9V battery and housed in the front of the blaster, and all of the code (and the LEGO schematics) are available on the project’s site.

This is quite an impressive replica, and the craftsmanship that went into the build shows, especially in the LEGO parts. We think Han Solo would indeed be proud! If you’re ready to go even further with Star Wars and LEGO, you might want to check out this barrel organ that plays the Star Wars theme.

TiLDA MKe: The EMF 2014 Badge

The TiLDA badge from EMF 2014


Hardware conference badges keep getting more complex, adding features that are sometimes useful, and sometimes just cool. The Electromagnetic Field (EMF) 2014 badge, TiLDA MKe, is no exception.

This badge displays the conference schedule, which can be updated over an RF link with base stations. It even notifies you when an event you’re interested in is about to start. Since we’ve missed many a talk by losing track of the time, this seems like a very useful feature.

Beyond the schedule, the device has a dedicated torch button to turn it into a flashlight. A rather helpful feature seeing as EMF takes place outdoors, in a field of the non-electromagnetic sort. They’re also working on porting some classic games to the system.

The badge is compatible with the Arduino Due, and is powered by an ARM Cortex M3. It’s rechargeable over USB, which is a nice change from AA powered badges. It also touts a radio transceiver, joystick, accelerometer, gyroscope, speaker, infrared, and is compatible with Arduino shields.

For more technical details, you can check out the EMF wiki. EMF 2014 takes place from August 29th to the 31st in Bletchley, UK, and you can still purchase tickets to score one of these badges.

Aquaponic System Uses Arduino For Consistent Performance

Smart Aquaponics

Food is just one of those things that we need to survive. Plants can grow on their own without human intervention but the quantity and quality of the crop will vary from year to year. Even elaborate farms can have good and bad years due to variables such as weather, disease, bugs, pollution and soil condition.

There is a system called Aquaponics that attempts to control those variables. Aquaponics combines aquaculture (raising aquatic animals) with hydroponics (growing plants in water). The Aquaponic system tries to emulate what happens in nature without the variation; water-based animals eat plants and excrete waste and that waste is used as food for plants.

[Kijani Grows] has built an Aquaponic setup and added a smart controller that is made out a bunch of stuff you would not normally associate with a garden. Their are several sensors in the system that measure water flow, tank level, water quality and dissolved oxygen. An Arduino monitors these sensors and reports the information back to a $20 router running OpenWRT. All of the recorded data is also stored for review later. Software on the router determines what needs to be adjusted in the enclosed ecosystem. The router communicates this information back to the Arduino which in turn controls the water pumps, heaters, fish feeder and lighting. And as if that wasn’t enough, the control system can be set up to send out messages via email, SMS or social media.

Hacking A Bee Hive

tumblr_inline_na763mgS0N1rnwm9n

[Marc] created a self-contained monitoring platform that enabled him to record the temperature and humidity of his bee hives.’

The health of colony can be determined based on a few factors. One is temperature which is an early indicator of whether or not the bees are about to swarm. Once temperature spikes are noticed, the bee wrangler can take the necessary steps to reduce the chance of losing the hive to a neighbor. Another indicator of bee health is humidity. If the area is too damp, it can damage the hive.

With that in mind, [Marc] developed a system to alert him via SMS or email if the sensor readings go beyond a certain range. In addition, he monitored the weight of the hive to see how much honey is inside. Frequency of the buzz was also recorded, and so was the activity of the entrance. He used an Arduino Duo and a DHT22 temperature/humidity sensor. A solar panel powered the bee monitoring system.

There were some challenges that needed to be overcome. Initially the Arduino wasn’t sending out data, but that was fixed with a simple debugging session. From there, he was able to broadcast the information creating graphs with the data. Battery levels, temperature, and humidity were all recorded. With the bee hive hacked and monitored, [Marc] was able to make progress on his system making great use of an Arduino.

THP Entry: A 6502 SBC Robot (On Multiple Boards)

SBC

Robots have always been a wonderful tool for learning electronics, but if you compare the robot kits from today against the robot kits from the 80s and early 90s, there’s a marked difference. There are fairly powerful microcontrollers in the new ones, and you program them in languages, and not straight machine code. Given this community’s propensity to say, ‘you could have just used a 555,’ this is obviously a problem.

[Carbon]’s entry for The Hackaday Prize is a great retro callback to the Heathkit HERO and robotic arms you can now find tucked away on a shelf in the electronics lab of every major educational institution. It’s a 65C02 single board computer, designed with robotics in mind.

The 6502 board is just what you would expect; a CPU, RAM, ROM, CPLD glue, and a serial port. The second board down on the stack is rather interesting – it’s a dual channel servo board made entirely out of discrete logic. The final board in the stack is an 8-channel ADC meant for a Pololu reflective sensor, making this 6502 in a Boe-bot chassis a proper line-following robot, coded in 6502 assembly.

[Carbon]’s video of his bot below.


SpaceWrencherThe project featured in this post is an entry in The Hackaday Prize. Build something awesome and win a trip to space or hundreds of other prizes.

Continue reading “THP Entry: A 6502 SBC Robot (On Multiple Boards)”

An FPGA Based 6502 Computer

A diagram of the CHOCHI Board

It’s no secret that people love the 6502 processor. This historic processor powered some of our favorite devices, including the Apple II, the Commodore 64, and the NES. If you want to play with the 6502, but don’t want to bother with obtaining legacy chips, the CHOCHI board is for you.

While many people have built modern homebrew 6502 computers, the CHOCHI will be much easier for those looking to play with the architecture. It’s based on a Xilinx XC3S50 FPGA which comes preconfigured as a 6502 processor.

After powering on the board, you can load a variety of provided binaries onto it. This collection includes a BASIC interpreter and a Forth interpreter. Of course, you’re free to write your own applications in 6502 assembly, or compile C code for the device using the cc65 compiler.

If you get bored with the 6502 core, you can always grab Xilinx’s ISE WebPACK for free and use the board as a generic FPGA development tool. It comes with 128K of SRAM and 31 I/O pins. Not bad for a $30 board.