The Chibi-Mikuvan, Or A Power Wheels With A Ford Fusion Battery

At all the big Maker Faires, the Power Racing Series makes an appearance, turning old Power Wheels into race cars that whip around the track at dozens of miles an hour. [Charles] is somewhat famous in the scene – there’s even a clause in the official rules named after him – so of course anything he brings to race day will be amazing. It was. It used a battery pack from a Ford Fusion plugin hybrid, a custom body, and a water cooling unit from a dead Mac G5.

A few months ago, we saw [Charles] tear into the battery pack he picked up for $300. This is the kind of equipment that will kill you before you know you’ve made a mistake, but [Charles] was able to take the pack apart and make a few battery packs – 28.8v and 16Ah – enough to get him around the track a few times.

The chassis for the Chibi-Mikuvan was built from steel, and the bodywork was built from machined pink foam, fiberglassed, and finished using a few tips [Charles] gleaned from [Burt Rutan]’s book, Moldless Composite Sandwich Aircraft Construction. The motor? That’s an enormous brushless motor meant for a 1/5th scale RC boat. The transmission is from an angle grinder, and the electronics are a work of art.

The result? A nearly perfect Power Wheels racer that has a curb weight of 110 pounds and tops out at 25 mph. It handles well, too: in the videos below, it overtakes the entire field of hacky racers in the Power Wheels Racing competition at Maker Faire NYC, and afterwards still had enough juice to tear around the faire.

Continue reading “The Chibi-Mikuvan, Or A Power Wheels With A Ford Fusion Battery”

Pain Machine Brings Pleasure, Too

Pain is a good thing. It tell us to pull our hand away from the stove and to stay off a turned ankle. But we all have different experiences of pain, and chronic pain degrades our quality of life. A person’s reports of pain will vary from one day to the next based on many factors, so the 1-10 scale isn’t universally effective in determining a person’s pain level. [Scott]’s entry into The Hackaday Prize is based on the classic cold pressor testing device, which measures changes in heart rate and blood pressure in a patient while their hand is immersed in ice water for one minute.

[Scott] has tentatively dubbed his device The Pain Machine, but it does more than the typical cold pressor apparatus; it also delivers simulated pain relief in the form of warm water when the valves are reversed. In addition, the subject under testing can push a button when they’ve had enough. While his original plan used external sources of hot and cold water, [Scott] pulled a couple of Peltier coolers from some wine chillers for a more contained design.

The Pain Machine uses an Arduino ATMega 2560 to control gravity flow solenoids, collect temperature data, and send the data cloudward. A couple of 110V pumps circulate the water. [Scott] will open up the code once he has finished commenting it and fleshed it out with use cases. For now, you can check out his two-minute entry video after the break.


SpaceWrencherThis project is an official entry to The Hackaday Prize that sadly didn’t make the quarterfinal selection. It’s still a great project, and worthy of a Hackaday post on its own.


Continue reading “Pain Machine Brings Pleasure, Too”

Add CNC To Your…Propane Tank??!?

It’s starting to be that time of year again; the Halloween-themed hacks are rolling in.

[John Lauer] needed a propane-powered flame effect for his backyard ICBM “crash site”. Rather than pony up for an expensive, electronically-controlled propane
valve, he made a custom bracket to connect a stepper motor to the propane burner’s existing valve.

With the stepper motor connected up, a TinyG stepper motor controller and [John’s] own graphical interface, ChiliPeppr, take care of the rest.

The hack is almost certainly a case of “everything looks like a nail when you have a hammer” but you have to admit that it works well and probably didn’t take [John] all that much time to whip up. Maybe everyone should have a couple spare stepper motors with driver circuitry just lying around ready to go? You know, just in case.

All the details of the build are in the video. If you’re done watching the flames, skip to around 2:50 where we see the adapter in action and then [John] steps us through its construction.

You may have seen coverage of the TinyG motor controller here before.

Additional thanks to [Alden Hart] for the tip.

The Teensy Audio Library

There are a few ways of playing .WAV files with a microcontroller, but other than that, doing any sort of serious audio processing has required a significantly beefier processor. This isn’t the case anymore: [Paul Stoffregen] has just released his Teensy Audio Library, a library for the ARM Cortex M4 found in the Teensy 3 that does WAV playback and recording, synthesis, analysis, effects, filtering, mixing, and internal signal routing in CD quality audio.

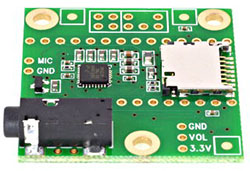
This is an impressive bit of code, made possible only because of the ARM Cortex M4 DSP instructions found in the Teensy 3.1. It won’t run on an 8-bit micro, or even the Cortex M3-based Arduino Due. This is a project meant for the Teensy, although [Paul] has open sourced everything and put it up on Github. There’s also a neat little audio adapter board for the Teensy 3 with a microSD card holder, a 1/8″ jack, and a connector for a microphone.

In addition to audio recording and playback, there’s also a great FFT object that will split your audio spectrum into 512 bins, updated at 86Hz. If you want a sound reactive LED project, there ‘ya go. There’s also a fair bit of synthesis functions for sine, saw, triangle, square, pulse, and arbitrary waveforms, a few effects functions for chorus, flanging, envelope filters, and a GUI audio system design tool that will output code directly to the Arduino IDE for uploading to the Teensy.

It’s really an incredible amount of work, and with the number of features that went into this, we can easily see the quality of homebrew musical instruments increasing drastically over the next few months. This thing has DIY Akai MPC/Monome, psuedo-analog synth, or portable effects box written all over it.

Retrotechtacular: The First Atlas Launch

As the Cold War conflict expanded in the 1950s, the Soviet Union dry-tested a hydrogen bomb and defense tactics became a top priority for the United States. Seeking to create a long-range nuclear missile option, the Air Force contracted Convair Astronautics to deliver SM-65 Atlas, the first in series of ICBMs. In the spotlight this week is a sort of video progress report which shows the first launch from Cape Canaveral’s LC-14 on June 11, 1957.

After the angle of attack probe is unsheathed, everyone moves out of the way. The launch is being monitored by base central control, but the swingin’ spot to spectate is the blockhouse. They have a periscope and everything. As the countdown continues, liquid oxygen pipelines whistle and wail into the idyllic Florida afternoon with the urgency of a thousand teakettles. Cameras and tracking equipment are readied, and the blockhouse’s blast door is sealed up tight.

Continue reading “Retrotechtacular: The First Atlas Launch”

Atmel And Arduino Announce Wi-Fi Shield 101 At World Maker Faire

Atmel and Arduino teamed up at World Maker Faire to introduce the Wi-Fi shield 101. [Gary] from Atmel gave us the lowdown on this new shield and its components. The shield is a rather spartan affair, carrying only devices of note: an Atmel WINC1500 WiFi module, and an ATECC108 crypto chip.

The WINC1500 is a nifty little WiFi module in its own right. WINC handles IEEE 802.11 b/g/n at up to 72 Mbps. 72Mbps may not sound like much by today’s standards, but it’s plenty fast for most embedded applications. WINC handles all the heavy lifting of the wireless connection. Connectivity is through SPI, UART or I2C, though on the Arduino shield it will be running in SPI mode.

The ATECC108 is a member of Atmel’s “CryptoAuthentication” family. It comes packaged in an 8-pin SOIC, and is compatible with serial I2C EEPROM specifications. Internally the similarities to serial EEPROMs end. The ‘108 has a 256-bit SHA engine in hardware, as well as a Federal Information Processing Standards (FIPS) level random number generator. Atmel sees this chip as being at the core of secure embedded systems. We think it’s pretty darn good, so long as we don’t hear about it at the next DEFCON.

The Wi-Fi shield 101 and associated libraries should be out in January 2015. We can’t wait to see all the new projects (and new ways to blink an LED) the shield will enable.

3D Printing Of Parameterized Speaker Enclosures

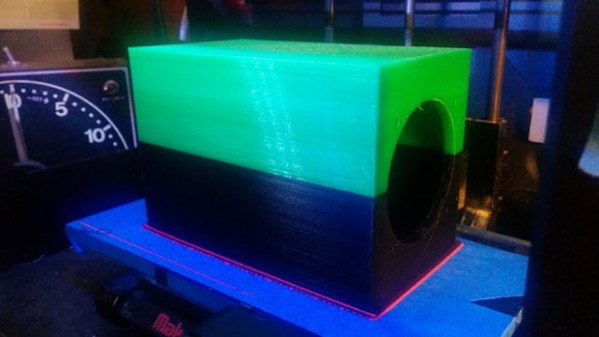
Despite what you would gather from looking at a mess of wires, carpet, and MDF in the back of a Honda Civic hatchback, building speaker enclosures is a pretty complex business. To get the right frequency response, you’ll need to take into account the driver’s resonant frequency, the volume of any internal components, and how well the speaker works when it reaches the resonant frequency. Heady stuff, but when [Rich] at NothingLabs started 3D printing his own speaker enclosures, he realized he could calculate an ideal enclosure automatically. Ah, the joys of OpenSCAD.

[Rich] wrote a bit of OpenSCAD and put it up on the Thingiverse Customizer, allowing anyone to manually enter a box volume, height and width ratio, size for a speaker hole, and even bass ports.

There are a few really cool features for this way of constructing speaker enclosures; assembly is a snap, and it’s most likely air tight right out of the printer. [Rich] printed an enclosure for a 3″ driver that has a frequency response down to 66Hz – an extremely impressive piece of work. Video below.

Continue reading “3D Printing Of Parameterized Speaker Enclosures”