Christmas Lights And Ships In A Bottle

Thanksgiving was last week, and Christmas has been invading department stores for two or three months now, and that can only mean one thing: it’s time to kill a tree, set it up in your living room, and put a few hundred watts of lights on it. All those lights, though; it’s as if Christmas lights were specifically invented as fodder for standup comedians for two months out of the year. Why can’t someone invent wireless Christmas lights?

We don’t know if it’s been invented, but here’s a Kickstarter campaign that’s selling that same idea. It’s called Aura, and it’s exactly what it says on the tin: wireless Christmas lights, controllable with a smartphone. If it works, it’s a brilliant idea.

Continue reading “Christmas Lights And Ships In A Bottle”

Astrophotography And Data-Analysis Sense Exoplanets

[David Schneider] was reading about recent discoveries of exoplanets. Simply put these are planets orbiting stars other than the sun. The rigs used by the research scientists include massive telescopes, but the fact that they’re using CCD sensors led [David] to wonder if a version of this could be done on the cheap in the backyard. The answer is yes. By capturing and processing data from a barn door tracker he was able to verify a known exoplanet.

Barn Door trackers are devices used to move a camera to compensate for the turning of the earth. This is necessary when taking images throughout the night, as the stars will not remain “stationary” to the camera’s frame without it. The good news is that they’re simple to build, we’ve seen a few over the years.

Other than having to wait until his part of the earth was pointed in the correct direction (on a clear night) at the same time as an exoplanet transit, [David] was ready to harvest all the data he needed. This part gets interesting really quickly. The camera needed to catch the planet passing in between the earth and the star it revolves around (called a transit). The data to prove this happened is really subtle. To uncover it [David] needed to control the data set for atmospheric changes by referencing several other stars. From there he focused on the data for the transit target and compared points across the entire set of captured images. The result is a dip in brightness that matches the specifications of the original discovery.

[David] explains the entire process in the clip after the break.

Continue reading “Astrophotography And Data-Analysis Sense Exoplanets”

A Z80 Computer With Switches And Blinkenlights

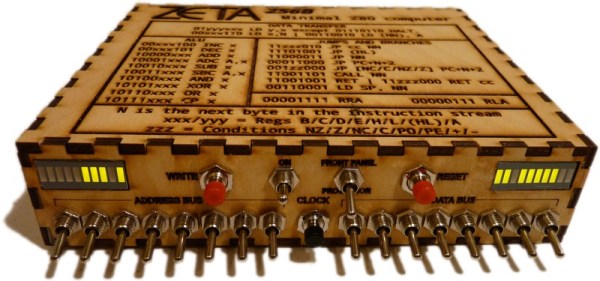
While most people who build their own computer from chips want the finished product to do something useful, there’s something to be said about a huge bank of switches and a bunch of blinkenlights. They’re incredibly simple – most of the time, you don’t even need RAM – and have a great classic look about them.

[Jim] wanted to build one of these computers and wound up creating a minimal system with switches and blinkenlights. It’s based on the Z80 CPU, has only 256 bytes of RAM, and not much else. Apart from a few extra chips to output data and address lines to LEDs and a few more to read switches, there are only two major chips in this computer.

With the circuit complete, [Jim] laser cut a small enclosure big enough to house his stripboard PCB, the switches and LEDs, and a few buttons to write to an address, perform a soft reset, and cycle the clock. One of the most practical additions to this switch/blinkenlight setup is a hand crank. There’s no crystal inside this computer, and all clock cycles are done manually. Instead of pushing a button hundreds of times to calculate something. [Jim] added a small hand crank that cycles the clock once per revolution. Crazy, but strangely practical.

[Jim] made a demo video of his computer in action, demonstrating how it’s able to calculate the greatest common divisor of two numbers. You can check that video out below.

Continue reading “A Z80 Computer With Switches And Blinkenlights”

Home Automation Setup Keeps You Informed

[johannes] wrote in to tell us about his latest project, a home automation setup he named Botman. While he calls it a home automation system, controlling lights and home appliances (which it does wirelessly on 433MHz) is just a small part of its functionality. The front panel of Botman includes a servo which points to laser-etched icons of the current weather. It also has a display which shows indoor and outdoor weather conditions along with the status of public transportation around [johannes]’s house.

Botman is built around an Arduino with an Ethernet shield. The Arduino has very little memory, so [johannes] used the Google Apps engine as a buffer between his Arduino and the JSON APIs of his data sources. This significantly reduces the amount of data the Arduino has to keep in memory and parse.

[johannes] also wrote an Android app that communicates with Botman. The app has buttons for controlling lights in his house and duplicates all the information shown on the front panel. [johannes] also built some logging features into Botman. The temperature readings and other information are uploaded from the Arduino to a Google Docs spreadsheet where he can view and graph them from anywhere. Check out the video after the break to see Botman in action.

Continue reading “Home Automation Setup Keeps You Informed”

3D-Printed Clock Tells Time With Gears

[ekaggrat] designed a 3d-printed clock that’s fairly simple to make and looks awesome. The clock features a series of 3d-printed gears, all driven by a single stepper motor that [ekaggrat] found in surplus.

The clock’s controller is based around an ATtiny2313 programmed with the Arduino IDE. The ATtiny controls a Darlington driver IC which is used to run the stepper motor. The ATtiny drives the stepper motor forward every minute, which moves both the hour and minute hands through the 3d-printed gears. The hour and minute are indicated by two orange posts inside the large gears.

[ekaggrat] etched his own PCB for the microcontroller and stepper driver, making the build nice and compact. If you want to build your own, [ekaggrat] posted all of his design files on GitHub. All you need is a PCB (or breadboard), a few components,  and a bit of time on a 3D printer to make your own clock.

3D Printing Atomic Force Microscopy

[Andres] is working with an Atomic Force Microscope, a device that drags a small needle across a surface to produce an image with incredible resolution. The AFM can produce native .STL files, and when you have that ability, what’s the obvious next step? That’s right. printing atomic force microscope images.

The AFM image above is of a hydrogel, a network of polymers that’s mostly water, but has a huge number of crosslinked polymers. After grabbing the image of a hydrogel from an Agilent 5100 AFM, [Andres] exported the STL, imported it into Blender, and upscaled it and turned it into a printable object.

If you’d like to try out this build but don’t have access to an atomic force microscope, never fear: you can build one for about $1000 from a few pieces of metal, an old CD burner, and a dozen or so consumable AFM probes. Actually, the probes are going to be what sets you back the most, so just do what they did in olden times – smash diamonds together and look through the broken pieces for a tip that’s sufficiently sharp.