Coloring 3D Prints With Sharpies

Printing objects in full color easily is one of the paramount goals of the ‘squirting plastic’ 3D printer scene, and so far all experiments have relied on multiple colors of filament, and sometimes multiple extruders. This, of course, requires a stock of different colored filaments, but [Mathew Beebe] has a different idea: why not dye a natural colored filament just before it’s fed into a printer? Following his intuition, [Mathew] is doing some experiments with the common Sharpie marker, and the resulting prints look much better than you would expect.

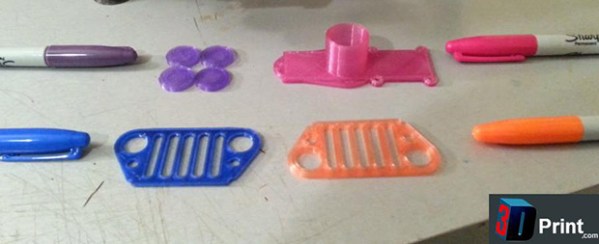
The basic procedure or this technique is to drill a hole in the butt end of the Sharpie, pull out the felt in the tip, and feed a length of filament through the marker before it goes into the extruder. The filament is dyed with the Sharpie ink, and the resulting print retains the color of the marker.

Despite the simplicity of the technique, the results are astonishing. An off-white ‘natural’ filament is easily transformed into any one of the colors found in Sharpies.

Besides the common Sharpie, there’s a slightly more interesting application  of this technique of coloring 3D printer filament; as anyone who has ever been in a dorm room with a blacklight knows, you can use the dye inside a common highlighter to make some wicked cool UV-sensitive liquor bottles. Whether the ‘Sharpie technique’ works with highlighters or other markers is as yet unknown, but it does deserve at least a little experimentation.

Video below.

Continue reading “Coloring 3D Prints With Sharpies”

Two Wheeler Is Gyroscope Stabilized

[Jim] loves gyros – not those newfangled MEMS devices, but old-fashioned mechanical gyroscopes. His obsession has pushed him to build this gyro stabilized two wheeler. We love watching hacks come together from simple basic materials and hand tools, with liberal amounts of hot glue to hold everything in place.  That seems to be [Jim’s] philosophy as well.

This is actually the fifth incarnation of [Jim’s] design. Along the way he’s learned a few important secrets about mechanical gyro design, such as balancing the motor and gyro assembly to be just a bit top-heavy. [Jim’s] gyro is a stack of CDs directly mounted to the shaft of a brushed speed400 R/C airplane motor. The motor spins the CDs up at breakneck speed – literally. [Jim] mentions that they’ve exploded during some of his early experiments.

The gyroscope is free to move in the fore-aft direction. Side to side balance tilting is on the wheels themselves. The wheels are model airplane wheels, which have a curved tread. No cheating by using flat LEGO wheels in [Jim’s] lab! A potentiometer measures the tilt angle of the gyro. The voltage from the pot is fed into an Arduino Uno which closes the loop by moving a servo mounted counterweight.

The vehicle is controlled with a regular R/C plane radio. A servo steers the front wheel while another DC motor drives the rear wheel. Not only is [Jim’s] creation able to balance on its own, it can even make a U-Turn within a hallway.

Continue reading “Two Wheeler Is Gyroscope Stabilized”

Input And Output On A Single Pin

IO

[Emilio] has a Raspberry Pi with a few sensors running totally headless. It’s a great way to gather data and post it on the Internet, but for the rare occasions when the Pi needs to be turned off for maintenance, [Emilio] needs to connect a monitor, a keyboard, and a mouse. Not a perfect solution when a simple pushbutton and indicator LED would suffice. There’s one problem with adding a simple button and LED combo: there’s only one GPIO pin available in the setup. That’s nothing a few resistors won’t fix.

After wiring up a very simple circuit on a piece of perfboard, [Emilio] met his design goal of being able to tell if the Pi was running and giving it a software reset button using only a single GPIO pin. The circuit requires only two resistors, and the software to make everything run – a simple Python script – toggles the pin between input and output, checking if the button is held down for five seconds. If it is, the Raspi powers off for [Emilio]’s routine maintenance.

Stylish Cafe Battlestation Spoils Customers

Cafe Battlestation

[Tasos] sent us this tip about the custom battlestation he’s been working on for his Internet café. (Greek; Translated). The desk started from humble enough beginnings: a simple frame from what appears to be MDF with cabinets to secure the PCs. The goal with this build was to provide an aesthetically pleasing and user-friendly construction. [Tasos] was dissatisfied with the limitations posed by off-the-shelf monitor mounts, so he fabricated his own, more adjustable alternatives, through which he ran the necessary cords.

[Tasos] gave each monitor stand a thorough sanding, priming and painting for a finished result that exudes metallic perfection, then he attached a large pushbutton for booting the computer and some LEDs to provide soft backlight. Under the hood, [Tasos] fitted the PCs’ innards into a custom enclosure of sorts. Though he’s yet to provide full details on this part of the construction, we suspect more images are forthcoming. You can find more details in his forum post.

Wind Tunnel Testing Now Available To The Common Man

DIY Wind Tunnel

If you are in the market for a DIY wind tunnel the folks over at sciencebuddies.org have got you covered. They have done a great job documenting how they built their own wind tunnel. Most of the structure is made of plywood with the test chamber is made of plexi-glass so that the operator can visually observe what is happening during a test. A common gable-mount fan provides the air flow, you may have one installed in your attic to keep it cool. The only non-widely available components are the force sensors that feed data to a computer for logging.

Continue reading “Wind Tunnel Testing Now Available To The Common Man”

My First Robot: A Dad’s Journey In Robotics For His Daughter

My first robot

[Joel Miller] wants to get his daughters into electronics early (his oldest is only 3), so he’s decided to foray into the wonderful world of robotics as a fun way to get them interested. As bonus to us and all other would-be robotics enthusiasts out there, he’s keeping track of the project on his blog!

He started by sketching out some ideas about what he wanted his robot to be capable of — it should be able to move around, be remote controlled, have sensors for experiments, and even have some personality — expression capable eyes maybe? Oh and it should be able to automatically charge itself, and have tank treads!

It’s been a few weeks since he started scheming up ideas… and he already has a prototype complete! Talk about a productive father! He decided to try 3D printing a continuous tank tread using ABS, but unfortunately it was a bit too stiff, so he’s opted to use a tried and true Lego system instead — although maybe he should try printing in two materials, like we just saw with the FlexyDualie extruder!

Continue reading “My First Robot: A Dad’s Journey In Robotics For His Daughter”

The Smallest ATtiny85 Based USB Board

Nanite 86

“Possibly the smallest ATtiny85 based ‘duino derivative”. Indeed! When Olimex announced the Olimexino 85s as the smallest Arduino ever, [Tim] took that as a challenge. His very small Arduino based USB devboard is quite a bit smaller than the Olimexino!

The Nanite 85 was carefully designed to be both small and functional. Not only is it 20% smaller than the Olimexino, but also sports a reset button! One of the coolest aspects of this design is that it has the same pinout and size as a DIP ATtiny85. This means that you can use the Nanite 85 for developing your code with the USB bootloader, and then you can directly replace it with a standard (pre-programmed) ATtiny85. The major downside to using this device over the aforementioned devices, is that it does not include a voltage regulator for powering the device via USB (or battery), the device is simply hooked directly to the 5V rail from the USB connector.

We can’t help but be impressed with this well-thought-out design. It is also easy to assemble since it uses larger surface mount components. If smaller components were used, even more features (such as a regulator) could be included. Do you have an even smaller USB Arduino? The race is on for the smallest Arduino ever!