Hackaday 68k: Blinking An LED

freerun

Time for another update for the Hackaday 68k, the 16-bit retrocomputer developed on Hackaday to show off both our love for vintage hardware and our new project hosting site. There’s still invites to be had, people. Get ’em while they’re hot.

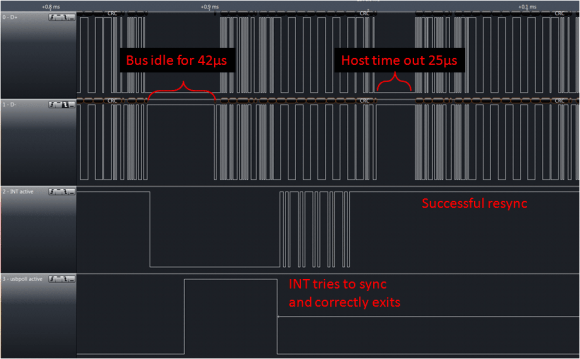
This post is going to cover exactly how complex a simple 68000 system is. The answer is, “not very.” A simple 68k system is at least as simple to design than some other homebrew systems we’ve seen around here. Yes, a 16-bit data bus means there’s more wires going everywhere, but like she said, just because it’s bigger doesn’t mean it’s harder.

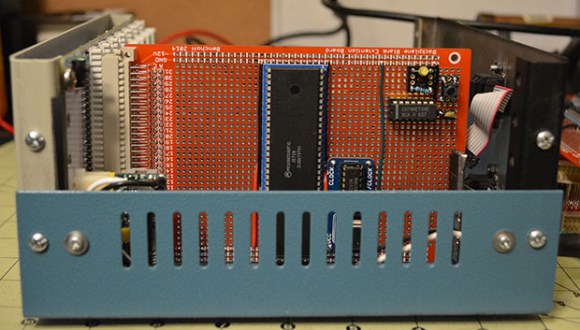
There is some progress to report on the construction of the Hackaday 68k. The processor has been verified as working with a blinking LED. It’s the ‘Hello World’ of computer design, and it’s at least as complex as blinking a LED with an Arduino.

You’re gonna want to click that ‘Read more’ link.

Continue reading “Hackaday 68k: Blinking An LED”

A Low Cost Arduino FPGA Shield

[technolomaniac] is kicking butt over at Hackaday Projects. He’s creating a low cost Arduino based FPGA shield. We’ve seen this pairing before, but never with a bill of materials in the $25 to $30 range. [technolomaniac’s] FPGA of choice is a Xilinx Spartan 6. He’s also including SDRAM, as well as an SPI Flash for configuration. Even though the Spartan 6 LX9 is a relatively small FPGA, it can pack enough punch that the Arduino almost becomes a peripheral. The main interconnect between the two will be the Arduino’s ability to program the Spartan via SPI. Thanks to the shared I/O pins though, the sky is the limit for parallel workflow.

[technolomaniac] spent quite a bit of time on his decoupling schematic. Even on a relatively small FPGA power decoupling is a big issue, especially when high speed signals come into play. Thankfully Xilinx provides guides for this task. We have to mention the two excellent videos [technolomaniac] created to explain his design. Documenting a project doesn’t have to be hours of endless writing. Sometimes it’s just easier to run a screen capture utility and click record. As of this writing, the schematic has just been overhauled, and [technolomaniac] is looking for feedback before he enters the all important layout stage. The design is up on his github repository in Altium format. Due to its high cost, Altium isn’t our first pick for Open Hardware designs. There are free viewers available, but [technolomaniac] makes it simple by putting up his schematic in PDF format (PDF link). Why not head over to projects and help him out?

Continue reading “A Low Cost Arduino FPGA Shield”

Make Your Electronics Lab In A Box

Unless your lucky enough to have a big personal workshop where you can have dedicated stations for all kinds of different tools, you’re probably like most of us here at Hack a Day — lots of projects, but never enough space.

[McLovinGyver] lives in a small flat, and finds setup and cleanup time often take longer than the project itself — so he’s come up with this handy dandy Electronics-Lab-in-a-Box (trademark pending).

The guide is really more of a series of pictures of his process of building the portable lab, but he shows off some great ideas of things you might want to include in your own personal version of it. The first step is deciding what tools you need in the lab. In general, your power supply unit, soldering iron, hot air re-flow and fume exhaustion are going to dictate the general size and shape of your lab — from there, it’s just a matter of filling in the gaps with the rest of your small tools.

Continue reading “Make Your Electronics Lab In A Box”

Monster 100W LED Flashlight For Under $10!

What would you do if you came across a 100W, 7500 lumen LED diode for under $10? Probably something like this.

It’s actually quite amazing how cheap LEDs are getting. [Julian Ilett] found this 2″ x 2″ LED on eBay for only £4.79 (<$10 USD). It’s rated for 32-34V with a current draw of 3000mA, which works out to about 100W. Its brightness? 7500 lumens. That’s brighter than most home theater setups.

At that price, [Julian] had to try playing with one. The problem with these higher power LEDs is that they typically need a rather expensive LED driver, due to the less common voltages they operate at — and of course, the concern of over-driving them and burning them out. Not interested in finding a suitable driver, [Julian] decided to try something a bit less conventional — wiring a pair of 18V drill batteries in series.

Continue reading “Monster 100W LED Flashlight For Under $10!”

Russian Man Builds A Chainsaw Out Of A Grinder

Ready for another ill-advised tool hack we definitely do not recommend you try at home? Why not take a gander at this man’s home-made chainsaw… made out of a grinder! (translated)

What this (Russian?) man has done is modified his large electric grinder — into a chainsaw. He’s added a weld plate, some mounting locations, and now it can accept either grinding wheels, or after a few minutes of assembly, a full length chainsaw blade attachment. He’s probably pretty proud of himself, but we really hope he doesn’t end up losing a finger… or worse.

Anyway, we’re not even going to point out the lack of safety guarding in this video, because it is such an obvious bad idea in general. That being said, it actually works in the demonstration!

Stick around — don’t sweat too much though, no one gets hurt. There is one thing that can be said about this project though… It’s most definitely a hack.

Continue reading “Russian Man Builds A Chainsaw Out Of A Grinder”

DIY Bell For Your Trains Of Lionel

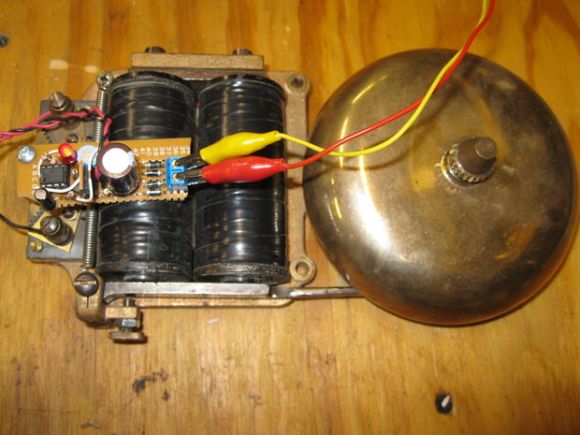
[Peter]’s dad recently rekindled his love for Lionel trains and wanted a bell to keep the crossings safe for O gauge drivers and pedestrians. Using parts he had lying around and a doorbell from the hardware store, [Peter] concocted this DIY train crossing bell at his dad’s request.

The idea was to make the bell chime about once per second. To achieve this, [Peter] used a non-repeating electro-mechanical doorbell that emits a single note on continuous press. You could also roll your own bell with a spring-loaded solenoid and something bell-like for it to strike.

[Peter]’s three-stage design uses a full-wave bridge rectifier to convert the AC from the train transformer to DC. He drops it to 5V and sends it through a 555 and some resistors to set the frequency and duty cycle. His output section translates the voltage back up to match the input desired by the doorbell.  [Peter] included a 1N4002 as a back EMF snubber to keep feedback from damaging the power MOSFET. Stick around for his demonstration video after the jump.

Continue reading “DIY Bell For Your Trains Of Lionel”

Interrupt Free V-USB

resync

[Tim’s] new version of Micronucleus, Micronucleus 2.0, improves upon V-USB by removing the need for interrupts. The original Micronucleus was a very small implementation of V-USB that took up only 2KB. Removing the need for interrupts is a big leap forward for V-USB.

For those of you that do not know, “V-USB is a software-only implementation of a low-speed USB device for Atmel’s AVR® microcontrollers, making it possible to build USB hardware with almost any AVR® microcontroller, not requiring any additional chip.” One tricky aspect of using V-USB is that the bootloader requires interrupts, which can lead to messy problems within the user program. By removing the need for interrupts, Micronucleus 2.0 reduces the complexity of the bootloader by removing the need to patch the interrupt vector for the user program.

With the added benefit of  speeding up the V-USB data transmission, Micronucleus 2.0 is very exciting for those minimal embedded platforms based on V-USB. Go ahead and try out Micronucleus 2.0! Leave a comment and let us know what you think.