Tweet Messages From Punch Cards

It all started with a conversation about the early days of computing. The next thing he knew, [Tim Jagenberg’s] colleague gave him a stack of punch cards and a challenge.  [Tim] attempted to read them with a mechanical contact and failed.  Undeterred, he decided to make a punch card-to-keyboard interface using optical parts from disassembled HP print stations.  Specifically, he took apart the slotted optical interrupter switches to use their IR-LEDs and photo-transistors. Next, [Tim] drilled holes into two pieces of plastic, gluing the LEDs on one piece of plastic and the photo-transistors on the other. The photo-transistors tell the Teensy 3.1 whenever a hole is detected.

[Tim] developed an interpreter on the Teensy that reads the punch card according to IBM model 029 keypunch codes. The Teensy enumerates as a USB keyboard when connected to a computer. As a punch card is read, the Teensy outputs the decoded characters as key presses.  When a punch card has been completely read, an ‘Enter’ key press is transmitted.  Tweeting the punch cards is no more complicated than typing the text yourself. Naturally, the first message posted on Twitter from the stack of punch cards was “Hello World!”  [Tim’s] binary and source code is available for download on Github.

We’ve enjoyed covering the backstory of the punch card and a previous project reading these cards using a digital camera setup. It’s always interesting to see the clever ways people use current technology and can-do attitude to read data from obsolete systems that would otherwise be lost.  We wonder what is on the rest of those punch cards?  Let’s hope [Tim] has more punch card tweets soon!

Speaker Cabinet Boom Box Build

When you get that itch to build something, it’s difficult to stop unless you achieve a feeling of accomplishment. And that’s how it was with [Rohit’s] boombox build.

He started out with a failing stereo. He figured he could build a replacement himself that played digital media but his attempts at mating microcontrollers and SD cards was thwarted. His backup plan was to hit DX for a cheap player and he was not disappointed. The faceplate he found has slots for USB and SD card, 7-segment displays for feedback, and both buttons and a remote for control. But this little player is meant to feed an amplifier. Why buy one when you can build one?

[Rohit] chose ST Micro’s little AMP called the TDA2030 in a Pentawatt package (this name for a zig-zag in-line package is new to us). We couldn’t find stocked chips from the usual suspects but there are distributors with singles in the $3.50-5 range. [Rohit] tried running it without a heat sink and it gets hot fast! If anyone has opinions on this choice of chip (or alternatives) we’d love to hear them.

But we digress. With an amp taken care of he moved onto sourcing speakers. A bit of repair work on an upright set got them working again. The bulky speaker box has more than enough room for the amp and front-end, both of which are pretty tiny. The result is a standalone music player that he can be proud of having hacked it together himself.

DIY Head Mounted Display Based On Movie Based On Stephen King Story

Ever since [will1384] watched “The Lawnmower Man” as a wee lad, he’s been interested in virtual reality. He has been messing around with it for years and even had a VictorMaxx Stuntmaster, one of the first available head mounted displays. Years later, the Oculus Rift came out and [will1384] wanted to try it out but the $350 price tag put it just out of his price range for a discretionary purchase. He then did what most of us HaD readers would do, try building one himself, and with a goal for doing it for around $100.

The main display is a 7″ LCD with a resolution of 1024×600 pixels and has a mini HDMI input. Some DIY head mounted display projects out on the ‘web use ski goggles or some sort of elastic strap to hold the display to the wearer’s head. [will1384] took a more industrial approach, literally. He used the head mounting system from a welding helmet. This not only has an adjustable band but also has a top strap to prevent the entire contraption from sliding down. Three-dimensional parts were printed out to secure the LCD to the welding helmet parts while at the same time creating a duct to block out external light.

diyhmd-lenses

Inside the goggles are a pair of 5x Loupe lenses mounted between the user’s eyes and the LCD screen. These were made to be adjustable so that the wearer can dial them in for the most comfortable viewing experience. The remote mounted to the top strap may look a little out-of-place but it is actually being used to capture head movement. In addition to a standard wireless remote, it is also an air mouse with internal gyroscopes.

Open-Source Laser Shooting Simulator

Looking to practice your marksmanship skills at home? Check out the homeLESS (Home LasEr Shooting Simulator), an open-source tool for marksmanship practice. [Laabicz] developed this system as a cheaper alternative to commercial laser shooting simulators, which are just as simple but very expensive.

[Laabicz]’s simulator primarily uses modified airsoft pistols that are fitted with batteries (installed in the magazine) and a laser in the chamber. Any gun can be used with the system as long as you can figure out how to attach a laser and trigger switch. To power the laser, a small capacitor is charged from batteries when the trigger switch is off. Once the trigger is pressed, the capacitor discharges through the laser and makes a short pulse of light.

The simulator is written in Processing and requires a projector and a webcam. The Processing sketch projects configurable moving targets on a screen or wall, and the webcam detects when a laser is triggered over any of the targets. The software supports multiple target types (including moving targets) and is quite configurable. Check out the video after the break to see the system in use.

Continue reading “Open-Source Laser Shooting Simulator”

Hello Kitty Night Light Gets Flashy Upgrades

See something in the world that sucks? As a person with hacker prowess, you view this sucky thing as a challenge to come up with an improvement and in some cases, an improvement that extends beyond what’s truly necessary but is just plain cool. This is what maker and father [Dan McDougall] did with his daughter’s light projecting Hello Kitty pillow.

kittypillow2
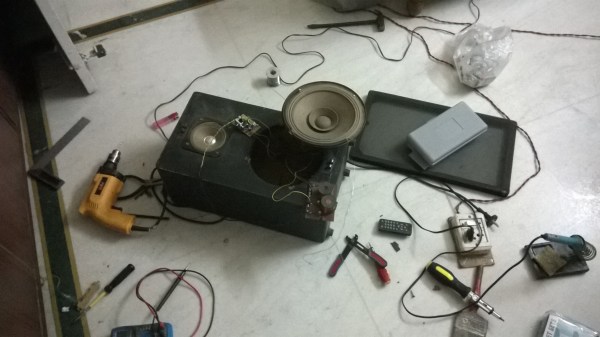
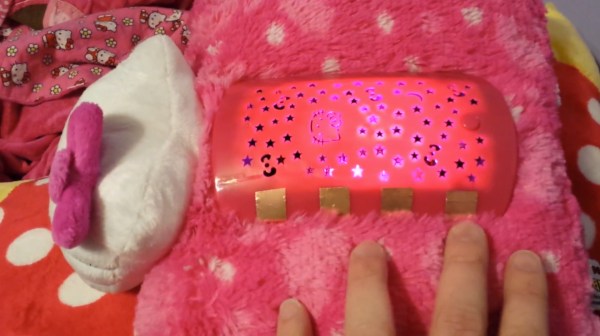
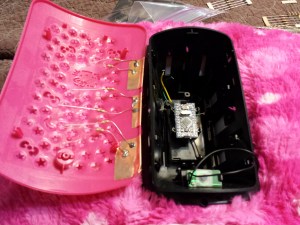
As a thing whose one purpose was to shine bright starry patterns on a child’s wall at night, the pillow failed miserably. [Dan] Wondered why his daughter’s toy couldn’t live up to reasonable expectations all while sucking batteries dry, so he opened the large pink plastic casing in the center of the pillow to find a rather minimal board driving three very dim LEDs. The LEDs that faded on and off to create mixtures of different colors weren’t even red, green and blue either. The makers of the toy used yellow instead of the slightly more expensive blue color. Having none of this, [Dan] replaced these sad innards with an Arduino Pro Mini which he programmed to drive an old salvaged speaker and three bright RGB LEDs borrowed from the end of a light strip. For the unnecessary but cool part, he used the additional pins of the Arduino micro-controller to add four touch sensitive buttons on the outside of the pink casing. These small capacitive tiles made from copper tape activate sound and change the color of the LEDs when touched, making the pillow a lot more reactive than it was before.

The Arduino Mini board and the added components fit nicely inside the original pink casing of the pillow when all was soldered up and finished. With threefold ultra bright LEDs and a super strobe mode, his daughter’s Hello Kitty pillow is more of a disco ball than a night light now… but we doubt she will complain about the cool additions. To see the pillow in action and hear more about the upgrades you can check out [Dan’s] video below:

Continue reading “Hello Kitty Night Light Gets Flashy Upgrades”

The Trompe-l’œil Menorah

Hanukkah decorations have been up in stores since before Halloween, and that means it’s time for electronic Menorahs with blinking LEDs, controllers, and if you’re really good, a real-time clock with support for the Jewish calendar. [Windell] over at Evil Mad Scientist just outdid himself with the Mega Menorah 9000. It’s a flat PCB with nine LEDs, but it uses stippling and a trompe-l’œil effect to make it appear three-dimensional.

Making a 2D object look three-dimensional isn’t that hard – you just need the right shading. A few years ago, [Evil Mad Scientist] created StippleGen, a library to turn images into something that can be easily reproduced with the EggBot CNC plotter. It’s actually quite impressive; there are Voronoi diagrams and travelling salesmen problems, all to draw on eggs. The library can be used for much more, like properly shading a PCB so that it looks three-dimensional.

The Mega Menorah 9000 is surprisingly large, at about 7.5″ wide. It’s powered by an ATtiny85 loaded up with the Adafruit Trinket firmware, making it a truly USB enabled Menorah. While it may just be a soldering kit, it is a fantastic looking PCB, something we’d like to see some more examples of in the future.

A USB-Controlled POV Light Stick

Wanting to showcase their USB LED strip controller, the folks at Maniacal Labs built a POV LED stick this weekend. Yes, it’s pretty much the same as any other POV LED display you’ve seen; set a camera for a long exposure, wave the POV light stick around, and get a cool pixely image in mid-air. This build is a little different, though: it’s controlled over WiFi with a Raspberry Pi connected to a WiFi network.

The USB LED strip controller in question is the AllPixel, a small board that controls NeoPixels, WS2801, LDP8806, and a bunch of other LED strip controllers over USB. The Stick used for this project consisted of two meters of LPD8806 LEDs, giving 96 pixels of horizontal resolution. A big battery and Raspberry Pi rounds out the rest of the electronics.

Building a LED POV display isn’t that much different from building a LED matrix display; all you have to do is break up the image into individual columns and display them sequentially. To do this, the Maniacal Labs folks whipped up a LEDPOV class that does just that. To get the images, just open the shutter on a camera, wave the stick around, and if you get it right, you’ll have a great pixely image of nyan cat or the rainbow wrencher.