Review: Printrbot Assembled Simple Metal

Hackaday is getting back into the swing of doing reviews, and with that comes reviews of the tool du jour, 3D printers. I have some reservations about reviewing a 3D printer; they’re a new technology, and what may be standard today could be hopelessly outdated in a few months time. Remember geared extruders? The new hotness is, apparently, direct drive extruders.

This is a review of the Printrbot Assembled Simple Metal. If you need any evidence that reviews of 3D printers have a shelf life, you only need to look at the Getting Started guides for this printer. When I bought my Simple Metal, the Printrbot recommended software stack was Slic3r and Repetier-Host. Barely three months later, Cura is now the Printrbot recommended software stack. If you think a simple change in software is inconsequential, check out these prints:

prusa parts
Prusa i3 X-carriages. Left sliced by Slic3r, right sliced by Cura

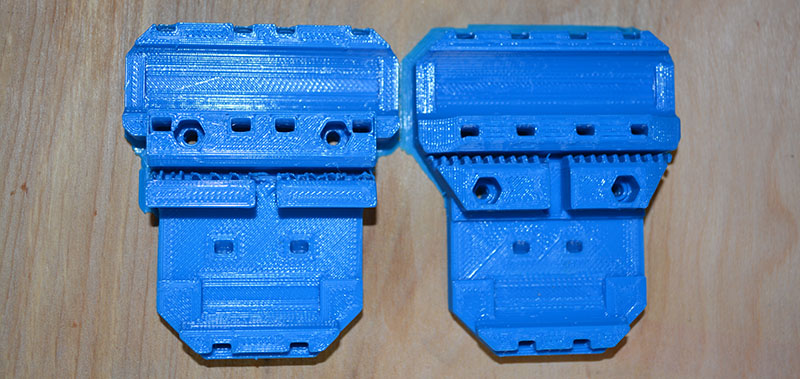
The print on the left was sliced with Slic3r. The print on the right was sliced with Cura. Notice the small teeth that grip the timing belt on each of these prints. With the Cura-sliced print, everything is fine. The Slic3r-sliced print is a complete failure, not of the machine, but the recommended software for the machine.

Therefore, if the goal of writing a review is to have a definitive opinion of a piece of equipment, a number of questions must be addressed. Since most 3D printing software is open source, should software be included in the review? Is the value proposition of a 3D printer simply a function of price to build volume (this seems to be the standard metric now), or are there intangibles? Should the review cover the quality of prints out of the box, or should the review only focus on print quality after dozens of hours of tweaking? I simply don’t know the answers to these questions, and I suspect you couldn’t get any two people to agree on the answers to these questions.

With that said, I feel I have used this printer enough to make a judgment call as to if this printer was a good buy.

Continue reading “Review: Printrbot Assembled Simple Metal”

1768 LEDs, Because 96 Just Wasn’t Enough

Some people would look at a massive 6’x4′ LED matrix hanging on the wall playing animations and be happy with the outcome. But [Ben] just isn’t one of those people. The original FLED (Fantastic LED thingy) was eight rows of twelve addressable LEDs for a total of 96 pixels. This spring he upped his game and retrofitted the display with 1768 LEDs.

It wasn’t simply an issue of restlessness, the original build suffered from LEDs dying. We actually featured it for that reason as a Fail of the Week.  This is not strictly a hobby project, it’s hanging on the wall in the Supplyframe offices, so pulling it down frequently to fix broken parts is not ideal.

fled-reborn-LED-layout
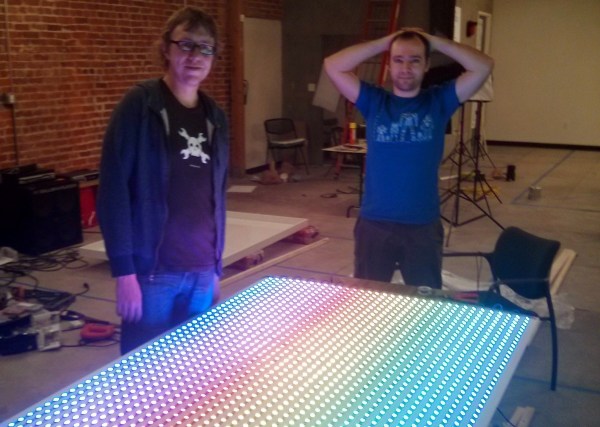
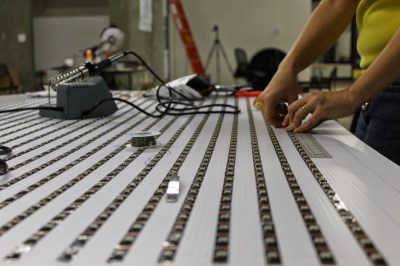
To make FLED more reliable [Ben] sourced strips of the new APA102 LEDs which we looked at back in December. They use an SPI bus instead of the bizarre timing scheme of the WS2812. At first glance you’d think this would mean easier assembly compared to soldering both sides of each of the original 96-pixels. These do come in strips, but laying out 52×34 still means soldering to the ends of each row.

A lot of love went into making sure those rows were laid out perfectly. A sheet of white foamed PVC serves as the substrate. There is grounding braid on either end of the rows, one is the voltage bus, the other is ground. It fits the original enclosure which is acrylic and does a great job of diffusing the light. I’ve seen it in person and it looks pretty much perfect!

It’s not just the physical layout of this many pixels that is a challenge. Pushing the data to all of them is much harder than it was with 96. [Ben] transitioned away from RaspberryPi. He considered using a Teensy 3.1 and ESP8266 but the WiFi of these cheap modules is far too slow to push frame information from a remote box. In the end it’s a BeagleBone Black that drives the reborn display. This is a great choice since there’s plenty of power under the hood and a traditional (and much faster) WiFi dongle can be used.

Don’t miss the animation demos found after the break.

Continue reading “1768 LEDs, Because 96 Just Wasn’t Enough”

Moore’s Law Of Raspberry Pi Clusters

[James J. Guthrie] just published a rather formal announcement that his 4-node Raspberry Pi cluster greatly outperforms a 64-node version. Of course the differentiating factor is the version of the hardware. [James] is using the Raspberry Pi 2 while the larger version used the Model B.

We covered that original build almost three years ago. It’s a cluster called the Iridris Pi supercomputer. The difference is a 700 MHz single core versus the 900 Mhz quad-core with double-the ram. This let [James] benchmark his four-node-wonder at 3.048 gigaflops. You’re a bit fuzzy about what a gigaflops is exactly? So were we… it’s a billion floating point operations per second… which doesn’t matter to your human brain. It’s a ruler with which you can take one type of measurement. This is triple the performance at 1/16th the number of nodes. The cost difference is staggering with the Iridris ringing in at around £2500 and the light-weight 4-node built at just £120. That’s more than an order of magnitude.

Look, there’s nothing fancy to see in [James’] project announcement. Yet. But it seems somewhat monumental to stand back and think that a $35 computer aimed at education is being used to build clusters for crunching Ph.D. level research projects.

Making Funhouse Mirror Lenses

[Robb] has had a little experience making lenses from scratch. His first attempt was for a DIY projector, and while the lens was a little blurry, it did work rather well for something carved out of a block of acrylic. Now he’s taking his experiments with lenses even further with DIY optics that turn everything into a funhouse mirror.

There were two techniques tested while making these lenses. The first was the old standby, CNC milling. A piece of acrylic was put in a CNC and carved with a 1/2″ ball mill. The second technique was 3D printing on a very fancy and very expensive Objet Connex 500. Neither of these methods produce a ready to use lens; to get a finished lens out of the machined or printed objects, [Robb] had to wet sand with 240, 320, 400, 600, 1000, 1500, and 2000 grit sandpaper. After a few hours worth of sanding, the parts were polished with a scratch remover.

Making a lens like this isn’t really that novel – it’s basically the same way lenses have been made for 500 years. The real trick here is making funhouse mirror style lenses. These lenses were created by raytracing in Rhino and Neon. It’s tricky; the index of refraction for acrylic is a little lower than glass, and the refraction for 3D photoresin is a bit higher than glass.

With those models in hand, it’s a relatively simple matter of making some very cool and very strange lenses.

Play Robotic Bongos Using Your Household Plants

[Kirk Kaiser] isn’t afraid to admit his latest project a bit strange, being a plant-controlled set of robotic bongos. We don’t find it odd at all.  This is the kind of thing we love to see. His project’s origins began a month ago after taking a class at NYC Resistor about creating music from robotic instruments. Inspired to make his own, [Kirk] repurposed a neighbor’s old wooden dish rack to serve as a mount for solenoids that, when triggered, strike a couple of plastic cowbells or bongo drums.

A Raspberry Pi was originally used to interface the solenoids with a computer or MIDI keyboard, but after frying it, he went with a Teensy LC instead and never looked back. Taking advantage of the Teensy’s MIDI features, [Kirk] programmed a specific note to trigger each solenoid. When he realized that the Teensy also had capacitive touch sensors, he decided to get his plants in on the fun in a MaKey MaKey kind of way. Each plant is connected to the Teensy’s touchRead pins by stranded wire; the other end is stripped, covered with copper tape, and placed into the soil. When a plant’s capacitance surpasses a threshold, the respective MIDI note – and solenoid – is triggered. [Kirk] quickly discovered that hard-coding threshold values was not the best idea. Looking for large changes was a better method, as the capacitance was dramatically affected when the plant’s soil dried up. As [Kirk] stood back and admired his work, he realized there was one thing missing – lights! He hooked up an Arduino with a DMX shield and some LEDs that light up whenever a plant is touched.

We do feel a disclaimer is at hand for anyone interested in using this botanical technique: thorny varieties are ill-advised, unless you want to play a prank and make a cactus the only way to turn the bongos off!

Continue reading “Play Robotic Bongos Using Your Household Plants”

Caption CERN Contest Week 11

Week 10 of the Caption CERN Contest is a wrap folks! Our surprised scientist brewed up a ton of great captions from our great Hackaday.io community. We may never know what exactly is in that keg/carboy, or what the heck is draining into that bucket. Still, it’s probably safe to say that no one has put this much thought into those particular items since this scientist performed his research.

The Funnies:

  • “After many decades of hard work, Dr. Milton and his research was moved down into basement after he complained one too many times about his missing stapler.” – [joe_pumpernickle]
  • “Parker! Get down here! Ever since that radioactive spider bit you, you’ve crawling up the walls!”-[DainBramage]
  • “It rubs the dielectric grease on its relay contacts or else it gets the hose again” -Team effort from [MechaTweak] and [Nick Sayer]

The winner for this week is [airbuckles] with “Meet Dooglas, experimenting with beer brewing, CERN style. Shown here controlling the critical HOP collider.” [airbuckles] won’t need any buckles for his new Robot T-Shirt From The Hackaday Store!

Week 11: A double-header!

cern-11-smWe’ve got something a bit different for week 11: Two images from CERN’s archives! Both of these images feature a lovely PDP-11 from Digital Equipment in Galway, Ireland. They also feature two CERN researchers. The scientist on the left is wearing typical hacker attire – sneakers, jeans, and a comfy shirt. The hacker on the right went for something which we’re guessing was a bit more stylish back in 1982, but hasn’t quite held up to the test of time.

These scientists must have been doing some heavy-duty number crunching to need a PDP-11. Do you know what that strange hand wired rack of equipment is in the center? Do you have any idea where we can find a pair of harem pants like the woman on the left? Write a caption and let us know!

Add your humorous caption as a comment to this project log. Make sure you’re commenting on the project log, not on the project itself. As always, if you actually have information about the image or the people in it, let CERN know on the  original left CERN image, and original right CERN image.

Good Luck!

The Possibility Of Driving 16,000 RGB LEDs

Like just about everyone we know, [Luis] decided a gigantic RGB LED matrix would be a cool thing to build. Gigantic LED matrices are very hard to build, though: not only do you have to deal with large power requirements and the inevitable problems of overheating, you also need to drive a boat load of LEDs. This is not easy.

[Luis] found a solution to the problem of driving these LEDs with a new, fancy ARM Cortex M4 microcontroller. All Cortex M4 ARMs have DMA, making automatic memory transfers to peripherals and LED strips a breeze.

The microcontroler [Luis] is using only supports 1024 transfers per transfer set, equating to a maximum of 14 LEDs per transfer. This problem can be fixed by using the ping-pong mode in the DMA controller by switching between data structures for every DMA request. Basically, he’s extending the number of LEDs is just switching between two regions of memory and setting up the DMA transfer.

The result is much better than [Luis]’ original circuit that was just a bunch of SPI lines. It also looks really good, judging by the video below. It’s not quite a gigantic LED matrix yet, but if you want to see what that would look like, check out the huge 6 by 4 foot matrix hanging in the Hackaday overlord office.

Continue reading “The Possibility Of Driving 16,000 RGB LEDs”