Simple Wave Generation In Python (and SciPy)

[153Armstrong] did a short post on how easy it is to generate waveforms using Python. We agree it is simple, but actually, it isn’t so much Python per se, it is some pretty cool libraries (SciPy, in particular) that do all the hard work. That may be splitting hairs, but it is worth nothing that SciPy (pronounced “Sigh Pie”) also does other handy tricks like Fourier transforms, too. You can see a video of his results, below.

The code is simple and one of the commenters pointed out an even more efficient way to write the data to a WAV file. The basic idea is to create an array of samples in a buffer using some features of SciPy’s NumPy component.

Continue reading “Simple Wave Generation In Python (and SciPy)”

Ambitious ATtiny85 Board Tests A Beginner’s Skills

[Chris O’Riley] has been playing around with Arduinos for around a year, and decided he wanted a breadboardable ATtiny85 in order to prototype using the actual controller that would be used in the final project. He wants to use it to interface with a Bosch BMP280 pressure sensor, but for now it stands alone.

It’s a simple board with the Tiny85, 3.3 V and 5 V regulators, a power LED, as well as the usual resistors and caps [Ed: not resistor sand caps]. The double-sided PCB [Chris] milled himself — he’s an illustrator and photographer by day, so it’s no surprise the board turned out gorgeous. He designed the board in Illustrator after taking a stab at Eagle, then ran it through his CNC to mill the circuits using a .017 inch end mill as well as drilling the vias. He add solder paste using the tip of a knife, but after messing around with an iron, he ended up investing in a hot air rework station.

We love our Tiny85s here on Hackaday. Check out the ATtiny85 gaming console, the NTSC-generating ATTiny85, and making DIY I2C devices with the chip.

Oscilloscope Mod For The Blues

Roughly 8% of males and 0.6% of females are red-green color blind, and yet many common oscilloscopes use yellow and green for the traces for their two-channel readouts. Since [Roberto Barrios] is afflicted by deuteranopia, a specific form of red-green colorblindness that makes differentiating between yellow and green hard, if not impossible, he got to work hacking his Agilent oscilloscope to make it more colorblind friendly.

Starting with a tip from [Mike] from the EEVblog forums, [Roberto Barrios] set out to rewire the LCD interface and swap the red and green signals. That way yellow will turn bluish (red component replaced by blue) and it could be seen as “very different now” from the green trace on the readouts. Sounds simple right? Well, slight issue: the 0.5 mm pitch of the connector. He did not want to design a PCB and wait a few weeks to receive it, so he decided on using 0.1 mm wires held together with Kapton tape to route each signal individually from one connector to the other. After an hour under the microscope, it was done. And boy, his work is impressive, go check it out.

Voila! It worked splendidly. Now [Roberto Barrios] can use his scope. And, the stock UI is mostly grey or white, so swapping the red and blue channels did not change much the appearance of the interface. Moreover, the switch had a small unintentional bonus, the loading screen is much cooler now with an edgy red sky. Further, [Roberto Barrios] “would not be [himself] if [he] could resist changing the CH1 button backlight LED to blue, to match the new trace color. So, no [he] couldn’t.”

This was a well done and very functional oscilloscope mod, but if you need more frivolity in your life, fear not: we’ve got your back with real-time Quake played on an oscilloscope.

Hackaday Prize Entry: Messing Around With New Vacuum Tubes

Vacuum tubes have been around for ages, and for better or worse, they have their advocates for use in amplifiers and preamps. However, tubes are simply inconvenient devices. Even a 12AX7 preamp tube is huge relative to a handful of transistors, tubes require weird voltages, and each and every one of them is a through-hole device that doesn’t lend itself to machine assembly.

This changed recently with the introduction a strange new tube from Japan. Noritake and Korg recently introduced a triode that uses the same packaging as VFD displays. The Korg Nutube is a vacuum tube that operates at lower voltages, is smaller than the usual preamp tubes, and still has the vacuum tube sound.

For his Hackaday Prize entry, [Kodera] is building a headphone amp with this new tube. Is a tube-based headphone amp particularly novel? No. But this is the first we’ve seen anyone playing around with this new, interesting piece of technology.

The requirements for this Nutube are simple enough, and the minimum anode voltage of this tube is just 8 V. [Kodera]’s circuit is running the tube at 12 V, and the only other circuitry in this preamp are a few coupling caps and an op-amp just before the power stage.

[Kodera] has crammed this circuit into a proper amplifier using a 2 x 15 W class-D chip from TI. It’s really a phenomenally simple circuit that’s also remarkably tiny. These kits are actually available on Tindie. Time will tell if the Nutube is picked up by some big-time manufacturers, but we’re happy to see someone is playing around with the latest advances in tube amp technology.

MEMS: The Biggest Word In Small

What’s tiny and on track to be worth $22 billion dollars by 2018? MEMS (Micro Electrical Mechanical Systems). That’s a catch-all phrase for microscopic devices that have moving parts. Usually, the component sizes range from 0.1 mm to 0.001 mm, which is tiny, indeed. There are some researchers working with even smaller components, sometimes referenced as NEMS (Nano Electrical Mechanical Systems).

Resonant Cantilever by [Pcflet01], CC BY-SA 3.0
MEMS have a wide range of applications including ink jet printers, accelerometers, gyroscopes, microphones, pressure sensors, displays, and more. Many of the sensors in a typical cell phone would not be possible without MEMS. There are many ways that MEMS devices are built, but just to get a flavor, consider the cantilever (see right), one of the most common MEMS constructions.

Continue reading “MEMS: The Biggest Word In Small”

A Switched Game Boy Advance SP

After Nintendo’s wild success with the Wii U, Nintendo released it’s Nintendo Switch. The switch functions primarily as a home console, stagnantly connected to a display. However, Nintendo switched things up a bit: the Switch can be removed from its dock for standalone tablet-like use. But there’s a slight problem: when the Switch is in portable mode, it leaves behind a bleak and black box. What’s one to do? Worry not: [Alexander Blake] is here to save the day with a Game Boy Advance SP and an X-Acto knife.

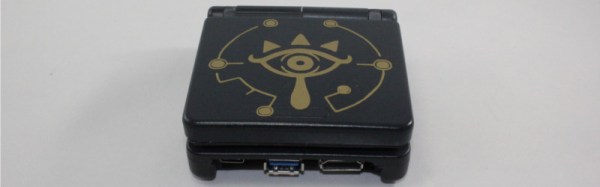
After casually noting that the main control board of the Switch was roughly Game Boy Advance SP sized, [Alexander Blake], aka [cptnalex], knew it was meant to be. After retrieving his broken Game Boy Advance SP from his closet, [cptnalex] set to work turning his Game Boy into a Nintendo Switch dock. When he was done, the results were stunning, especially considering the fact that this is his first console mod. Moreover, the very fact that he did it all with an X-Acto knife rather than a Dremel is astounding.

With the screen providing support to the Switch, [cptnalex’s] design leaves some to be desired for long term use. But we know for sure that [cptnalex’s] design does, in fact, work. Due to naysayers of the internetTM, [cptnalex] filmed a video of his dock in uses (embedded after the break). But, what the design lacks in structural stability, it more than makes up for in aesthetics. On the device itself, [cptnalex’s] history with controller painting shines through.

If you want to see more of [cptnalex’s] work, you can follow him on Instagram. For more console mods that will take your breath away, look no farther than [Bungle’s] vacuum formed portable N64.

Continue reading “A Switched Game Boy Advance SP”

Hacking An Inspection Microscope

Sometimes I need to be able to take photographs of very small things, and the so-called macro mode on my point-and-shoot camera just won’t cut it. And it never hurts to have an inspection scope on hand for tiny soldering jobs, either, though I prefer a simple jeweler’s loupe in one eye for most tasks. So I sent just over $40 off to my close friend Alibaba, and a few weeks later was the proud owner of a halfway usable inspection scope that records stills or video to an SD card.

Unfortunately, it’s only halfway useable because of chintzy interface design and a wobbly mount. So I spent an afternoon, took the microscope apart, and got it under microcontroller control, complete with WiFi and a scripting language. Much better! Now I can make microscope time-lapses, but much more importantly I can take blur-free photos without touching the wiggly rig. It was a fun hack, so I thought I’d share. Read on!

Continue reading “Hacking An Inspection Microscope”