When is a hot glue stick not a hot glue stick? When it’s PLA, of course! A glue gun that dispenses molten PLA instead of hot glue turned out to be a handy tool for joining 3D-printed objects together, once I had figured out how to print my own “glue” sticks out of PLA. The result is a bit like a plus-sized 3D-printing pen, but much simpler and capable of much heavier extrusion. But it wasn’t quite as simple as shoving scrap PLA into a hot glue gun and mashing the trigger; a few glitches needed to be ironed out.
Why Use a Glue Gun for PLA?
 Some solutions come from no more than looking at two dissimilar things while in the right mindset, and realizing they can be mashed together. In this case I had recently segmented a large, hollow, 3D model into smaller 3D-printer-sized pieces and printed them all out, but found myself with a problem. I now had a large number of curved, thin-walled pieces that needed to be connected flush with one another. These were essentially butt joints on all sides — the weakest kind of joint — offering very little surface for gluing. On top of it all, the curved surfaces meant clamping was impractical, and any movement of the pieces while gluing would result in other pieces not lining up.
An advantage was that only the outside of my hollow model was a presentation surface; the inside could be ugly. A hot glue gun is worth considering for a job like this. The idea would be to hold two pieces with the presentation sides lined up properly with each other, then anchor the seams together by applying melted glue on the inside (non-presentation) side of the joint. Let the hot glue cool and harden, and repeat. It’s a workable process, but I felt that hot glue just wasn’t the right thing to use in this case. Hot glue can be slow to cool completely, and will always have a bit of flexibility to it. I wanted to work fast, and I wanted the joints to be hard and stiff. What I really wanted was melted PLA instead of glue, but I had no way to do it. Friction welding the 3D-printed pieces was a possibility but I doubted how maneuverable my rotary tool would be in awkward orientations. I was considering ordering a 3D-printing pen to use as a small PLA spot welder when I laid eyes on my cheap desktop glue gun.
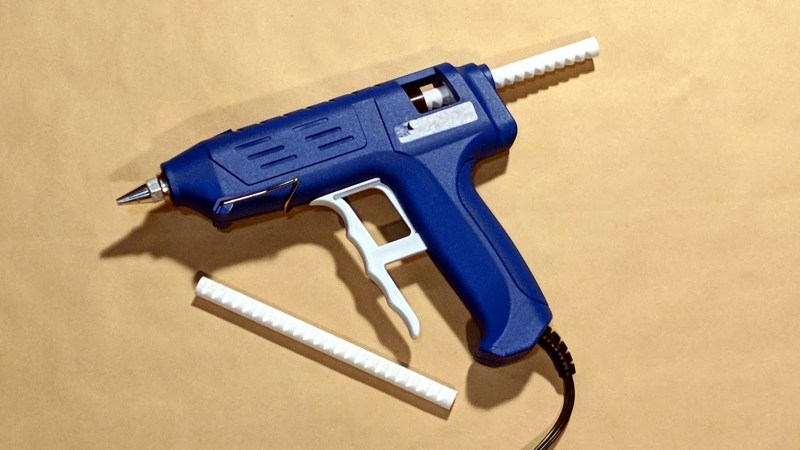
A glue gun had everything I needed: good ergonomics, good tip visibility and tactical tactile feedback, and simple mechanical operation. If it could be made to extrude melted PLA instead of hot glue, it would be the ideal tool for the job. After some initial tests and a discussion with colleagues, it was clear that trying to make this happen was worth possibly wrecking a cheap glue gun.
Will a Glue Gun Melt PLA?
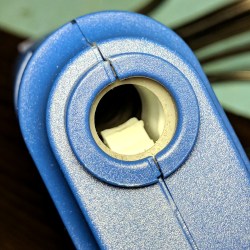
According to the RepRap Wiki entry for PLA, it softens around 60 °C to 65 °C and melts around 180 °C to 220 °C. Will a glue gun do the job? To find the answer to this question, I manually pushed a bundle of scrap PLA filament through a small desktop glue gun that I didn’t mind ruining. The glue gun was a hobby unit made for lower-temperature glue sticks. The small hobby unit eventually melted the PLA but only barely; the PLA came out more like softened putty. Based on this teardown of a cheap hobby glue gun the operating temperature is expected to be around 150 °C, which isn’t enough to really melt PLA properly.
Another thing that became clear during this process was that the glue gun had special needs for extrusion and feeding. To feed properly, the trigger mechanism needed to be able to grip and push on a solid cylinder, not a bundle of filaments. In addition, proper extrusion required a solid shape that filled the opening of the melting chamber completely to prevent backflow. Otherwise, molten plastic prefers to spill out the back instead of being forced through the nozzle. In other words, I needed:
- A higher-temperature glue gun, and
- A “glue stick” of the correct size and shape made from PLA instead of hot glue
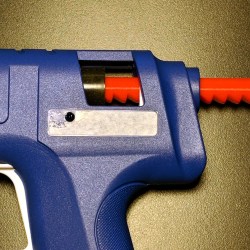
After a bit of research, I purchased an economical high-temperature glue gun that claimed 80 W and an operating temperature of up to 208 °C.
Testing PLA “Glue Sticks”
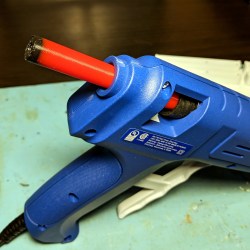
To feed my new glue gun I needed a cylinder 11 mm in diameter and at least 5 in long. Happily, 3D printers exist for the sole purpose of turning 1.75 mm filament into other shapes and sizes. It felt a little strange to use a 3D printer simply to turn 1.75 mm diameter plastic into 11 mm diameter plastic, but in about an hour I had printed a high (75%) infill 11 mm x 150 mm cylinder of PLA for testing.
That first stick of PLA was enough to show that the 80 W glue gun was able to melt and extrude PLA acceptably; the only hitch was a ten to fifteen minute warmup in my cool workshop, compared to only five minutes or less for hot glue.
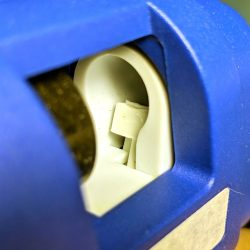
However, a problem was revealed. The feed mechanism for the glue gun has a small levered arm that bites into a glue stick and pushes it forward when the trigger is pulled. However, the PLA “glue stick” was smooth and hard, and the feed system could not properly bite into it. In fact, the ridged surface of the PLA cylinder quickly wore away the teeth in the little arm as it tried in vain to find something to grab onto.
Feeding Problem Solved by Adding Notches to the PLA Sticks
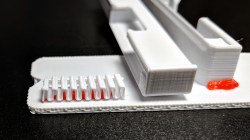
The solution was a small change to the 3D model for the glue stick. Adding a series of angled notches to the cylinder model allowed the raised arm to latch and push perfectly.
Testing The Bonds
With an 80 W glue gun doing the melting, and the notches in the cylinder of PLA allowing the feed system do its job when the trigger was pulled, molten PLA flowed easily and with excellent control. I performed some simple tests:
- Using PLA like glue by depositing a molten blob, then mashing a part down on top of it. Results were good, but the PLA blob adds some bulk because it doesn’t smear out fully before it starts to cool and harden.
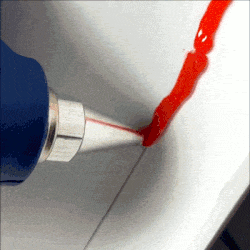
- Joining seams: the molten PLA melts only slightly to the surface being joined, but still ends up surprisingly strong. I was able to pull the seam apart but in the process always broke one or the other of the surfaces, or broke the seam itself in two (leaving the remains stuck to the parts I had joined).
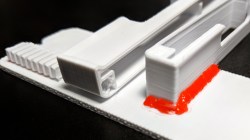

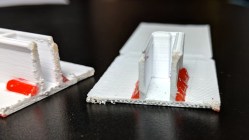
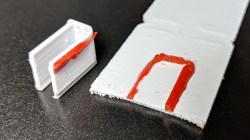
Is There Really Any Welding Happening?
A true weld results when the material of the joint and both pieces meld together to become one. That clearly isn’t the case. There is some melting together happening, but it’s superficial at best. Nevertheless, the result easily passes a “tug test”. The cut-away test joint shows the red PLA has flowed into and filled every nook and cranny, which probably accounts for most of the strength.
Lessons Learned
- A small hobby glue gun reliably softened but did not melt PLA. A glue gun made for higher-temperature hot glue melted PLA acceptably.
- The test glue gun was an economical dual-heater 80 W unit that did the job, but takes a good ten minutes or more to warm up and melt the plastic filling the chamber (compared to five minutes or less for hot glue.)
- Aside from heat, the biggest issue keeping PLA from being used in a glue gun is that glue gun feed mechanisms are not made to grip and push on smooth, hard PLA. They expect a much softer hot glue stick. The test gun functioned well with PLA sticks that had notches in the side, but this will vary depending on the design of the specific glue gun being used.
- The STL file for my simple notched glue stick is available on GitHub. It may or may not be compatible with other glue gun feed systems.
- It’s not much of a weld since it’s superficial only, but it still takes more than casual effort to pull pieces apart.
- Experimenting is fun.
Does The PLA Glue Gun Do the Job?
My large multi-piece 3D print was a big hollow object with thin pieces fitting together like a jigsaw puzzle, and using the PLA glue gun to quickly and efficiently stick those 3D-printed pieces together with no need for clamping was better than expected.
For situations where a PLA glue gun may not do the job, check out this method to ease printing and assembly of multi-part models with a bit of help from OpenSCAD. But for my big hollow model, manually aligning the surfaces and bonding the inside seams was quick, easy, sturdy, and absolutely worth repurposing a $30 glue gun and giving it a place in the tool drawer.


3D printing is the bitcoin of CNC world.
…is the LED strips of the electronics world…
The thing with 3D printing is that most people only see the crappy home made repraps and think the trinkets they produce is what to expect. The world of additive manufacturing is a lot more than that, whole industries depend on it (the classic example being hearing aid manufacturing). There’s the dental applications, medicine from representative models of bones, to printed joints and cell farms. Speaking of CNC, turbine blades are seeing higher success rates being printed rather than milled in some cases. Etc etc, my fever riddled brain can’t quite keep a coherent thought going for very long so I’m stopping there, but you get the idea.
100% agree with the whole turbine thing. The time and material savings you get from printing mostly complete and then milling to finish is insane.
That’d be true if it didn’t actually produce results. As it is: Its a great prototyping tool and I’ve made quite a few production components with my 3D printer.
Versus Bitcoin: Which is largely just generating heat for a Ponzi scheme.
Didn’t start out as a ponzi scheme, originally we/I hoped it would indeed be a new coinage.
And frankly I’m deeply disappointing that instead of fixing what happened the bitcoin people ran with it and not only destroyed bitcoin as a currency but probably all crypto currencies.
It was never going to be anything more than just another fiat currency, even if it could be considered a currency.
Even in its original form, it had more in common with penny stocks. It a solution looking for a problem.
Would be cool to make a 2-piece mold of the notched stick, then put scrap PLA into it & heat it up to make the sticks. This would result in recycling scrap pieces into a usable item.Jim
Excellent idea! If this mold were made from porcelain or high temp plastic…maybe silicone…one could simply use the microwave a recycle all scrap material into usable sticks. Good thinking.
***EDIT*** was supposed to be “and” recycle all scrap, not “a” recycle all scrap. ***EDIT***
Or metal. Like an iron or maybe even a brass mold should work fine. I’ve done jewelry and we’d use these molds https://www.etsystudio.com/listing/491343526/two-piece-reversible-wire-plate to cast thin ingots.
“Arthurist”
I looked at your referenced “two piece, reversible, wire & ingot mold”, on Etsy. What a great mold idea. A “modified” version of this mold would be ideal for making the PLA glue sticks. I would think, once you had the mold, it would be considerably faster than 3D printing each PLA glue stick.
Here’s a possible different approach. Would it be easy to first melt PLA scraps, then pour the melted PLA into a two piece mold? Also, would it be possible to melt PLA in a wax injection machine, and then inject the melted PLA into a two piece mold? I’m guessing, that wouldn’t be much different than making multiple wax patterns, in silicone molds, with the same wax injection machine. Although, not sure whether the PLA might damage the machine.
When using this “Etsy” two piece, reversible mold, for the purpose it was designed, how difficult is it pour the molten metal into this mold? I would think it might be difficult, without making a real mess. Is there, by chance, a video showing this mold being used to make small metal ingots, or wire? If so, I would really like to watch it.
Overall, your “two piece” mold idea, is great!
Jim Dasher
Spectrum Graphics
Edmonds, WA
(Seattle metro)
E.: rii.jed@gmail.com
I think PLA is too viscous to just pour; it probably has to be rammed with moderate force into a preheated mold
For what its worth, ive made multiple molds out of pla (believe it or not) and petg for a professional fisherman that uses them to make his own lures out of old broken one and out of some kind of plastic rubber he buys in pellets and melts down and injects it into them. Hes had really good success using the molds ive lrinted for him.
note: I accidentally clicked Report instead of Reply. Mods, please don’t remove the parent post.
Anyway, just to add my 0.2c:
When my hot glue gun had used up most of the glue stick, I wrapped a regular graphite pencil with electrical tape and inserted the pencil in the gun, so it pushed the remaining glue inside. No printed sticks necessary :D
I just use a new glue stick. I would not want to insert electrical tape (soft PVC) into my glue gun. It could melt and either stick there or lose it’s softeners and become brittle at re solidifying.
2-part silicone will do the trick. Safe up to something around 300 °C, far above PLA mt. Does PLA melt in a microwave? I’d be concerned about thermal degradation though, as the temperature will be totally uneven in a microwave.
Interesting, but I think regular hot glue would still be superior. The “softness” helps in keeping parts from breaking apart.
Maybe hot melt is stickier but I’ve found in the past it’s easier to peel glues off when they’re more or less flexible than the attached material. I’d go hot-glue for flexible stuff, epoxy for hard stuff. Also it takes more surface prep to bond dissimilar materials well.
Ever since I switched to Steinel hot glue I don’t have this problem / handy feature of hot glue being detachable anymore. That stuff in the extra sticky version (I think Bosch sells the same stuff for their cordless glue guns) will never come of anything (except glass and cold surfaces) ever again. Especially not from PLA.
yep – I use bosch glue sticks with the bosch 200W hot glue gun, and what you are attaching to will break first…
Rubbing alcohol breaks the bond of hot glue. Dribble some on (91% works better than 70%) the glue so it runs along where the glue is stuck to the surface. Peels right off. The alcohol also works to get hot glue out of fabric. Apply the alcohol then rub the glue. It’ll ball up and come out of the fabric.
I got my MP 3d printing pen for $15, has heat & flow control, and I don’t have to make sticks. If you plan ahead, you can leave a little void in each piece that accepts the nozzle and allows you to inject the PLA between the parts. I’ve welded some parts together that are like one piece afterward.
Leaving a void to fill up with molten PLA is a very cool idea. Have you written any of that up? (tips@hackaday.com)
I mentioned elsewhere that it might be possible to drag the glue gun tip along the joint to make a void after printing and, this will heat up the surfaces to be joined before hitting them with the melted pla. Just an idea i am going to try. This might make for more of a weld.
I found this worked well with PVC conduit that I was gluing together but was initially too smooth for the hot glue to sufficiently adhere to. My Bosch glue gun nozzle is certainly hot enough to melt plastic it comes into contact with. Let us know how it goes for you with PLA.
I never have thought enough ahead to do it, so I bevel each piece with the dremel making a “V” to accept the bead.
https://imgur.com/a/py2py
I keep thinking about buying a 3D print pen for repairs, but even though I see people say it works I still fear their statements might be fueled by enthusiasm and optimism.
I also want to try friction welding but have yet to find plastic rods locally that I can try it with. I need something ABS that is not too expensive to give it a try, but where do I find such rods?
I’ve tried it, and found the results to be rather poor. Maybe I didn’t work at it long enough, but I never achieved anything better than a surface bond.
If you are using abs, why not make a slurry with acetone? (Or just use a light coat of acetone?)
Can you use a heat gun to heat up the target surface enough so that it is melty and run your PLA glue gun over that?
I’m either seeing a starter step where you flash the area about to be glued with a heat gun to make it surface molten, then use the PLA glue gun, or you attach a well insulated metal hose to blow the hot air from a heat gun onto the surface (similar to the way welding equipment might blow shield gasses over an area being welded) so that the PLA is being put onto a surface that is already slightly molten.
I did hit some PLA prints with a heat gun out of curiosity once, but it always deformed the print badly because the PLA softens waaayyyy before it actually melts. Maybe if the hot air were hotter and more focused?
Because it’s not using a 3D printer and that train of thought simply wont do…..
Nice! I like that I can use a tool I already have instead of getting a new hand-held 3D printing pen.
What I’ve been doing is plastic welding my 3D prints just like they do for repairing car bumpers except I’m using printer filament and an hot-air SMD soldering pencil instead of a dedicated plastic-welding gun. My joints also look smoother and I think stronger because the filament and the target pieces all get heated. It does require two hands unlike the glue gun.
They have their uses but PLA solvents can be pretty nasty, can spread out to where you don’t want it, and don’t work as well when you try to join thin pieces edge-to-edge.
Maybe it would help to dissolve some (scrap) PLA in a quantity of THF to make it more viscous and sticky? But this gets now similar to commercial PVC cement. :-)
Nah, the solvents required to melt PLA enough to bond together are super low viscosity and a pain in the ass to control. They’re also really really toxic.
I saw Bill Doran (Punished Props) trying a 3d printer pen as a welder but the his results weren’t strong enough. He ended up super gluing the bits and then using the pen for weld line aesthetics. I wonder if your thicker PLA stick carries more heat with its additional mass, that could be improving the bond vs a regular printer pen.
I would think that keeping the diameter at 1.75 or 3mm would cut down on the thermal mass and allow the temp to go higher, faster.
But as often as the nozzle of my hot end clogs I wonder how long this would last.
Good article. I think with just a bit more tweaking and prep, this could be really very useful indeed. When I get home, I am going to measure the temp of my hot glue gun. Thanks.
Also, I am going to try slowly dragging the glue gun tip across the joint to heat it up, possibly an inch or so, then hit it with the melted glue just to see if that helps get an actual “weld”.
I never really came up with a good way to measure how much the glue gun was able to heat the PLA. Taking temperature at the tip with a non-contact thermometer was unreliable. If you have a good solution, let us know!
I have a digital thermometer with a remote thermal probe I should be able to use on the tip. If the tip gets anywhere near 200-210 C it might work to melt a small channel to be filled with the melted pla. I bought a decent glue gun a year or so ago but it may not be the type that gets hot enough for this. I’ll see what I can do.
I have one of those thermal imagers for cell phone, and while scoping out my laptop I found that metal surfaces don’t transmit infrared properly, instead just reflect whatever is above them. They all read as room temperature. Putting tape on the hot surfaces made them readable. You’ll probably need a similar indirect trick to read the metal glue gun tip.
For ABS I’d definitely use a solvent but solvents for PLA are not as easy to find.
(My go-to glues for prints are either E-6000 or IPS-16 but neither is a solvent for PLA.)
Tetrahydrofuran is supposed to work on PLA. Can be found in some primer/cleaners for PVC pipe, but there are some THF free versions.
Did you have a link to the gun you used so that the printer grooves will match up? Great idea btw. I use glue guns for this all the time but a little more heat could make a difference
The one in the header image for the article is an 80W High Temperature “Surebonder” I bought from Amazon. I saw a lot of glue guns of similar design with different names, and just picked one.
BTW ever since this entry about a repair for the trigger arm in a glue gun ( https://hackaday.com/2018/01/30/repairs-you-can-print-broken-glue-gun-triggers-replacement/ ) I suspect that the same lever-arm arrangement is probably actually quite common for glue guns.
PLA is surprisingly chemically inert stuff, so much that it’s kind of a pain to glue securely because you only get surface bonds.
The only reasonably common solvents that will readily dissolve PLA are Chloroform and Toluene, neither of which compare favorably in ease/safety to ~200°C heat.
I haven’t personally, from what I’ve read and my understanding of the chemistry it should work fine, with the caveat that DCM isn’t the best thing health-wise, and is inconvenient to protect against because both Latex and Nitrile are soluble.
I did try a nominally-DCM-bearing pipe cement with some PLA samples and the bonds were very weak, but I believe the particular glue was really mostly Cyclohexanone.
I would imagine hot glue used as a place holder, just a drop/blob to hold the pieces together and then CA glue (and baking soda) to set the pieces in place after which you can remove the hot glue if you want. I guess another way to put my thinking is spot weld with hot glue and then weld with CA glue. If you are dead set on welding with PLA and a rotary tool, why not use an extension that allows you to hold the tip like a pen?
As Punished Props was mentioned, they did a video with 3d Printing Nerd related to different ways to adhere two prints together. Superglue(CA glue) turned out to be about the best if not the best way to stick two prints together for strength.
That is a great video indeed. I love super glue and after learning the baking soda trick have had even more love for it. That being said I also love hot glue and this idea totally ticks all the right boxes with myself but I think you are right, that super glue is still the best way to connect two plastic prints at least in my experience.
Have you tried getting different hot melt adhesives? The standard (mostly wax) hot melt is pretty useless but there are a lot of glues of varying stiffness, strength and intended substrate that work incredibly well. 3M has a whole line, but just google and find what you need:
https://www.3m.com/3M/en_US/company-us/all-3m-products/~/All-3M-Products/Adhesives-Tapes/Industrial-Adhesives-and-Tapes/Non-Structural-Adhesives/Hot-Melt-Adhesives/?N=5002385+8710676+8710815+8710968+8711017+8716336+3294857497&rt=r3
Just don’t get it on the skin, you can’t get the molten blobs off!
should have added, the pla through a glue gun is a neat trick, I’ll keep that one in my back pocket.
Whoa. As usual, a visit to 3M shows how much wider the adhesives world is beyond what one sees on the shelf at the hardware store!
How about pre-heating the joint with the tip of the too-cold-for-PLA hot glue gun? Safer than using a soldering iron.
Also, perhaps after using the PLA glue gun to weld the pieces together, put down a layer of low-temp hot glue on top of the more critical PLA welds. At that point speed wouldn’t be an issue.
That’s true. In fact the process I settled on when assembling my pieces was to anchor one corner while being very careful to align it first. Then with that corner anchored (it didn’t take long because the PLA cools and hardens fast) do the opposite corner and work my way around. It was a little like hand soldering fine-pitch SMT parts. The fast cooling of the PLA really shines here. It’s hard to overstate just how much faster and easier the whole process becomes as a result.
Once the piece was spot-anchored at the corners, I simply ran a PLA bead down the seams on the inside but could have used something else. I liked how this meant the presentation side of the seams didn’t have glue or anything in them mucking them up & making filling and sanding harder, and again it was very fast to do.
Like you say, once the corners are anchored you could use anything you like to reinforce and also as you say, speed wouldn’t be an issue any more.
What about printing 1/2 of a stick (lengthwise) and cutting a glue stick in half and then feeding the two together. I’m curious how PLA/glue would set.
FWIW, if you are creating the model, rabbeting the edges with the occasional ‘rivet hole’, melting plastic rivets in the holes, then smoothing the seam with a soldering iron hot knife works *VERY* well. Now that I have some Polymorph, I’m considering using it for /semi/permanent rivets, as it /melts/ at 60C, allowing me to take things apart with only hot water.
I think you mean tactile feedback. Tactical is a different word.
Ew, gross. Good catch, that one totally slipped past us!
I use a soldering iron to weld pla and inova-1800. A wide tip on my Hakko is best. You can use filament as a filler rod.
I’ve had good success using Oatey Multipurpose Cement (CPVC, PVC, ABS). I like even more using welding with a piece of 3mm filament chucked in a Dremel. If I need to hold pieces in place, I use the cement, then finish the joint with the Dremel. The result is very strong – and with a little practice very neat.
you can get a 3d printing pen for 30 bucks on amazon. same thing without having to hack anything. and it uses regular 1.75mm.
Hi,
Nice post on using a printing sticks for Pla glue gun. I got this information from a customer care agency of Iannone3d.com when I contacted him for 3D print service. They said that they are using hot Pla glue gun for their 3D printings. But at that time I didn’t understand about this gun. But after your post, I have got some knowledge on this.
A fun solution, but friction welding, easily done via any normal Dremel is to my mind superior. You can use scraps directly without having to print, and depending on how you do it (3mm filament works great for friction welding) or 2×1.75 pushed together is what I’ve recently been using. If you want to you can push in, before your Dremel chucked up stuff is done, and create some voids, then fill them up. While application is not as fast, it can have some fun effects. Print in say blue and yellow, use clear for your welding, and get a green mixture. I’ve also had luck using dissimilar plastics (ABS and PLA) for this, with no noticeable ill effects in any testing, other than a tendency to go deeper in PLA, if not careful.
It would be interesting to test the glued PLA vs welded PLA.
You know, now that I think about it it’s odd that hardware stores don’t sell plastic sticks of various materials for friction welding.
I mean it’s well established that it works, people going to hardware stores tend to have some sort of drill, and they sell dremels, so why isn’t it an official item yet? Hell, Dremel could sell branded stick and make a profit, but they don’t for some reason. Missed opportunity.
I quickly checked on aliexpress and they sell plastic welding rods, but they are flattish meant to be put down with a hot air nozzle or a soldering iron I guess.
just a “me too”: the only solvent i’ve found for PLA that is available at the hardware store is plumber’s PVC pipe primer. It’s nasty as heck, as runny as water, it discolors the PLA, has a fantastically brief working time, and it’s still not as strong as melting PLA into the joint.
i like the idea of re-purposing a hot melt glue gun. when i need to do something like this, i just ask my printer to extrude a filament in mid-air (like G1 E100 F100), and i rub my pieces on the tip of the nozzle. i guess the glue gun might be able to fit some places the nozzle can’t, though.. and it definitely gives a fatter bead.
To avoid having to print the PLA replacement, I wonder if it would work to just use a bundle of cut lengths of PLA filament. These could be melted together on the back so they move together into the glue gun. Still would need to solve the grip issue, but that could possibly be solved by using a file or blade to notch it manually.
I may need to try this when I get home…
You could also create either a metal or plaster mold of the PLA rod shape, and melt scrap pieces into it, like a terrible version of an injection mold
Glad to see things come around.
I don’t think any of us would have thought way back when we started creating “FDM 3D printers” (SantaClaus machines back then) in the 90s, using hot-melt glue guns and pen plotters, experimenting with all kinds of materials, that >20 years later some guy would use a material specifically designed for a 3D printer in a glue gun.
Yeah, right? I’m just waiting until someone runs out of 3 mm welding rod and 3D prints some out of 1.75 mm printer filament!
(Seriously, I think Donald’s experiments were very cool, and that a PLA tacking tool is probably useful.)
You can even use recycled PLA. https://www.thingiverse.com/thing:2294351
Oh, wow. That’s a neat approach. I like the idea of the stick being hollow so it can be stuffed with scraps. The stick doesn’t have any sort of features to work with the feed system of the glue gun though. That was a major problem in mine; I found that a hard plastic stick just didn’t work well at all. But the idea of a hollow tube is a really interesting one. Thanks for sharing!
Don I’ve been trying to print up the PLA sticks, but they are looking more like modern art, than a stick that can work in my glue gun. Any suggestions?
I’ve been trying to print these, but they look more like “works of art” than workable PLA sticks. Did you have trouble initially?
Not at all, but the printer I used was very well tuned and I used a high (75%) infill.
It’s impossible to say what’s happening to you without a picture or seeing the process, but maybe this general troubleshooting guide can help you: https://www.simplify3d.com/support/print-quality-troubleshooting/
Great! Printed the stick and using it with my 70w hot glue gun for gluing an Iron Helmet. It’s like a 3D pen. It sticks very very good and it fills the gaps. Now I can sand and paint it.
Fill it with TPU and squirt gaskets into existence freehand, into your part!
Dude now that would be awesome. Or possibly even I rings too, who knows.
One could have used plastic welding techniques. Plastic welders and plastic welding rod is even available from Harbor Freight.
Very nice idea, never occurred to me to have a glue gun or a 3d handheld printer for joint work!
We used to ‘glue’ large plastic sheets together for containers where I worked. There are special purpose ‘heat guns’ but this is pretty close.
https://www.google.com/url?sa=i&url=https%3A%2F%2Fwww.youtube.com%2Fwatch%3Fv%3DE-ozLyFHUHQ&psig=AOvVaw2CrVux5Y9VXPUUiAz39QzE&ust=1608327740232000&source=images&cd=vfe&ved=0CA0QjhxqFwoTCNC9wLD91e0CFQAAAAAdAAAAABAF
Can I leave a link? Anyway, the hot air behind the rod pre-melts some of the plastic the rod melts into. This is structural welding.
Maybe do it with a heat gun and small nozzle, weld it together the same way you would metal. Though on a thin piece it would be very difficult.
Could you make the ‘inside’ of the part overlap (make it thicker with a step) to increase the glue area?
I was just thinking about whether or not this would be feasible (I watch my girlfriend use hot glue in everything from sculpture to woodworking). A quick google search led me here. Brilliant. And thanks for the breakdown!
Y’all gave me flash backs of poly pipe welding using a hot plate. I loved everyone’s contributions here!