A Microwave Erector Set

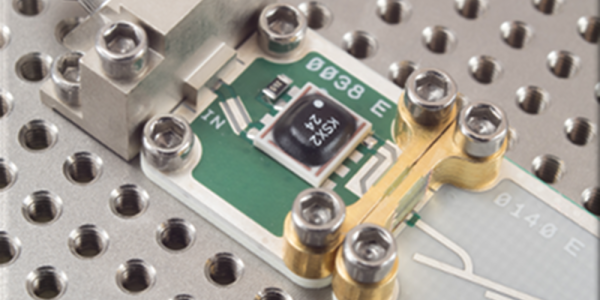
RF design isn’t always easy, especially at higher frequencies. Despite improvements in simulation tools, there’s still no substitute for prototyping and trying out different things. That wasn’t so bad when that meant nailing some nails in a piece of wood and wiring up discrete components. But at today’s microwave frequencies and with today’s IC packaging that simply doesn’t work. Solving this problem is what drives a company called X-Microwave. They have a standard grid pattern PCB for a wide range of RF circuits and accessories to tie them all together. Probably the best way to get a feel for the system is to watch the simple video below. There’s also a free simulator tool worth taking note of that you’ll see in a bit.

Before you get too excited, we’ll warn you that while this stuff is cheap if you need it, it isn’t an impulse buy. The baseboards and probes (the connectors) run from $150 to $300. You can get kits, too, but a bare-bones two-port system is going to start at about $550, which is about $100 off the component parts and includes some extras. Then you need less expensive parts to make the boxes around things if you need them. Oh. Then you also need the PCBs which are not cheap, either. Their prices vary widely as you’d expect, but — for example — we saw amplifiers as low as $80 and as high as nearly $1000. So a complete system could get pretty pricey.

Continue reading “A Microwave Erector Set”

Getting The Lead Out Of Lithium Battery Recycling

When that fateful morning comes that your car no longer roars to life with a quick twist of the key, but rather groans its displeasure at the sad state of your ride’s electrical system, your course is clear: you need a new battery. Whether you do it yourself or – perish the thought – farm out the job to someone else, the end result is the same. You get a spanking new lead-acid battery, and the old one is whisked away to be ground up and turned into a new battery in a nearly perfect closed loop system.

Contrast this to what happens to the battery in your laptop when it finally gives up the ghost. Some of us will pop the pack open, find the likely one bad cell, and either fix the pack or repurpose the good cells. But most dead lithium-based battery packs are dropped in the regular trash, or placed in blue recycling bins with the best of intentions but generally end up in the landfill anyway.

Why the difference between lead and lithium batteries? What about these two seemingly similar technologies dictates why one battery can have 98% of its material recycled, while the other is cheaper to just toss? And what are the implications down the road, when battery packs from electric vehicles start to enter the waste stream in bulk?

Continue reading “Getting The Lead Out Of Lithium Battery Recycling”

Acrylic Stencils Help With Component Placement For SMD Assembly

Surface mount is where the action is in the world of DIY PCBs, and deservedly so. SMDs are so much smaller than through-hole components, and fewer holes to drill make surface-mount PCBs easier to manufacture. Reflow soldering is even a snap now thanks to DIY ovens and solder stencils you can get when you order your boards.

So what’s the point of adding another stencil to the surface-mount process? These component placement stencils are [James Bowman]’s solution for speeding up assembly of boards in production runs too small to justify a pick and place robot. [James] finds that placing small components like discrete resistors and caps easy, but struggles with the placement of the larger components, like QFN packaged microcontrollers. Getting such packages lined up exactly is hard when the leads are underneath, and he found repositioning led to smeared solder paste. His acrylic stencils, which are laser-cut from SVGs derived directly from the Eagle files with a script he provides, sandwich the prepped board and let him just drop the big packages into their holes. The acrylic pops off after placement, leaving the components stuck to the solder paste and ready for their trip to the Easy Bake.

[James] claims it really speeds up hand placement in his biggish runs, and it’s a whole lot cheaper than a dedicated robot. But as slick as we think this idea is, a DIY pick and place is still really sweet.

It’s 1984, And You Can’t Afford A Computer. Never Mind, Have This Pop-Up Paper One Instead!

It’s an oft-derided sentiment from a Certain Type of Older Person, that the Youth of Today don’t know how lucky they are with their technology. Back when they were young they were happy with paper and string! Part of the hilarity comes from their often getting the technology itself wrong, for example chastising the youngsters for their iPods and Game Boys when in reality those long-ago-retired devices are edging into the realm of retrotechnology.

But maybe they have a point after all, because paper and string could be pretty good fun to play with. Take the example presented  in a Twitter thread by [Marcin Wichary]. A pop-up book from 1984 that presents the inner workings of a computer in an astounding level of detail, perhaps it stretches the pop-up card designer’s art to the limit, but along the way it makes a fascinating read for any retrocomputing enthusiast. Aside from the pop-up model of the computer with an insertable floppy disk that brings text onto the screen we see at  first, there is a pop-up keyboard with a working key, a peer inside the workings of a floppy disc, a circuit board complete with a paper chip that the reader can insert into a socket, and a simulation of a CRT electron bean using a piece of string. A Twitter thread on a book is not our normal fare, but this one is something special!

Did any of you have this book when you were younger? Perhaps you still have it? We’d love to hear from you in the comments. It’s probably not the type of book we normally review, but we’ve been known to venture slightly outside tech on that front.