A Look At The Basics Of Building An Arduino Watch

Miniaturization has made smart watches possible, even for the DIY maker to tinker with. For those just getting to grips with basic digital electronics, it can be daunting, however. For those just starting out, [陳亮] put together a handy guide to building the core of an Arduino-based watch.

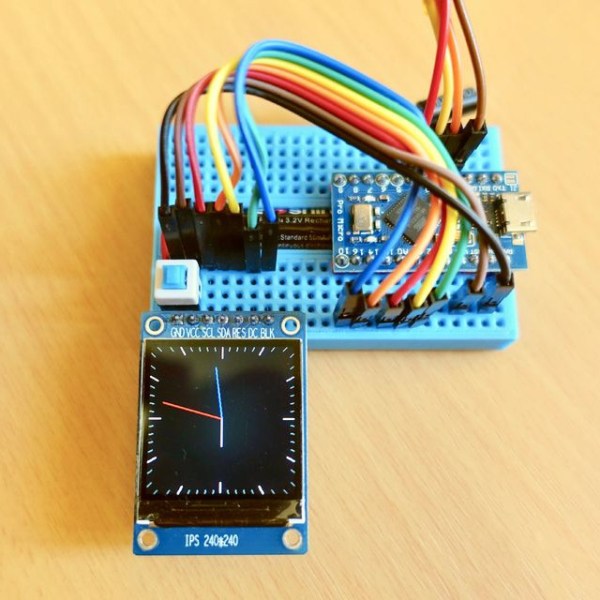
The writeup starts at the beginning, going over the basic hardware requirements for a smart watch. This involves considering size, packaging and power draw, as well as the user interface. The build settles on an Arduino Pro Micro, as it uses the ATmega32U4 which eliminates secondary USB-to-serial chips, helping cut down on power consumption. A square IPS LCD display is used to display an analog-style watch face, and time is kept by a DS3231 real-time clock. A pair of small vibration sensors are used to wake the watch when the user moves their wrist to check the time.

While it doesn’t cover the final assembly into a watch-like form factor, it’s a handy guide on what it takes to build a working watch for those who are still getting their feet wet with hardware. Once you’ve got that down, it’s time to contemplate how you’ll build the sleek exterior. Naturally, a good maker has that covered, too.

Automate The Freight: When The Freight Is People

Before I got a license and a car, getting to and from high school was an ordeal. The hour-long bus ride was awful, as one would expect when sixty adolescents are crammed together with minimal supervision. Avoiding the realities going on around me was a constant chore, aided by frequent mental excursions. One such wandering led me to the conclusion that we high schoolers were nothing but cargo on a delivery truck designed for people. That was a cheery fact to face at the beginning of a school day.

What’s true for a bus full of students is equally true for every city bus, trolley, subway, or long-haul motorcoach you see. People can be freight just as much as pallets of groceries in a semi or a bunch of smiling boxes and envelopes in a brown panel truck. And the same economic factors that we’ve been insisting will make it far more likely that autonomous vehicles will penetrate the freight delivery market before we see self-driving passenger vehicles are at work with people moving. This time on Automate the Freight: what happens when the freight is people?

Continue reading “Automate The Freight: When The Freight Is People”

Driving P5 Panels With A Raspberry Pi

Building displays out of LEDs can be fun, but quickly becomes tedious as the pixel count increases. At this point, it’s worthwhile investing in off-the-shelf panels that have everything pre-soldered and ready to go. [Tom Hammond] wanted to run a P5 panel, and put a Raspberry Pi to work to get it going.

P5 panels are so-called for their 5 mm spacing between LEDs. The panels in question are built with RGB LEDs, allowing full-color graphics to be displayed. In this build, a 64 x 32 panel is used for a total of 2048 pixels. A Raspberry Pi Zero runs the display, using its GPIO to clock out pixel data. Software designed for Christmas light displays is used to program the light show, with xLights being the choice in this case. It’s all wrapped up in a tidy 3D printed frame, and the final product looks remarkably well put together.

It’s a great way to get familiar with P5 panels, and an excellent starting point if you’re contemplating a larger build down the track. If you’re going all out, consider how to make the most of your install from an architectural perspective. Video after the break.

Continue reading “Driving P5 Panels With A Raspberry Pi”

Reon Pocket Keeps You Cool With A Peltier Element

With another summer of heatwaves leaving its mark on our planet, finding a way to stay cool during the day isn’t an easy task. From the morning and afternoon commute in public transport, to busy crowds outside during lunch hour, there are many times when you cannot just find a place inside an airconditioned room to deal with the heat. Exactly for this purpose Sony has successfully completed a kickstarter (in Japanese) on its corporate ‘First Flight’ crowdfunding platform for the Reon Pocket.

Many people probably aren’t aware of Sony’s crowdfunding platform, but it’s a way to gauge the interest from the public for more ‘out there’ products, which do not fit Sony’s usual business model. In this case the Reon Pocket is a Peltier-based device which is placed against the back of one’s neck, from where it can either lower or increase the body’s temperature, reportedly by -13 ℃ and +8.3 ℃ respectively.

Covered in more detail by Engadget and its Japanese sister site, the reported 24 hour battery life refers to the Bluetooth link that connects the device with one’s smartphone, whereas the battery lasts under two hours with the peltier element active. This is probably not too shocking to anyone who knows how a peltier element functions, and how much electricity they consume.

Still, the basic concept seems sound, and there are functioning prototypes. While a 2-hour battery life isn’t amazingly long, it can be just the thing one needs to keep one’s cool during that 15 minute walk to the office in a three-piece suit, without needing a shower afterwards. The device isn’t expensive either, with a projected ¥12,760 (about $117) supplied. Naturally the device will only be on sale in Japan.

Continue reading “Reon Pocket Keeps You Cool With A Peltier Element”