Yes, circuit sculptures are amazing. But the patience and skill required puts most of the designs we’ve seen fairly far out of reach of the average beginner. We totally understand — not everyone finds fun in fiddly, structural soldering.
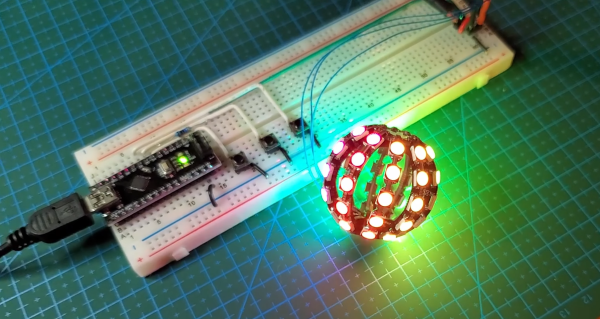
This SMD LED ball is almost ready for prime time. [Hari] wants this to be accessible for everyone and completely parametric, so he’s still working out the kinks. Check out the current form after the break as [Hari] rolls the ball through the various display modes using an Arduino and talks about the failures along the way, like having to file out the LED slots because they were designed too tightly the first time. [Hari] is also working on the friction fit of the pieces so the ball is easier to assemble, especially at the beginning.
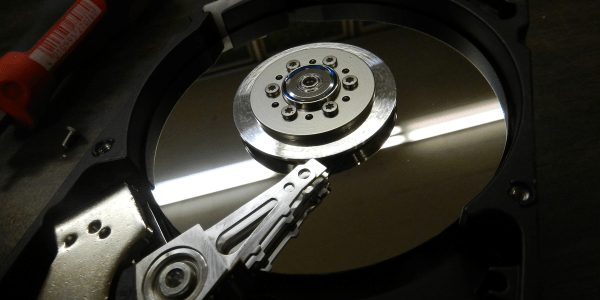
It should have been another fine day, but not all was well in paradise. Few things bring a creeping feeling of doom like a computer that hardlocks and then refuses to boot. The clicking sound coming from the tower probably isn’t a good sign either. Those backups are up to date, right? Right?
There are some legends and old stories about hard drive repair. One of my favorites is the official solution to stiction for old drives: Smack it with a mallet. Another trick I’ve heard repeatedly is to freeze a hard drive before trying to read data off of it. This could actually be useful in a couple instances. The temperature change can help with stiction, and freezing the drive could potentially help an overheating drive last a bit longer. The downside is the potential for condensation inside the drive. Don’t turn to one of these questionable fixes unless you’ve exhausted the safer options.
For the purpose of this article, we’ll assume the problem is the hard drive, and not another component like a power supply or SATA cable causing problems. A truly dead drive is a topic for another time, but if the drive is alive enough to show up as a block device when plugged in, then there’s hope for recovering the data. One of the USB to SATA cables available on your favorite online store is a great way to recover data. Another option is booting off a Linux DVD or flash drive, and accessing the drive in place. If you’re lucky, you can just copy your files and call it a day. If the file transfer fails because of the dying drive, or you need a full disk image, it’s time to pull out some tools and get to work. Continue reading “Tales From The Sysadmin: Impending Hard Drive Doom”→
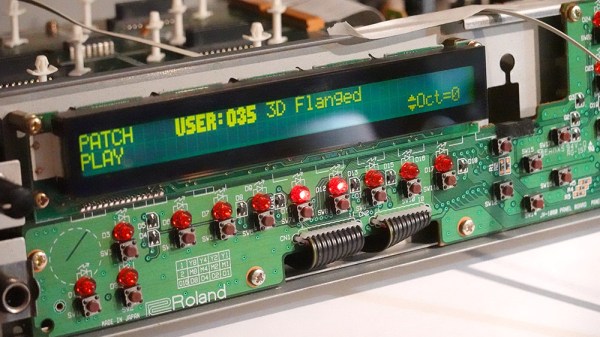
[Mitxela]’s repair of a Roland JV-1080 (a rack-mounted 90s-era synthesizer) sounds simple: replace a broken rotary encoder on the front panel. It turned out to be anything but simple, since the part in question is not today’s idea of a standard rotary encoder at all. The JV-1080 uses some kind of rotary pulse switch, which has three outputs (one for each direction, and one for pushing the knob in like a button.) Turn the knob in one direction, and one of the output wires is briefly shorted to ground with every detent. Turn it the other way, and the same happens on the other output wire. This is the part that needed a replacement.
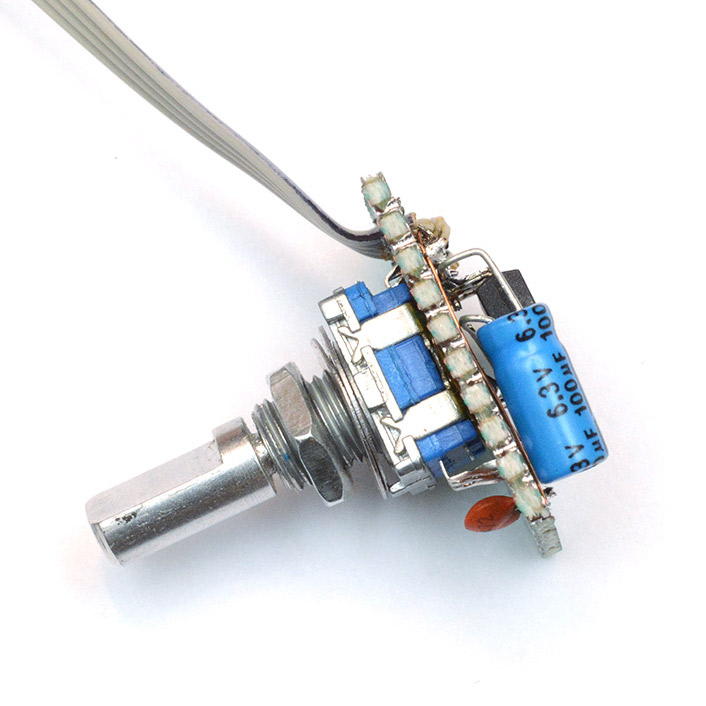
The finished unit uses a modern rotary encoder and microcontroller in place of the original part, and implements a few tricks to power it.
Rather than track down a source for the broken part, [Mitxela] opted to replace it with a modern rotary encoder combined with an ATtiny85 microcontroller to make it act like something the JV-1080 understands and expects. There was an additional wrinkle, however. The original rotary pulse switch is an entirely passive device, and lives at the end of a four-conductor cable with no power provided on it. How could the ATtiny85 be powered without resorting to running a wire to a DC voltage supply somewhere? Success was had, but it did take some finessing.
For the power, it turns out that the signal wires are weakly pulled up to +5 V and [Mitxela] used that for a power supply to the microcontroller. Still, by itself that wasn’t enough, because the ATtiny85 can easily consume more current than the weak pullups can source. We really recommend reading all the details in [Mitxela]’s writeup, but the short version is that the ATtiny85 does two things.
First, it minimizes its power usage by spending most of its time in sleep mode (consuming barely any power at all) and uses an interrupt to wake up just long enough to handle knob activity. Second, the trickle of power from the weak pullups doesn’t feed the ATtiny directly. It charges a 100 uF capacitor through a diode, and that is what keeps the microcontroller from browning out during its brief spurts of activity. Even better, after browsing the datasheet for the ATtiny, [Mitxela] saw it was possible to use the built-in ESD protection diodes for this purpose instead of adding a separate component.
It’s a neat trick and makes for a very compact package. Visit the project’s GitHub repository to dive into the nitty gritty. In the end, a single assembly at the end of a 4-wire connector acts just like the original passive component, no extra wires or hardware modifications needed.
When opening older hardware it’s never quite certain what will be found on the inside. But at least [Mitxela]’s repair duties on this synth didn’t end up with him tripping out on LSD.
Getting retro hardware up and running again is sometimes a feat, and the amount of effort needed tends to go up exponentially with increased hardware age. Getting an IDE hard drive running again is one thing, but things like peripherals on truly “retro” computers like Commodores and Amigas is another beast altogether if you even have a 30-year-old mouse still lying around. That’s why adapters like Project mouSTer are here to help you connect modern USB hardware to truly ancient computers.
This piece of equipment was built for the Atari ST (hence the name), a 8-bit computer from the mid-80s. It mates a DB9 plug with USB via a small microcontroller which does the translating. The firmware can be flashed over the USB connection so there’s planned support for other machines of this vintage. The chip supports all the features the original mouse did, too, including PS4 pad support and support for joysticks, and comes in an impressively tiny package once assembled which blends in seamlessly.
The project is a great step to getting retro computers working again, even if you can’t find exact OEM replacements anymore. That’s a common problem, and we’ve seen this solved in other ways for other old Ataris. It’s not uncommon to put modern power supplies in retro computers, either, as long as they power up and work after everything’s wired together.