DualShock Flight Simulator Yoke

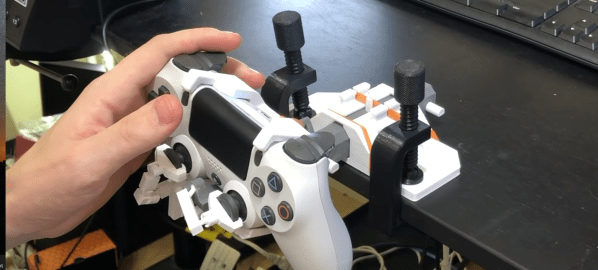
Aircraft control interfaces can be divided into stick or yoke, with the stick being more popular for flight simulators. [Akaki Kuumeri] has been designing some ingenious 3D printed adaptors for game console controllers, and his latest build is a yoke adaptor for the PlayStation DualShock Controller.

Like his previous joystick/throttle combination, this yoke makes use of a series of ball and socket links to convert the yoke’s push/pull and rotation motion into the appropriate inputs on the controller’s thumbs sticks. All the components are 3D printed except for rubber bands to provide spring tension. On the sliding contact surfaces between the different components, [Akaki] specifically designed the parts to slide along the grain (layer lines) to allow for smooth motion without resorting to bearings.

If you want an absolute minimalist yoke, tape some potentiometers to a desk drawer. Or you can go to the other end of the scale and build a complete cockpit. With the arrival of Microsoft Flight Simulator 2020, we’ll be seeing a lot of controller builds.

Building Walks With Robot Legs

The Shanghai Evolution Shift company has just pulled off one of the most impressive robotic projects we’ve ever seen – making a building walk using 198 robotic legs. We’ve all seen structural relocation documentaries where large buildings are moved to new locations. This involves jacking up the building and installing a supporting platform on wheels, then carefully towing the building to its new site.

But the T shape of the five story, 7600 ton Lagena elementary school was problematic, and the route to the new site involved taking a curved path and rotating the building. This ruled out the more traditional methods of relocation. Robot legs came to the rescue. It took 18 days for the building to walk 62 meters and rotate 21 degrees to its new home. This project is part of a trend to preserve historic architecture rather than bulldoze everything to make space for modern buildings.

After watching the video below, we think you’ll agree that this is a unique application of robotics and an amazing engineering feat. Disclaimer – don’t try this at home. Thanks to [Chuckz] for sending us this tip.

Continue reading “Building Walks With Robot Legs”

3D Printed Workshop Lamp Uses A Few Neat Tricks

As far as light fittings go, store bought is fine, but it’s hard to beat something you’ve built yourself from the ground up. [Heliox] demonstrates this well, with a 3D-printed workshop lamp that looks the business and is functional, too.

The lamp has plenty of neat design touches that speak to [Heliox]’s experience in the 3D printed arts. The articulating arms are modular, and feature integrated cable guides. The lamp base features nuts inserted mid-print for easy assembly, and the swivel is actually a two-piece mechanism printed as a single assembly. The table clamp uses a large screw, and the benefit of 3D printing means its easy to customise to suit any individual table. Using black and orange filaments gives the lamp a proper industrial look, and the bright LED strips are perfect for illuminating a bench for fine detailed work.

It’s a great addition to [Heliox]’s workspace, and the tall articulated design means it can cast light without getting in the way of what you’re doing. We’ve featured her work before, too – like this glorious infinity cube. Video after the break.

Continue reading “3D Printed Workshop Lamp Uses A Few Neat Tricks”

Minimalist Low Power Supercapacitor Sensor Node

One of the biggest challenges for wireless sensor networks is that of power. Solar panels usually produce less power than you hoped, especially small ones, and designing super low power circuits is tricky. [Strange.rand] has dropped into the low-power rabbit hole, and is designing a low-cost wireless sensor node that runs on solar power and a supercapacitor.

The main components of the sensor node is an ATMega 328P microcontroller running at 4Mhz, RFM69 radio transceiver, I2C temperature/humidity sensor, 1F supercapacitor, and a small solar panel. The radio, MCU, and sensor all run on 1.5-3.6V, but the supercap and solar panel combination can go up to 5.5V. To regulate the power to lower voltage components a low-drop voltage regulator might seem like the simplest solution, but [strange.rand] found that the 3.3V regulator was consuming an additional 20uA or more when the voltage dropped below 3.3V. Instead, he opted to eliminate the LDO, and limit the charging voltage of the capacitor to 3.6V with a comparator-based overvoltage protection circuit. Using this configuration, the circuit was able to run for 42 hours on a single charge, transmitting data once per minute while above 2.7V, and once every three minutes below that.

Another challenge was undervoltage protection. [strange.rand] discovered that the ATmega consumes an undocumented 3-5 mA when it goes into brown-out below 1.8V. The small solar panel only produces 1 mA, so the MCU would prevent the supercapacitor from charging again. He solved this with another comparator circuit to cut power to the other components.

We see challenges like these a lot with environmental sensors and weather stations with smaller solar panels. For communication, low power consumption of a sub-Ghz radio is probably your best bet, but if you want to use WiFi, you can get the power usage down with a few tricks.

Quick And Simple Milliohmmeter

User [mircemk] presents his “MiliOhm Meter” project which you can build with an Arduino, a handful of common parts from your lab, and a cigar box.  It doesn’t get much simpler than this, folks.  While this is something you won’t be getting calibrated with NIST traceability, it looks like a fun and quick project that’s more than suited for hobbyist measurements.  It’s not only easy to build, the Arduino sketch is less than thirty lines of code.  This is a great learning project, plus you get something useful for your lab when its finished.

We like the creative use of colored tape instead of paint on the project’s box.  If this style suits you, [mircemk] has published several other similar lab instrument projects on his Hackaday.io page, including a frequency meter, an audio spectrum analyzer, and an auto-ranging capacitance meter to name a few.  You might recognize him from some other projects we’ve featured, such as the crazy kinematic arms that set a clock’s hands every minute.

Continue reading “Quick And Simple Milliohmmeter”

Bespoke Storage Technologies: The Alphabet Soup Found In Modern Hard Drives And Beyond

It seems like just yesterday (maybe for some of you it was) we were installing Windows 3.1 off floppy drives onto a 256 MB hard drive, but hard drives have since gotten a lot bigger and a lot more complicated, and there are a lot more options than spinning platters.

The explosion of storage options is the result of addressing a variety of niches of use. The typical torrenter downloads a file, which is written once but read many times. For some people a drive is used as a backup that’s stored elsewhere and left unpowered. For others it is a server frequently reading and writing data like logs or swap files. In all cases it’s physics that sets the limits of what storage media can do; if you choose wisely for your use case you’ll get the bet performance.

The jargon in this realm is daunting: superparamagnetic limit, LMR, PMR, CMR, SMR, HAMR, MAMR, EAMR, XAMR, and QLC to name the most common. Let’s take a look at how we got here, and how the past and present of persistent storage have expanded what the word hard drive actually means and what is found under the hood.

Continue reading “Bespoke Storage Technologies: The Alphabet Soup Found In Modern Hard Drives And Beyond”

DIY Heavy Duty Linear Slides

The rise of cost-effective CNC platforms like 3D printers, routers, and laser cutters has gone hand in hand with the availability of affordable and accurate linear rails and extrusions. However, they quickly become expensive when you need something for heavy loads. [Andy Pugh] found himself in need of a large linear slide, so he resorted to making his own with steel square tubing and a bit of PTFE (Teflon).

The PTFE slider/spacers

[Andy] needed a compact motorcycle lift for his small workshop, so he designed one with a single vertical tube that mounts on his floor. The moving part of the lift is a slightly larger tube, onto which the motorcycle mounts. To allow the outer part to slide easily [Andy] machined a set of 16 PTFE spacers to fit between the surfaces of the tubes. The spacers have a small shoulder that lets them mount securely in the outer tube without pushing out. After a bit of fine-tuning with a file, it slides smoothly enough for [Andy]’s purposes. With a large lead screw mounted onto the lift, he can easily lift his 200 kg motorcycle with a cordless drill, without taking up all the floor space required by a traditional motorcycle lift.

Although the Teflon spacers will wear with regular use and, they are more than good enough for the occasional motorcycle service, and are also easy to replace. You may not want to use this on your next CNC machine build, but it is a handy blueprint to keep in your mental toolbox for certain use-cases. These spacers were machined on a lathe, but we found that very similar looking PTFE parts are sold as “wrist pin buttons” for the piston of old air cooled VW engines, and could be modified for the purpose.

For other lifting applications, check out this hydraulic workbench, and this forklift for moving stuff in your crawl space without crawling.