The Russian Woodpecker: Official Bird Of The Cold War Nests In Giant Antenna

On July 4th, 1976, as Americans celebrated the country’s bicentennial with beer and bottle rockets, a strong signal began disrupting shortwave, maritime, aeronautical, and telecommunications signals all over the world. The signal was a rapid 10 Hz tapping that sounded like a woodpecker or a helicopter thup-thupping on the roof. It had a wide bandwidth of 40 kHz and sometimes exceeded 10 MW.

This was during the Cold War, and plenty of people rushed to the conclusion that it was some sort of Soviet mind control scheme or weather control experiment. But amateur radio operators traced the mysterious signal to an over-the-horizon radar antenna near Chernobyl, Ukraine (then part of the USSR) and they named it the Russian Woodpecker. Here’s a clip of the sound.

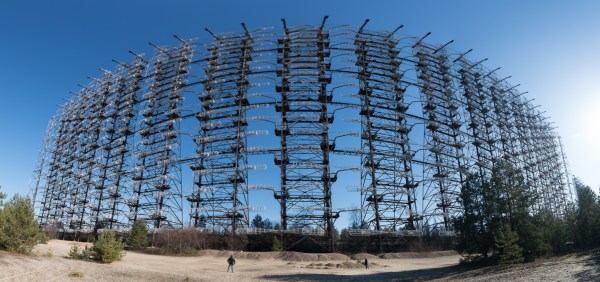
The frequency-hopping Woodpecker signal was so strong that it made communication impossible on certain channels and could even be heard across telephone lines when conditions were right. Several countries filed official complaints with the USSR through the UN, but there was no stopping the Russian Woodpecker. Russia wouldn’t even own up to the signal’s existence, which has since been traced to an immense antenna structure that is nearly half a mile long and at 490 feet, stands slightly taller than the Great Pyramid at Giza.

This imposing steel structure stands within the irradiated forest near Pripyat, an idyllic town founded in 1970 to house the Chernobyl nuclear plant workers. Pictured above is the transmitter, also known as Duga-1, Chernobyl-2, or Duga-3 depending on who you ask. Located 30 miles northeast of Chernobyl, on old Soviet maps the area is simply labeled Boy Scout Camp. Today, it’s all within the Chernobyl Exclusion Zone.

It was such a secret that the government denied it’s existence, yet was being heard all over the world. What was this mammoth installation used for?

Continue reading “The Russian Woodpecker: Official Bird Of The Cold War Nests In Giant Antenna”

Original Game Boy Powered Up With GBA Motherboard

The Game Boy DMG-01 is about as iconic as a piece of consumer electronics can get, but let’s be honest, it hasn’t exactly aged well. While there’s certainly a number of games for the system that are still as entertaining in 2021 as they were in the 80s and 90s, the hardware itself is another story entirely. Having to squint at the unlit display, with its somewhat nauseating green tint, certainly takes away from the experience of hunting down Pokémon.

Which is precisely why [The Poor Student Hobbyist] decided to take an original Game Boy and replace its internals with more modern hardware in the form of a Game Boy Advance (GBA) SP motherboard and aftermarket IPS LCD panel. The backwards compatibility mode of the GBA allows him to play those classic Game Boy and Game Boy Color games from their original cartridges, while the IPS display brings them to life in a way never before possible.

Relocating the cartridge connector took several attempts.

Now on the surface, this might seem like a relatively simple project. After all, the GBA SP was much smaller than its predecessors, so there should be plenty of room inside the relatively cavernous DMG-01 case for the transplanted hardware. But [The Poor Student Hobbyist] made things quite a bit harder on himself by deciding early on that there would be no external signs that the Game Boy had been modified; beyond the wildly improved screen, anyway.

That meant deleting the GBA’s shoulder buttons, though since the goal was always to play older games that predated their addition to the system, that wasn’t really a problem. The GBA’s larger and wider screen is still intact, albeit hidden behind the Game Boy’s original bezel. It turns out the image isn’t exactly centered on the physical display, so [The Poor Student Hobbyist] came up with a 3D printed adapter to mount it with a slight offset. The adapter also allows the small tactile switch that controls the screen brightness to be mounted where the “Contrast” wheel used to go.

An incredible amount of thought and effort went into making the final result look as close to stock as possible, and luckily for us, [The Poor Student Hobbyist] did a phenomenal job of documenting it for others who might want to make similar modifications. Even if you’re not in the market for a rejuvenated Game Boy, it’s worth browsing through the build log to marvel at the passion that went into this project.

Some would argue [The Poor Student Hobbyist] should have just put a Raspberry Pi into a Game Boy case and be done with it, but where’s the fun in that? Sure it might have been a somewhat better Bitcoin miner, but there’s something to be said for playing classic games on real hardware.

Smallest Discrete Transistor 555 Timer

Over at Tiny Transistor labs, [Robo] took it upon himself to reproduce the classic 555 timer in discrete transistor form. For bonus points, he also managed to put it in a package that’s the same basic size, pin compatible with, and a plug-in replacement for the original. The first task was deciding which 555 circuit to implement. He examined a handful of different implementations — and by examined, we mean dissected them and studied the die circuitry under a microscope. In the end, he went with Hans Camenzind’s original circuit, both as a tribute and because it used the fewest transistors — a point which helped manage the final size, which is only a little bit bigger than the IC!

Speaking of sizes, have you ever soldered an EIA 01005 resistor? We agree with [mbedded.ninja] who wrote on a post about standard chip resistor sizes, the 01005 is a “ridiculously small chip package that can barely be seen by the naked eye.”  It is 16 thou x 8 thou (0.4 mm x 0.2 mm) in size, and despite its name and placement in the Imperial series, it is not half the size of an 0201. The transistors are your standard 2N3904 / 2N3906, but purchased in a not-so-standard DFN (Dual Flat Pack, No Leads). We might think a 1.0 x 0.6 mm component as small, but compared to its neighboring resistors in this circuit, it’s huge.

[Robo] has done this kind of project before, most recently making a discrete recreation of of the classic 741 op-amp. We covered a similar, but larger, discrete 555 timer project back in 2011. If you want to go really big-scale with your own reproduction project, check out the MOnSter 6502 from five years ago for further inspiration. Thanks to [Lucas] for the tip.