The Incredible Mechanical Artistry Of François Junod

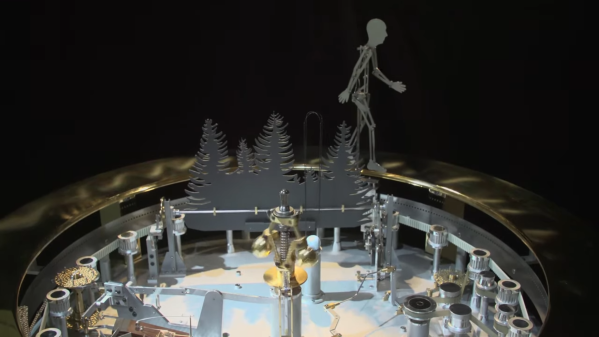
The art of building purely mechanical automatons has dramatically declined with the arrival of electronics over the past century, but there are still a few craftsmen who keep the art form alive. [François Junod] is one of these masters, and the craftsmanship and intricacy on display in his automata is absolutely amazing.

[François]’ creations are all completely devoid of electronics, and are powered either by wound-up springs or weights. The mechanics of the automata are part of the display, and contain a vast array of gears, linkages, belts and tracks. Many of them also include their own soundtrack, which range from simple bells and chimes to complete melodies from mechanized wind instruments, as demonstrated in Le Champignonneur below. He also collaborates with craftsman like jewelers on works like La Fée Ondine, which we thought was CGI when we first saw it in the video after the break.

Very few people have the time, skill and patience to make these creations, but we are glad there are still a few around. Some builds, like [Patelo]’s flightless drone aren’t quite as complex, but are no less inspiring. If you don’t quite have the time and fabrication skills, you can still create mesmerizing automatons with 3D printing like [gzumwalt]. Continue reading “The Incredible Mechanical Artistry Of François Junod”

The Game Boy As You Have Never Seen It Before Is Newest From [Sprite_tm]

Explain a Game Boy to a child in 2021 and they’ll have little idea of how much impact that chunky grey brick had back in the day. Search for a YouTube video to demonstrate, and you might find the one we’ve put below the break. It starts with the classic Tetris on the Game Boy, then moves on to Super Mario World before treating us to Sonic the Hedgehog, and finally Doom. All seminal games of the Game Boy’s heyday, with one small problem. The last three were never Game Boy titles, and certainly wouldn’t have run on the device’s limited hardware. Most of you will by now not be surprised to find that the narrator is none other than [Sprite_tm], and his Game Boy has one of the nicest Raspberry Pi conversions we’ve ever seen.

Given his previous work we expected the cartridges to have an ESP32 on board that  somehow mapped into Game Boy display memory, but in fact he’s swapped the original Nintendo motherboard with a replacement carrying an ICE40 FPGA on one side to handle the Nintendo hardware and a Pi Zero on the other to do the heavy lifting. Insert a Game Boy cartridge and it emulates the original to the point you’d never suspect it wasn’t the real thing, but insert one of the non Game Boy cartridges and it passes an identifier to the Pi which launches a script to run the appropriate Pi code. So the Mario and Sonic games are running in Pi-based emulators, and Doom is running natively on the Pi. It gives the appearance of a seamless gaming experience, wherein lies its charm.

This project certainly has the quality we’ve come to expect from Sprite, and a quick flick through these pages will show plenty of previous examples. One of the most recent was a miniature working DEC VT100 terminal containing an emulated PDP minicomputer.

Continue reading “The Game Boy As You Have Never Seen It Before Is Newest From [Sprite_tm]”

Ball CVT Drives Robot From A Constant Speed Motor

[James Bruton] is experimenting is a series of interesting mechanical mechanisms, the latest being a CVT transmission system which uses a tilting sphere to get a variable speed output from a constant speed input. Video after the break.

In [James]’ proof of concept RC vehicle, a single powered disc is mounted on top, at 90 degree to the wheels. A rotating sphere makes contact with both the driven disc and the wheel. When the rotation axis of the sphere is at 45° between the disc and the wheel, it provides a one 1:1 transmission ratio. As the axis is tilted, the contact points on the sphere shift, changing the relative circumference at the contact points, and therefore changing the transmission ratio. It can also reverse by tilting the sphere in the opposite direction, and disconnected from the output wheel by aligning it with the hole in the bottom of the sphere. [James]’ simple two-wheel RC car concept quite well, driving around his kitchen with the transmission spheres being tilted by servos.

Thanks to the response time, CVT gearboxes are generally not needed for electric motors, but on internal combustion engines that which run best within a certain RPM range they can be very useful. One possible weak point of a design like this is it’s dependence on friction to transfer torque, which makes it vulnerable to wear and slipping.

This build is a spin-off of his spherical omni-wheels and the robot chassis he developed around them. For another interesting robot mechanism, check out is gyroscope balancing system. Continue reading “Ball CVT Drives Robot From A Constant Speed Motor”

SMART Response XE Turned Pocket BASIC Playground

Ever since the SMART Response XE was brought to our attention back in 2018, we’ve been keeping a close lookout for projects that make use of the Arduino-compatible educational gadget. Admittedly it’s taken a bit longer than we’d expected for the community to really start digging into the capabilities of the QWERTY handheld, but occasionally we see an effort like this port of BASIC to the SMART Response XE by [Dan Geiger] that reminds us of why we were so excited by this device to begin with.

This project combines the SMART Response XE support library by [Larry Bank] with Tiny BASIC Plus, which itself is an update of the Arduino BASIC port by [Michael Field]. The end result is a fun little BASIC handheld that has all the features and capabilities you’d expect, plus several device-specific commands that [Dan] has added such as BATT to check the battery voltage and MSAVE/MLOAD which will save and load BASIC programs to EEPROM.

To install the BASIC interpreter to your own SMART Response XE, [Dan] goes over the process of flashing it to the hardware using an AVR ISP MkII and a few pogo pins soldered to a bit of perboard. There are holes under the battery door of the device that exposes the programming pads on the PCB, so you don’t even need to crack open the case. Although if you are willing to crack open the case, you might as well add in a CC1101 transceiver so the handy little device can double as a spectrum analyzer.

Continue reading “SMART Response XE Turned Pocket BASIC Playground”

Just How Vulnerable To Accidental Erasure Are EPROMs Anyway?

On the scale of things worth worrying about, having to consider whether your EPROMs will be accidentally erased by some stray light in the shop is probably pretty low on the list. Still, losing irreplaceable data can make for a bad day, so it might just pay to know what your risks really are.

To address this question, [Adrian] set out to test just how susceptible to accidental erasure some common EPROM chips are. An EPROM, or “erasable programmable read-only memory”, is a non-volatile memory chip that can be programmed electrically and then erased optically, by exposing the die inside the chip to light at a specific wavelength, usually in a special chip erasing tool. But erasure can also happen in daylight (even if it takes a few weeks), so [Adrian] cooked up an experiment to see what the risk really is.

He exposed a selection of EPROMs with known contents to UV and checked their contents. Three of the chips had a simple paper or foil label applied, while one had its quartz window exposed to the UV. As expected, the unprotected chip was erased in just 30 minutes. The covered chips, though, all survived that onslaught, and much more — up to 780 minutes of continuous exposure.

So rest easy — it seems that even a simple paper label is enough to protect your precious retro EPROMs. It’s a good data point, and hats off to [Adrian] for taking a look at this. But now we can’t help but wonder: what would a little sunscreen applied to the quartz window do to erasability? Sounds like a fun experiment, too.

Continue reading “Just How Vulnerable To Accidental Erasure Are EPROMs Anyway?”

Kathleen Lonsdale Saw Through The Structure Of Benzene

The unspoken promise of new technologies is that they will advance and enhance our picture of the world — that goes double for the ones that are specifically designed to let us look closer at the physical world than we’ve ever been able to before. One such advancement was the invention of X-ray crystallography that let scientists peer into the spatial arrangements of atoms within a molecule. Kathleen Lonsdale got in on the ground floor of X-ray crystallography soon after its discovery in the early 20th century, and used it to prove conclusively that the benzene molecule is a flat hexagon of six carbon atoms, ending a decades-long scientific dispute once and for all.

Benzene is an organic chemical compound in the form of a colorless, flammable liquid. It has many uses as an additive in gasoline, and it is used to make plastics and synthetic rubber. It’s also a good solvent. Although the formula for benzene had been known for a long time, the dimensions and atomic structure remained a mystery for more than sixty years.

Kathleen Lonsdale was a crystallography pioneer and developed several techniques to study crystal structures using X-rays. She was brilliant, but she was also humble, hard-working, and adaptable, particularly as she managed three young children and a budding chemistry career. At the outbreak of World War II, she spent a month in jail for reasons related to her staunch pacifism, and later worked toward prison reform, visiting women’s prisons habitually.

After the war, Kathleen traveled the world to support movements that promote peace and was often asked to speak on science, religion, and the role of women in science. She received many honors in her lifetime, and became a Dame of the British Empire in 1956. Before all of that, she honored organic chemistry with her contributions.

Continue reading “Kathleen Lonsdale Saw Through The Structure Of Benzene”

PetBot: Turn PET Bottles Into Filament

Recycling plastic into filament normally involves chopping it into tiny pieces and pushing it through a screw extruder. [JRT3D] is taking a different approach with PetBot, which cuts PET bottles into tape and then turns it into filament. See the videos after the break.

Cutting the tape and extrusion happens in two completely separated processes on the same machine. A PET bottle is prepared by cutting off the bottom, and the open rim is pushed between a pair of bearings, where a cutter slices the bottle into one long strip, as a driven spool rolls it up. The spool of tape is then moved to the second stage of the machine, which pulls the tape through a hot end very similar to that on a 3D printer. While most conventional extruders push the plastic through a nozzle with a screw, the PetBot only heats up the tape to slightly above its glass transition temperature, which allows the driven spool to slowly pull it through the nozzle without breaking. A fan cools the filament just before it goes onto the spool. The same stepper motor is used for both stages of the process.

We like the simplicity of this machine compared to a conventional screw extruder, but it’s not without trade-offs. Firstly is the limitation of the filament length by the material in a single bottle. Getting longer lengths would involve fusing the tape after cutting, or the filament after extrusion, which is not as simple as it might seem. The process would likely be limited to large soda bottle with smooth exterior surfaces to allow the thickness and width of the tape to be as consistent as possible. We are curious to see the consistency of the filaments shape and diameter, and how sensitive it is to variations in the thickness and width of the tape. That being said, as long as you understand the limitations of the machine, we do not doubt that it can be useful. Continue reading “PetBot: Turn PET Bottles Into Filament”