3D Print Yourself A Tiny Steam Train Complete With Smoke Effects

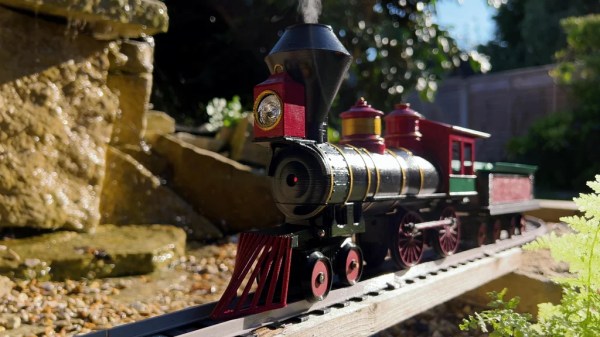
Model trains are fun, but sometimes little whirring motors in electric models feel a long way from the hulking metal beasts of the real railways. [Lewis] of [DIY Machines] adds back some of the flavor with this little steam train build, smoke effects included!

The body of the train itself is 3D printed in PLA. It’s designed to O-gauge scale, and comes complete with models for 3D printed track as well. The parts are given a coat of paint to better approximate the finish of the real thing; sometimes bare plastic just won’t suffice, after all.

Propulsion is thanks to an onboard battery and a simple gearmotor, driven by a HG7881 motor driver. An ESP32-CAM is responsible for running the show, allowing the train to be commanded wirelessly. As a bonus, the camera is mounted in the very front of the train, allowing one to watch a livestream of its progress about the tracks. Meanwhile, the smoke effect is thanks to a small water atomizer fitted in the train’s chimney, which makes the train look that little bit more authentic.

The combination of a self-powered train and 3D-printed tracks is a compelling one. [Lewis] has been able to leave his PETG 3D-printed track outside for over two years and it’s still in working order. That’s not something easy to achieve when using metal rails to deliver power.

Overall, this is a fun way to get into building your own model trains, and is a lot more hands-on than simply buying pre-built models from a store. From there, the sky is really the limit for your creativity! Video after the break.

Continue reading “3D Print Yourself A Tiny Steam Train Complete With Smoke Effects”

Trojans Can Lurk Inside AVR Bootloaders

If there’s one thing we’ve learned over the years, it’s that if it’s got a silicon chip inside, it could be carrying a virus. Research by one group focused on hiding a trojan inside an AVR Arduino bootloader, proving even our little hobbyist microcontrollers aren’t safe.

The specific aim of the research was to hide a trojan inside the bootloader of an AVR chip itself. This would allow the trojan to remain present on something like a 3D printer even if the main firmware itself was reinstalled. The trojan would still be able to have an effect on the printer’s performance from its dastardly hiding place, but would be more difficult to notice and remove.

The target of the work was the ATmega328P, commonly used in 3D printers, in particular those using the Marlin firmware. For the full technical details, you can dive in and read the research paper for yourself. In basic terms, though, the modified bootloader was able to use the chip’s IVSEL register to allow bootloader execution after boot via interrupt. When an interrupt is called, execution passes to the trojan-infected bootloader’s special code, before then returning to the program’s own interrupt to avoid raising suspicion. The trojan can also execute after the program’s interrupt code too, increasing the flexibility of the attack. Continue reading “Trojans Can Lurk Inside AVR Bootloaders”

Metric And Inch Threads Fight It Out For Ultra-Precise Positioning

When you’re a machinist, your stock in trade is precision, with measurements in the thousandths of your preferred unit being common. But when you’re a diemaker, your precision game needs to be even finer, and being able to position tools and material with seemingly impossibly granularity becomes really important.

For [Adam Demuth], aka “Adam the Machinist” on YouTube, the need for ultra-fine resolution machinist’s jacks that wouldn’t break the bank led to a design using off-the-shelf hardware and some 3D printed parts. The design centers around an inch-metric thread adapter that you can pick up from McMaster-Carr. The female thread on the adapter is an M8-1.25, while the male side is a 5/8″-16 thread. The pitches of these threads are very close to each other — only 0.0063″, or 161 microns. To take advantage of this, [Adam] printed a cage with compliant mechanism springs; the cage holds the threaded parts together and provide axial preload to remove backlash, and allows mounting of precision steel balls at each end to make sure the force of the jack is transmitted through a single point at each end. Each full turn of the jack moves the ends by the pitch difference, leading to ultra-fine resolution positioning. Need even more precision? Try an M5 to 10-32 adapter for about 6 microns per revolution!

While we’ve seen different thread pitches used for fine positioning before, [Adam]’s approach needs to machining. And as useful as these jacks are on their own, [Adam] stepped things up by using three of them to make a kinematic base, which is finely adjustable in three axes. It’s not quite a nanopositioning Stewart platform, but you could see how adding three more jacks and some actuators could make that happen.

Continue reading “Metric And Inch Threads Fight It Out For Ultra-Precise Positioning”

Old Barcode Scanner Motherboards Live Again

Sometimes, hacking is just for the pleasure of diving into the secrets of old hardware. That was very much the case when [glitch] and a friend started hacking on some old Intel 8080 boards that had been living in the junk pile for too long.

The boards in question were motherboards from Identicon barcode scanners, running the Intel 8080 CPU. Hacking on the 8080 is a little different, with the ancient CPU requiring three separate voltages to run. However, with the power rails figured out and power applied, it was possible to get the old boards up and running.

The boards were first run with test ROMs which showed the 8080 CPU to be functional. The ROMs hosted a simple program which got the 8080 to spit out the word “HELO” on to an HP HDSP-2416 ASCII character display. From there, the barcode scanner boards were installed in a chassis and hooked up to a bigger Siemens character display, and the memory was mapped out.

The result was that [glitch] and co were able to largely reverse engineer the Identicon hardware, learning it was fairly similar to the Intel MCS-80 reference design of the era. They were able to get code running on the platform, access the RAM, and fit a larger 8-character display. However, without the original barcode scanner attachment, the boards weren’t able to return to their original duty.

As far as hacks go, it’s pretty old school. The boards don’t talk to Twitter, nor run the lights or help with the dishes. However, plenty of fun was had seeing if this old metal could be made to follow instructions once more. Hacking for the pleasure of it is always a good thing by our book!

Wow! You Could Have A (Tiny) V8!

If you grew up before high gas prices and strict emission control regulations, you probably had — or wanted — a car with a V8 engine. An engineering masterpiece created in France, it would define automotive power for the best part of a century. Of course, you can still get them, but the realities of our day make them a luxury. [Vlad] shows us his latest Christmas list addition: a fully-functioning but tiny V8 — the Toyan FS-V800 that has a displacement of two centiliters.

It runs on R/C nitro fuel and is claimed to be the world’s smallest production V8. You can buy the thing built or as a kit and we suggest to protect your street cred, you claim you bought the kit even if you go for the assembled version. The cylinder bores are 17 mm and 16 tiny valves regulate the flow. There are even tiny mufflers for the manifold exhaust. [Dennis] has a video of his operating that you can see below, and his YouTube channel has a lot of information on building the kit and some modifications, too.

Cooling? Water-cooled, of course. The manufacturer claims the engine can rev to 12,500 RPM and can produce over four horsepower. The total size would allow it to fit easily in a five inch cubical volume. You could build it into something, or just display it as a conversation piece. Be prepared for sticker shock, though. We hear the going price for these is about $1,500.

If you’re a bit short on cash or would rather just play with some pretend ponies, this impressive open source engine simulator might be just what you’re looking for.

Continue reading “Wow! You Could Have A (Tiny) V8!”

Know Audio: Stereo

In our occasional series charting audio and Hi-Fi technology we have passed at a technical level the main components of a home audio set-up. In our last outing when we looked at cabling we left you with a promise of covering instrumentation, but now it’s time instead for a short digression into another topic: stereo. It’s a word so tied-in with Hi-Fi that “a stereo” is an alternative word for almost any music system, but what does it really mean? What makes a stereo recording, and how does it arrive at your ears?

From West London Trains, To 3D Audio

A steam train passing through a station, from a distance in black and white
The driver of this Great Western Railway train had no idea that he was making audio history.

As most of you will know, a mono recording uses a single microphone and a single channel while a stereo one uses two microphones recording simultaneously a left and right channel. These are then played back through a pair of speakers, and the result is a sense of spatial field for the listener. Instruments appear to come from their relative positions when recorded, and the sense of being in the performance is enhanced.

Stereo recording as we know it was first perfected as one of the many inventions credited to Alan Blumlein, then working for EMI in London. We have one of his stereo demonstration films in “Trains at Hayes“, filmed from the EMI laboratories overlooking the Great Western Railway, and featuring a series of steam-hauled trains crossing the field of view with a corresponding stereo sound field. His work laid down the fundamentals of stereo recording, including microphone configurations and what would become the standard for stereo audio recording on disk with the channels on the opposite sides of a 45 degree groove. Continue reading “Know Audio: Stereo”

A 3D Printed Marble Run Features Neat Elevator Linkage

There’s seldom anything as joyful and relaxing to watch as a simple marble run. Of course, the thing about letting marbles fall under gravity is that you eventually need to lift them back up again. The Marblevator has a mechanism that does just that.

Overall, the build features a relatively simple marble run. It consists of just six 3D printed ramps which the marble tumbles down in just a few seconds. However, the real magic is in the mechanism that restores the marbles from the bottom of the run all the way back to the top.

A motor turns a gear, which then rotates a crank leading to a multi-link rhombus. On one corner of the rhombus is a small protrusion with a magnet attached, which picks up the marbles from the bottom of the run. As the mechanism turns, the rhombus shifts and brings the marble-carrying arm to the top of the marble run. There, it’s grabbed by another magnet, which holds the marble for a moment before letting it drop back down through the run.

It’s a simple project that nonetheless would make a brilliant desk toy. It’s also a great way to learn about linkage analysis and designing such systems on your own. If you’re big into marble runs, you might also consider procedurally generating them. Video after the break.

Continue reading “A 3D Printed Marble Run Features Neat Elevator Linkage”