Hackaday Podcast 200: Happy New Year, The Ultimate Game Boy, And Python All The Things

This week, Editor-in-Chief Elliot Williams and Managing Editor Tom Nardi ring in the New Year with…well, pretty much the same stuff they do every other week. After taking some time to talk about the nuts and bolts of the podcast in honor of Episode 200, discussion moves on to favorite stories of the week including an impeccably cloned Dyson lamp, one hacker’s years-long quest to build the ultimate Game Boy, developing hardware in Python, building a breadboard computer with the 6502’s simplified sibling, and the latest developments surrounding the NABU set-top box turned retrocomputer. The episode wraps up with a review of some of the biggest themes we saw in 2022, and how they’re likely to shape the tech world in the coming years.

Check out the links below if you want to follow along, and as always, tell us what you think about this episode in the comments!

Download it in living MP3.

Continue reading “Hackaday Podcast 200: Happy New Year, The Ultimate Game Boy, And Python All The Things”

Triple Zone Clock Tells Time In Style

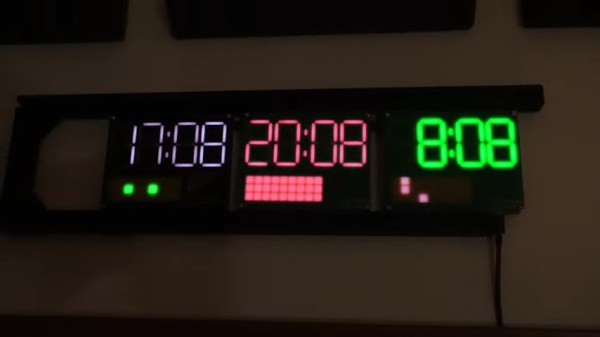
Although the cutoff for saying ‘Happy New Year’ is somewhere around today, there’s still plenty of time to reminisce about 2022 and all that we accomplished. Hackaday alum [Jeremy Cook] spent much of last year designing and building a triple-zone PCB clock, dubbed the 742 clock. It is called so because of all the 7-segments, and then 42 from the height in millimeters of each PCB. Also because it’s 24 backwards, and if we may be so bold, because 42.

If this looks familiar, it’s because we covered the single-panel version a few months ago. Much like that one, the triple time zone clock is controlled by a single Wemos D1 mini, and the other two panels are chained to the primary board. This version has a frame made of 20/20 extrusion with nice 3D printed caps on the ends to finish off the look.

As with the single-panel clock, this one uses bared-FR4 PCBs to diffuse the LEDs, and the effect looks really nice. We particularly like the capacitive corners that control the clock and the colors, which change throughout the day when left to their own devices. Be sure to check out the build video after the break.

Are you really into LEDs? Consider building a Berlin clock.

Continue reading “Triple Zone Clock Tells Time In Style”

Fifteen Flat CRTs And A Bunch Of Magnets Make For Interactive Fun

If you were a curious child growing up when TVs were universally equipped with cathode ray tubes, chances are good that you discovered the effect a magnet can have on a beam of electrons. Watching the picture on the family TV warp and twist like a funhouse mirror was good clean fun, or at least it was right up to the point where you permanently damaged a color CRT by warping the shadow mask with a particularly powerful speaker magnet — ask us how we know.

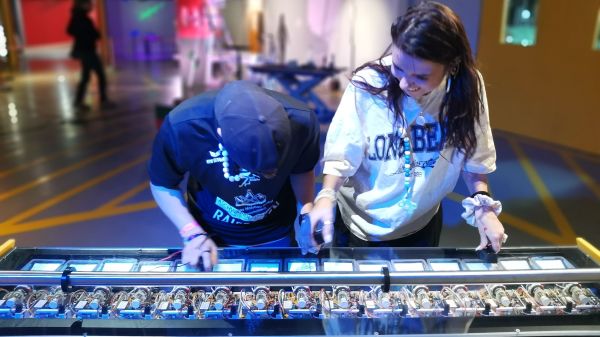
To bring this experience to a generation who may never have seen a CRT display in their lives, [Niklas Roy] developed “Deflektron”, an interactive display for a science museum in Switzerland. The CRTs that [Niklas] chose for the exhibit were the flat-ish monochrome tubes that were used in video doorbell systems in the late 2000s, like the one [Bitluni] used for his CRT Game Boy. After locating fifteen of these things — probably the biggest hack here — they were stripped out of their cases and mounted into custom modules. The modules were then mounted into a console that looks a little like an 80s synthesizer.

In use, each monitor displays video from a camera mounted to the module. Users then get to use a selection of tethered neodymium magnets to warp and distort their faces on the screen. [Niklas] put a lot of thought into both the interactivity of the exhibit, plus the practical realities of a public installation, which will likely take quite a beating. He’s no stranger to such public displays, of course — you might remember his interactive public fountain, or this cyborg baby in a window.

Continue reading “Fifteen Flat CRTs And A Bunch Of Magnets Make For Interactive Fun”

Developing An Open Source Bike Computer

While bicycles appear to have standardized around a relatively common shape and size, parts for these bikes are another story entirely. It seems as though most reputable bike manufacturers are currently racing against each other to see who can include the most planned obsolescence and force their customers to upgrade even when their old bikes might otherwise be perfectly fine. Luckily, the magic of open source components could solve some of this issue, and this open-source bike computer is something you’ll never have to worry about being forced to upgrade.

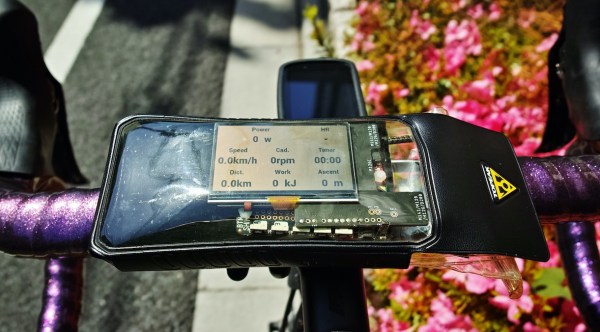
The build is based around a Raspberry Pi Zero in order to keep it compact, and it uses a small 2.7 inch LCD screen to display some common information about the current bike ride, including location, speed, and power input from the pedals. It also includes some I2C sensors including pressure and temperature as well as an accelerometer. The system can also be configured to display a map of the current ride as well thanks to the GPS equipment housed inside. It keeps a log in a .fit file format as well so that all rides can be archived.

When compared against a commercial offering it seems to hold up pretty well, and we especially like that it’s not behind a walled garden like other products which could, at any point, decide to charge for map upgrades (or not offer them at all). It’s a little more work to set up, of course, but worth it in the end. It might also be a good idea to pair it with other open source bicycle components as well.

Thanks to [Richard] for the tip!