An Electric Vehicle Conversion With A Difference

For a first try at an electric vehicle conversion we’re guessing that most would pick a small city car as a base vehicle, or perhaps a Kei van. Not [LiamTronix], who instead chose to do it with an old Ferguson tractor. It might not be the most promising of EV platforms, but as you can see in the video below, it results in a surprisingly practical agricultural vehicle.

A 1950s or 1960s tractor like the Ferguson usually has its engine as a structural member with the bellhousing taking the full strength of the machine and the front axle attached to the front of the block. Thus after he’s extracted the machine from its barn we see him parting engine and gearbox with plenty of support, as it’s a surprisingly hazardous process. These conversions rely upon making a precise plate to mount the motor perfectly in line with the input shaft. We see this process, plus that of making the splined coupler using the center of the old clutch plate. It’s been a while since we last did a clutch alignment, and seeing him using a 3D printed alignment tool we wish we’d had our printer back then.

The motor is surprisingly a DC unit, which he first tests with a 12 V car battery. We see the building of a hefty steel frame to take the place of the engine block in the structure, and then a battery pack that’s beautifully built. The final tractor at the end of the video still has a few additions before it’s finished, but it’s a usable machine we wouldn’t be ashamed to have for small round-the-farm tasks.

Surprisingly there haven’t been as many electric tractors on these pages as you’d expect, though we’ve seen some commercial ones.

Continue reading “An Electric Vehicle Conversion With A Difference”

KolibriOS: The Operating System That Fits On A 1.44 MB 3.5″ Floppy Disk

While most operating systems are written in C and C++, KolibriOS is written in pure x86 assembly and as a result small and lightweight enough to run off a standard 1.44 MB floppy disk, as demonstrated in a recent video by [Michael].

Screenshot of the KolibriOS desktop on first boot with default wallpaper.

As a fork of 32-bit MenuetOS back in 2004, KolibriOS has since followed its own course, sticking to the x86 codebase and requiring only a modest system with an i586-compatible CPU, 8 MB of RAM and VESA-compatible videocard. Unlike MenuetOS’ proprietary x86_64 version, there’s no 64-bit in KolibriOS, but at this level you probably won’t miss it.

In the video by [Michael], the OS boots incredibly fast off both a 3.5″ floppy and a CD-ROM, with the CD-ROM version having the advantage of more software being provided with it, including shareware versions of DOOM and Wolfenstein 3D.

Although web browsers (e.g. Netsurf) are also provided, [Michael] did not get Ethernet working, though he doesn’t say whether he checked the hardware compatibility list. Quite a few common 3Com, Intel and Realtek NICs are supported out of the box.

For audio it was a similar story, with the hardware compatibility left unverified after audio was found to be not working. Despite this, the OS was fast, stable, runs DOOM smoothly and overall seems to be a great small OS for x86 platforms that could give an old system a new lease on life.

Continue reading “KolibriOS: The Operating System That Fits On A 1.44 MB 3.5″ Floppy Disk”

Pi Pico Lays Down The Groove

From the 60s to perhaps the mid-00s, the path to musical stardom was essentially straight with very few forks. As a teenager you’d round up a drummer and a few guitar players and start jamming out of a garage, hoping to build to bigger and bigger venues. Few people made it for plenty of reasons, not least of which was because putting together a band like this is expensive. It wasn’t until capable electronic devices became mainstream and accepted in popular culture in the last decade or two that a few different paths for success finally opened up, and this groovebox shows just how much music can be created this way with a few straightforward electronic tools.

The groovebox is based on a Raspberry Pi Pico 2 and includes enough storage for 16 tracks with a sequencer for each track, along with a set of 16 scenes. Audio plays through PCM5102A DAC module, with a 160×128 TFT display and a touch-sensitive pad for user inputs. It’s not just a device for looping stored audio, though. There’s also a drum machine built in which can record and loop beats with varying sounds and pitches, as well as a sample slicer and a pattern generator and also as the ability to copy and paste clips.

There are a few limitations to using a device this small though. Because of memory size it outputs a 22 kHz mono signal, and its on-board storage is not particularly large either, but it does have an SD card slot for expansion. But it’s hard to beat the bang-for-the-buck qualities of a device like this, regardless, not to mention the portability. Especially when compared with the cost of multiple guitars, a drum set and a bunch of other analog equipment, it’s easy to see how musicians wielding these instruments have risen in popularity recently. This 12-button MIDI instrument could expand one’s digital musical capabilities even further.

Continue reading “Pi Pico Lays Down The Groove”

Tearing Down Nintendo’s Alarmo Alarm Clock

All your Nintendo Alarmo are belong to mew~ (Credit: GaryOderNichts, Blogspot)

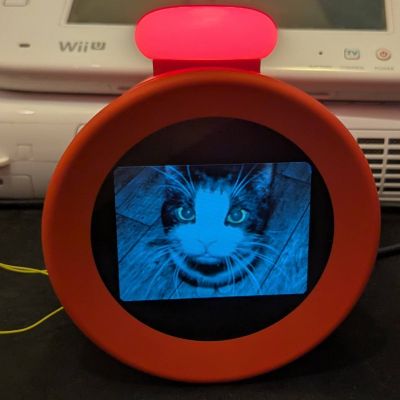
Most of us will probably have seen Nintendo’s latest gadget pop up recently. Rather than a Switch 2 announcement, we got greeted with a Nintendo-branded alarm clock. Featuring a 2.8″ color LCD and a range of sensors, it can detect and respond to a user, and even work as an alarm clock for the low, low price of €99. All of which takes the form of Nintendo-themed characters alongside some mini-games. Naturally this has led people like [Gary] to buy one to see just how hackable these alarm clocks are.

As can be expected from a ‘smart’ alarm clock it has 2.4 GHz WiFi connectivity for firmware and content download, as well as a 24 GHz millimeter wave presence sensor. Before [Gary] even had received his Alarmo, others had already torn into their unit, uncovering the main MCU (STM32H730ZBI6) alongside a 4 GB eMMC IC, as well as the MCU’s SWD pads on the PCB. This gave [Gary] a quick start with reverse-engineering, though of course the MCU was protected (readout protection, or RDP) against firmware dumps, but the main firmware could be dumped from the eMMC without issues.

After this [Gary] had a heap of fun decrypting the firmware, which seems to always get loaded into the external octal SPI RAM before execution, as per the boot sequence (see featured image). This boot sequence offers a few possibilities for inserting one’s own (properly signed) contents. As it turns out via the USB route arbitrary firmware binaries can be loaded, which provided a backdoor to defeat RDP. Unfortunately the MCU is further locked down with Secure Access Mode, which prevents dumping the firmware again.

So far firmware updates for the Alarmo have not nailed shut the USB backdoor, making further reverse-engineering quite easy for the time being. If you too wish to hack your Alarmo and maybe add some feline charm, you can check [Gary]’s GitHub project.

FLOSS Weekly Episode 807: Bitten By The Penguin

This week, Jonathan Bennett and Dan Lynch chat with Josh Bressers, VP of Security at Anchore, and host of the Open Source Security and Hacker History podcasts. We talk security, SBOMs, and how Josh almost became a Sun fan instead of a Linux geek.

https://opensourcesecurity.io
https://hackerhistory.com
https://infosec.exchange/@joshbressers
https://anchore.com

Continue reading “FLOSS Weekly Episode 807: Bitten By The Penguin”

Haiku OS’s Beta 5 Release Brings Us Into A New BeOS Era

The name BeOS is one which tends to evoke either sighs of nostalgia or blank stares, mostly determined by one’s knowledge of the 1990s operating system scene. Originally released in 1995 by Be Inc., it was featured primarily on the company’s PowerPC-based BeBox computers, as well as being pitched to potential customers including Apple, who was looking for a replacement for MacOS. By then running on both PowerPC and x86-based systems, BeOS remained one of those niche operating systems which even the free Personal Edition (PE) of BeOS Release 5 from 1998 could not change.

As one of the many who downloaded BeOS R5 PE and installed it on a Windows system to have a poke at it, I found it to be a visually charming and quite functional OS, but saw no urgent need to use it instead of Windows 98 SE or 2000. This would appear to have been the general response from the public, as no BeOS revival ensued. Yet even as BeOS floundered and Be Inc. got bought up, sold off and dissected for its parts, a group of fans who wanted to see BeOS live on decided to make their own version. First called OpenBeOS and now Haiku, it’s a fascinating look at a multimedia-centric desktop OS that feels both very 1990s, but also very modern.

With the recent release of the R1 Beta 5 much has been improved, which raises the interesting question of how close Haiku is to becoming a serious desktop OS contender.

Continue reading “Haiku OS’s Beta 5 Release Brings Us Into A New BeOS Era”

Use PicoGlitcher For Voltage Glitching Attacks

We see a fair few glitcher projects, especially the simpler voltage glitchers. Still, quite often due to their relative simplicity, they’re little more than a microcontroller board and a few components hanging off some wires. PicoGlitcher by Hackaday.IO user [Matthias Kesenheimer] is a simple voltage glitcher which aims to make the hardware setup a little more robust without getting caught up in the complexities of other techniques. Based on the Raspberry Pico (obviously!), the board has sufficient niceties to simplify glitching attacks in various situations, providing controllable host power if required.

A pair of 74LVC8T245 (according to the provided BoM) level shifters allow connecting to targets at voltages from 1.8 V to 5 V if powered by PicoGlitcher or anything in spec for the ‘245 if target power is being used. In addition to the expected RESET and TRIGGER signals, spare GPIOs are brought out to a header for whatever purpose is needed to control a particular attack. If a programmed reset doesn’t get the job done, the target power is provided via a TPS2041 load switch to enable cold starts. The final part of the interface is an analog input provided by an SMA connector.

The glitching signal is also brought out to an SMA connector via a pair of transistors; an IRLML2502 NMOS performs ‘low power’ glitching by momentarily connecting the glitch output to ground. This ‘crowbarring’ causes a rapid dip in supply voltage and upsets the target, hopefully in a helpful way. An IRF7807 ‘NMOS device provides a higher power option, which can handle pulse loads of up to 66A. Which transistor you select in the Findus glitching toolchain depends on the type of load connected, particularly the amount of decoupling capacitance that needs to be discharged. For boards with heavier decoupling, use the beefy IRF7807 and accept the glitch won’t be as sharp as you’d like. For other hardware, the faster, smaller device is sufficient.

The software to drive PicoGlitcher and the hardware design files for KiCAD are provided on the project GitHub page. There also appears to be an Eagle project in there. You can’t have too much hardware documentation! For the software, check out the documentation for a quick overview of how it all works and some nice examples against some targets known to be susceptible to this type of attack.

For a cheap way to glitch an STM8, you can just use a pile of wires. But for something a bit more complicated, such as a Starlink user terminal, you need something a bit more robust. Finally, voltage glitching doesn’t always work, so the next tool you can reach for is a picoEMP.

Continue reading “Use PicoGlitcher For Voltage Glitching Attacks”