HF In Small Spaces

Generally, the biggest problem a new ham radio operator will come across when starting out on the high frequency (HF) bands is finding physical space for the antennas. For a quick example, a dipole antenna for the 20 m band will need around 10 m of wire, and the lower frequencies like 80 m need about four times as much linear space. But if you’re willing to trade a large space requirement for a high voltage hazard instead, a magnetic loop antenna might be just the ticket.

Loop antennas like these are typically used only for receiving, but in a pinch they can be used to transmit as well. To tune the antennas, which are much shorter than a standard vertical or dipole, a capacitor is soldered onto the ends, which electrically lengthens the antenna. [OM0ET] is using two loops of coax cable for the antenna, with each end soldered to one half of a dual variable capacitor which allows this antenna to tune from the 30 m bands to the 10 m bands, although he is using it mostly for WSPR on 20 m. His project also includes the use of an openWSPR module, meaning that he doesn’t have to dedicate an entire computer to run this mode.

The main downsides of antennas like these is that they are not omnidirectional, are not particularly good at transmitting, and develop a significantly high voltage across the capacitor as this similar mag loop antenna project demonstrated. But for those with extreme limitations on space or who, like [OM0ET] want a simple, small setup for running low-power applications like WSPR they can really excel. In fact, WSPR is a great mode for getting on the air at an absolute minimum of cost.

Continue reading “HF In Small Spaces”

Simple Circuit Keeps Process Control Loops In Tune

Spare a moment’s pity for the process engineer, whose job it is to keep industrial automation running no matter what. These poor souls seem to be forever on call, fielding panicked requests to come to the factory floor whenever the line goes down. Day or night, weekends, vacations, whatever — when it breaks, the process engineer jumps.

The pressures of such a gig can be enormous, and seem to have weighed on [Tom Goff] enough that he spent a weekend building a junk bin analog signal generator to replace a loop calibrator that he misplaced. Two process control signaling schemes were to be supported — the 0 to 10 VDC analog signal, and the venerable 4-20 mA current loop. All that’s needed for both outputs is an Arduino and an LM358 dual op-amp, plus a few support components. The 0-10 V signal starts as a PWM output from the Arduino, with its 0-5 V average amplified by one of the op-amps set up as a non-inverting amp with a gain of 2. With a little filtering, the voltage output is pretty stable, and swings nicely through the desired range — see the video below for that.

The current loop output is only slightly more complicated. An identical circuit on a separate Arduino output generates the same 10 V max output, but a code change limits the low end of the range to 1 V. This output of the op-amp is fed through a 500-Ī© trimmer pot, and the magic of Ohm’s Law results in a 4-20 mA current. The circuit lives on a piece of perf board in a small enclosure and does the job it was built for — nothing fancy needed.

And spoiler alert: [Tom] found the missing loop calibrator — after he built this, of course. Isn’t that always the way?

Continue reading “Simple Circuit Keeps Process Control Loops In Tune”

Compose Any Song With Twelve Buttons

Limitations placed on any creative process often paradoxically create an environment in which creativity flourishes. A simple overview of modern pop, rock, or country music illustrates this principle quite readily. A bulk of these songs are built around a very small subset of music theory, often varying no more than the key or the lyrics. Somehow, almost all modern popular music exists within this tiny realm. [DeckerEgo] may have had this idea in mind when he created this tiny MIDI device which allows the creation of complex musical scores using a keyboard with only 12 buttons.

The instrument is based around the Adafruit MacroPad, which is itself built on the RP2040 chip. As a MIDI device, it needs to be connected to a computer running software which can support MIDI instruments, but once its assembled and given its firmware, it’s ready to rock. A musician can select one of any number of musical scales to operate within, and the 12 keys on the pad are mapped to the 12 chromatic notes within that scale. It can also be used to generate drum tracks or other backing tracks to loop before being used to create melodies as well.

[DeckerEgo] took a bit of inspiration from an even simpler macro pad we featured before which is based around the idea that a shockingly high number of songs use the same four chords. His macro pad includes creation of chord progressions as well, but expands on that idea to make more complete compositions possible. And, for those looking to build their own or expand on this project, he has also made all of the source code available on his GitHub page.

Continue reading “Compose Any Song With Twelve Buttons”

He’s The Operator Of His Pocket Arduino

The band Kraftwerk hit the music scene with its unique electronic sound in the 70s in Germany, opening the door for the electronic music revolution of the following decade. If you’re not familiar with the band, they often had songs with a technology theme as well, and thanks to modern microcontroller technology it’s possible to replicate the Kraftwerk sound with microcontrollers as [Steven] aka [Marquis de Geek] demonstrates in his melodic build.

While the music is played on a Stylophone and a Korg synthesizer, it is fed through five separate Arduinos, four of which have various synths and looping samplers installed on them (and presumably represent each of the four members of Kraftwerk). Samplers like this allow pieces of music to be repeated continuously once recorded, which means that [Steven] can play entire songs on his own. The fifth Arduino functions as a controller, handling MIDI and pattern sequencing over I2C, and everything is finally channeled through a homemade mixer.

[Marquis] also dressed in Kraftwerk-appropriate attire for the video demonstration below, which really sells the tribute to the famous and groundbreaking band. While it’s a great build in its own right and is a great recreation of the Kraftwerk sound, we can think of one more way to really put this project over the top — a Kraftwerk-inspired LED tie.

Continue reading “He’s The Operator Of His Pocket Arduino”

Homebrew Loop Antenna Brings The Shortwave World To You

Radio may be dead in terms of delivering entertainment, but it’s times like these when the original social network comes into its own. Being able to tune in stations from across the planet to get fresh perspectives on a global event can even be a life saver. You’ll need a good antenna to do that, which is where this homebrew loop antenna for the shortwave radio bands shines.

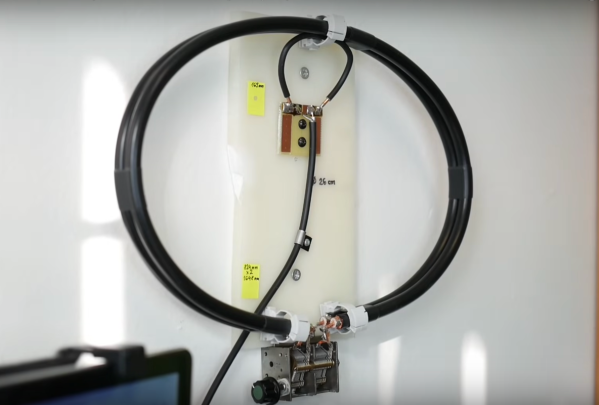
To be honest, pretty much any chunk of wire will do as an antenna for most shortwave receivers. But not everyone lives somewhere where it’s possible to string up a hundred meters of wire and get a good ground connection, which could make a passive loop antenna like this a good choice. Plus, loops tend to cancel the electrical noise that’s so part of life today, which can make it easier to pull in weak, distant stations.

[Thomas]’s design is based on a length of coaxial cable, which should be stiff enough to give the loop some stability, like a low-loss RG-8 or RG-213. The coax braid and dielectric are exposed at the midpoint of the cable to create a feed point, while the shield and center conductor at the other ends are cross-connected. A 1:1 transformer is wound on a toroid core to connect to the feedpoint; [Thomas] calls it a balun but we tend to think it’s more of an unun, since both the antenna and feedline are unbalanced. He reports good results from the loop across the shortwave band.

The shortwave and ham bands are a treasure trove of information and entertainment just waiting to be explored. Check them out — you might learn something, and you might even stumble across spies doing their thing.

[via RTL-SDR.com]

Wire Loop And Amplifier Solve Audio Problem For The Hearing Impaired

Imagine being asked to provide sound reinforcement for a meeting that occurs in a large room, where anyone can be the speaker, and in a situation where microphones would hinder the flow of the meeting. Throw in a couple of attendees who have hearing disabilities, and you’ve got quite a challenge to make sure everyone gets heard.

Such a situation faced [David Schneider] at his Quaker meetinghouse, which he ended up solving with this home-brew audio induction loop system. The worship style of conservative sects of the Religious Society of Friends, as the Quakers are formally known, is “silent worship”, where congregants sit together in silence until someone feels moved to share something. Anyone can speak at any time from anywhere in the room, leading to the audio problem.

Rooms mics and a low power FM transmitter didn’t work because those using radio as aids to hearing the service felt awkward, so [David] decided to take advantage of a feature in the hearing aids worn by some members: telecoils. These are inductive receivers built into some hearing aids to send sound directly to them using magnetic fields generated by a loop in the listening area. [David]’s loop ended up being 240 meters of 20-gauge copper wire in the attic above the meeting room. The impedance ended up close to 8 ohms, perfect for feeding directly from the speaker terminals of an old stereo amplifier. Pumping 160 Watts into the coil allows the hearing-aid wearers below hear the service now.

There’s still work to be done on the input side to improve audio quality, but [David]’s solution is elegant in that it helps those who need it most using technology they already have. And perhaps those who need but don’t yet have hearing aids can roll their own.

Reverse Engineering An Insulin Pump With An SDR And Decapping

Insulin pumps are a medical device used by people with diabetes to automatically deliver a measured dose of insulin into their bloodstream. Traditionally they have involved a canula and separate connected pump, but more recent models have taken the form of a patch with a pump mounted directly upon it. When [Pete Schwamb]’s daughter receivedĀ  one of these pumps, an Omnipod, he responded to a bounty offer for reverse engineering its RF protocol. As one of the people who helped create Loop, an app framework for controlling insulin delivery systems, he was in a particularly good position to do the work.

The reverse engineering itself started with the familiar tale of using an SDR to eavesdrop on the device’s 433MHz communication between pump and control device. Interrogating the raw data was straightforward enough, but making sense of it was not. There was a problem with the CRC algorithm used by the device which had a bug involving a bitwise shift in the wrong direction, then they hit a brick wall in the encryption of the data. Hardware investigation revealed a custom chip in the device, and there they might have stalled.

But the international reverse engineering community is not without resources and expertise, and through the incredible work of a university researcher in the UK (whose paper incidentally includes a pump teardown) they were able with an arduous process supported by many people to have the firmware recovered through decapping the chip. Even once they had thus extracted the encryption code and produced their own software their problems were not over, because communication issues necessitated a much better antenna on the RileyLink Bluetooth bridge boards that translated Bluetooth from a mobile phone to 433 MHz for the device.

This precis doesn’t fully encapsulate the immense amount of work over several years by a large group of people with some very specialist skills that reverse engineering the Omnipod represents. To succeed in this task is an incredible feat, and makes for a fascinating write-up.

Thanks [Alex] for the tip.