Obfuscated C 8080 Emulator Ported

[Oscar] is no stranger to writing hard-to-read C code. While most of us do that by accident, there are those who strive to write the most unreadable code and enter it in the IOCCC — the International Obfuscated C Code Contest. One of his winning entries was a single C function that emulates an 8080. With a few support files, the plucky little emulator will run CP/M.

The emulator won best in show, but that was in 2006. Things have changed a bit and [Oscar] has updated the code so that you can continue to try it if you want to give yourself a headache reading code. The portability isn’t a CPU issue — modern CPUs will happily run code from 2006. The problem is the compiler and operating system. Compilers are much stricter these days, and Linux needs a little extra coaxing to give access to the input stream the way the faux computer needs it.

Continue reading “Obfuscated C 8080 Emulator Ported”

It’s Never Been Easier To Build A WiFi-Controlled RC Car

Today, wireless-enabled microcontrollers are everywhere and can be had for just a few bucks. You can use them to build all kinds of connected projects more cheaply than ever before. [ROBO HUB] demonstrates this well with an incredibly simple WiFi-controlled RC car build.

The build is based around an NodeMCU ESP8266 microcontroller, paired with an L293D motor driver. This lets the microcontroller drive brushed DC motors for differential drive. Power is courtesy of three 18650 lithium-ion batteries. These parts are assembled into a 3D-printed car of sorts with four wheels. The drivetrain is rather odd, with gear motors installed on the two front wheels, and simple brushed DC motors installed on the two rear wheels. The motors on each side are paired together so the vehicle has tank-style steering.

Meanwhile, the ESP8266 is programmed so it can be controlled via a smartphone app. The touchscreen controls are not as elegant as toy RC cars of years past, but it’s pretty good for a cheap DIY build.

It’s a fairly simple project and one that any high-school student could follow along to learn something. Projects like these can be a great way to learn about everything from mechanics to electronics and even basic programming. It may not be complicated, but that makes it a great learning tool. We see a ton of projects like this on the regular, and every time they’re built, somebody is picking up some new skills.

We’ve been talking about WiFi-controlled RC cars for a long time. Way back when it was nowhere near this easy. Video after the break. Continue reading “It’s Never Been Easier To Build A WiFi-Controlled RC Car”

Interactive Cake Takes Your Picture

[Abigail] is a confectionery roboticist, and [Hazal] is a developer advocate at a robotics company. The two met recently and decided to collaborate on a smart cake, with amusing results.

The resulting cake not only looks like a camera it also has a camera inside. When the camera detects people in its field of view, a NeoPixel is lit up in green to signal it’s spotted something. If you so desire, you can then hit a button and the cakera (cake-camera, keep up) will take your photo.

The cake itself looks to be a sponge of some sort with fondant used to create the camera housing and a surround for the preview screen. Inside the cake is a standard photo-booth style setup built with a Raspberry Pi. The Pi is responsible for taking photos with a USB cam. It does this when instructed via an arcade button acting as the shutter release. After taking a photo, the Pi prints out a receipt with an Adafruit thermal printer. This provides the user a number they can use to receive their photo afterward.

We’ve seen some neat cakes before, too. If you’ve been hacking on cakes, either edible or theoretical, we might just want to know more. Drop us a line!

Clever E-Ink Driver Does 32 Levels Of Grey, Avoids Update Flicker, And More

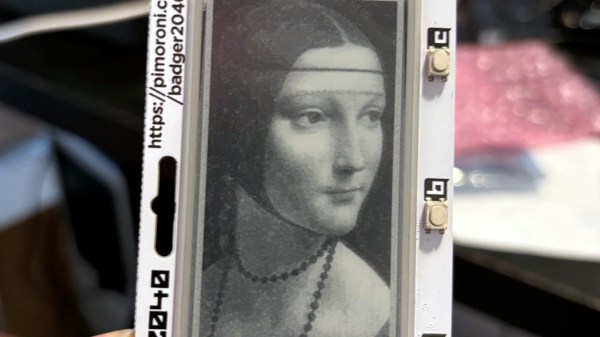
There’s a lot to like about E-Ink displays, and you might be about to like them even more with [antirez]’s MicroPython driver for the Badger 2040 (or any display based on the UC8151 / IL0373) because it brings all kinds of useful features to your next project.

E-Ink displays are great. They are high contrast, daylight-readable, and require zero power to maintain a displayed image. But a few things come with the territory: displays have slow refresh rates compared to other display types, expect flickering during screen changes, and the displays are monochrome. [Antirez]’s new driver not only provides a MicroPython interface but goes in some fantastic directions that challenge those usual drawbacks.

Probably the most striking is the ability to display greyscale images without relying on dithering, which means the results avoid the charmingly gritty look of old-school dithering. Dithering has its place, but it’s not always the best choice, so options are great.

Similarly, display flicker may be a small price to pay for some, but if the obvious flicker is too boorish and crude-looking one can use an anti-flicker refresh mode that greatly limits flickering at the cost of update speed. Over time some image ghosting will accumulate which necessitates an occasional whole-screen refresh, but the effect is overall much nicer when updating something like a clock face.

How is this all done? It turns out that the controller chips for these displays are highly configurable, and it’s possible to do much more than simply drive the display in known-good and completely approved modes. It’s also entirely possible to permanently damage one’s display by doing so. Part of what makes [antirez]’s work so appealing is that he has already done the work finding workable configurations.

His driver is designed using computed LUTs (look-up tables) that make using and exploring alternative refresh modes easy and efficient, invaluable for exploring the capabilities of a patented, poorly documented technology like E-Paper displays.

We’ve seen the Badger 2040 E-Ink display in a teapot timer and a custom macropad, and [antirez]’s uc8151_micropython project is a fantastic step forward. And don’t miss another of [antirez]’s clever microcontroller hacks: playing audio without a DAC.

Building A Tribute Version Of Mattel’s VertiBird Toy

Mattel had a ton of hit toys in the 20th century. In the early 1970s, the VertiBird was one of them, letting kids pretend to fly a helicopter in circles on their loungeroom floor. An original VertiBird can be hard to come by these days, but what if you could make your own? Well, [Gord Payne] did just that!

The design of the VertiBird is simple enough that it’s easy to replicate with a 3D printer. It features a helicopter on a rod that spins around a central base. The helicopter itself has a rotor powered by a motor, with variable speed control to vary the lift it produces. The helicopter’s flight can be controlled in a circular path around the base using throttle and pitch controls. [Gord’s] build was inspired by an earlier replica from [Luke J Barker] and borrows some parts from it, too. However, this build uses an ATTiny85 microcontroller to control the helicopter’s tilt and direction with the aid of a servo.

It’s great to see this classic toy recreated from scratch, particularly given the enormous cost of original sets these days. It’s also great fun to watch [Gord] execute an aerial rescue with the toy, too. Video after the break.

Continue reading “Building A Tribute Version Of Mattel’s VertiBird Toy”

Tiny Signal Generator Revealed

There was a time when test equipment was big and heavy. Those days are gone, and [Kiss Analog] shows us the inside of a Uni-T UTG962E arbitrary waveform generator. The device is truly tiny. You might think this is due to the dense packing of the circuit board. However, one board is packed but the other board seems to have a high degree of integration on one IC. You can check out the video below.

The main processor is some sort of ARM — we think an STM32F-series part. The markings were hard to make out under the microscope.

Continue reading “Tiny Signal Generator Revealed”

New Pens For Old Plotters

Finding consumables is an ever-present problem facing anyone working with old computer hardware. Many of these devices ceased manufacture decades ago and what old stock remains is invariably degraded by time. [Retrohax] has encountered it with the pens for an Atari plotter, a machine that uses an ALPS mechanism that appears in more than one 1980s machine. The original pens had dried out beyond the ability to refill, so he takes us through the process of finding replacements.

Sadly there are no equivalent modern pens ripe for modification, so whatever replacement he used would have to involve a little lateral thinking. He thought salvation was at hand in the form of multicolor ballpoint refills of the type where the ink is in an easily cuttable plastic tube. [Retrohax] and was able to make a 3D-printed holder for a cut-down ballpoint refill. Sadly the pressure required for a good line from a ballpoint was much higher than the original pens, so he was back to square one. Then he happened upon gel pens and tried the same trick with a gel pen refill. This gave instant success and should provide a valid technique for more than just this ALPS mechanism.

If you haven’t got a classic plotter to hand, never fear. You can have a go at making your own.