Activate interlock! Dynotherms connected! Infracells up! Mega thrusters are go! If you grew up in the 80’s you undoubtedly know that quote means it’s time to form Voltron. The 1984 Lion Force Voltron series has shown an incredible amount of staying power. These 5 lions have come together to form no less than 3 reboot series, the most recent coming out just this month from Dreamworks and Netflix.
[Matt and Kerry Stagmer], blacksmiths for the Man at Arms web series haven’t forgotten Voltron either. Every episode of the original series ended with the mighty robot defeating enemies using an iconic blazing sword. While they might not be able to bring us 5 robot lions which join together to form one mega robot, [Matt and Kerry] can bring us a human sized version of Voltron’s sword (YouTube).
Starting with a high-resolution image of a toy version of the sword, [Matt] traced the outline. The shape was sent over to a plasma cutter. Rather than cut one sword, two outlines were cut. One in 1/4″ steel, the other in 3/16″. A CNC was used to cut grooves in the 1/4″ section. These grooves became the manifold for propane gas jets. Separate jets were cut around the perimeter of the sword. With this complete, the two pieces were carefully TIG welded together.
This sword isn’t all prop and no chop. The upper sections were heat-treated and sharpened to a razor edge. We won’t go so far as to call this practical. It wields more like an ax than a sword. At the end of the day it doesn’t really matter though – this blazing sword is completely awesome.
Last week on the Hacklet we covered optical microscopy projects. Those are the familiar scopes that many of us have at work or even at home on our benches. These are scopes that you typically can use with your eye, or an unmodified camera. This week we’re taking a look at more extreme ways of making small things look big. Electron streams and the forces of a single atom can be used to create incredibly magnified images. So let’s jump right in and check out the best advanced microscopy projects on Hackaday.io!
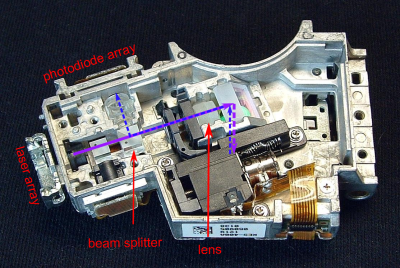
We start with [andreas.betz] and BluBEAM – a scanning laser microscope. [Andreas] aims to create a scanning confocal microscope. The diffraction limit is the law of the land for standard optical microscopes. While you can’t break the law, you can find ways around it. Confocal microscopy is one technique used quite a bit in medicine and industry. Confocal scopes are generally very expensive, well outside the budget of the average hacker. [Andreas] hopes to break that barrier by creating a scanning confocal microscope using parts from a PlayStation 3 Blu-Ray optical drive. Optical drives use voice coils to maintain focus. [Andreas] had to create a custom PCB with a voice coil driver to operate the PS3 optics assembly. He also needed to drive the laser. BluBeam is still very much a work in progress, so keep an eye on it!
Next up is [MatthiasR.] with DIY Scanning tunneling microscope. Open atmosphere scanning tunneling microscopes are popular on Hackaday.io. I covered [Dan Berard]’s creation in Hacklet 103. Inspired by Dan, [Matthias] is building his own STM.
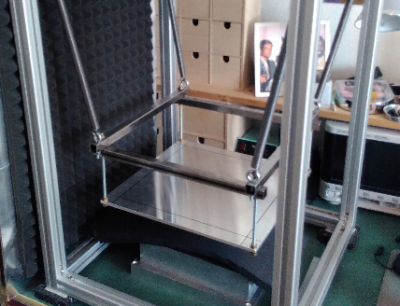
Environmental vibration is a huge problem with high magnification microscopes. [Matthias] is combating this by building a vibration isolation platform using extruded aluminum. He’s currently working on the STM preamplifier, which amplifies and converts the nano amp STM values to voltages which can be read by a digital to analog converter. [Matthias] is using the venerable Analog ADA4530 for this task. With an input bias of 20 femtoamps (!) it should be up to the task.
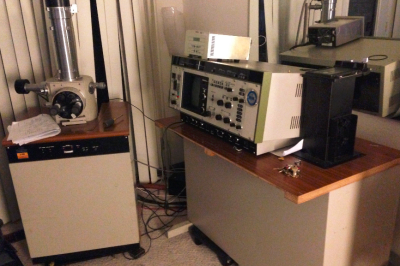
Next we have [Jerry Biehler] AKA [macona] with Hitachi S-450 Scanning Electron Microscope. Scanning electron microscopes have to be the top of the microscopy food chain. Jerry got his hands on a 1980’s vintage Hitachi SEM which was no longer working. The problem turned out to be a dodgy repair made years earlier with electrical tape. Fast forward a couple of years of use, and [Jerry] has done quite a lot to his old machine. He’s learned how to make his own filaments from tungsten wire. The slow oil diffusion vacuum pump has been replaced with a turbomolecular pump. The SEM now resides in [Jerry’s] living room, which keeps it at a relatively constant temperature.
Finally, we have [beniroquai] with Holoscope – Superresolution Holographic Microscope. Holoscope is a device which increases the resolution of a standard camera by using the physical properties of light to its advantage. Precise tiny shifts of the object being magnified cause minute changes in a reflected image, which is captured by a Raspberry Pi camera. The Pi can then reconstruct a higher resolution image using the phase data. [beniroquai] has put a lot of time into this project, even sacrificing an expensive Sony connected camera to the ESD gods. I’m following along with this one. I can’t wait to see [beniroquai]’s first few images.
If you want to see more advanced microscopy projects, check out our new advanced microscope projects list! If I missed your project, don’t be shy, just drop me a message on Hackaday.io. That’s it for this week’s Hacklet. As always, see you next week. Same hack time, same hack channel, bringing you the best of Hackaday.io!
Humans have always wanted to make small things bigger. To see that which is unseen with the naked eye. The inventor of the original microscope happened sometime in the 1600’s, though the inventor is still contested. Some say it was Cornelis Drebbel, while others say Hans Lippershey. Galileo Galilei’s compound microscope is probably the most well-known ancient magnifier. Regardless of who created the device, hackers, makers, engineers, and scientists have used microscopes to study mysteries of biology, geology, electronics, and just about anything else you can imagine.
This is a fitting topic for this week’s Hacklet at is aligns well with the Citizen Scientist challenge round of the Hackaday Prize which began on Monday. Making quality microscopes more widely available is one of many great starting ideas for an entry. Let’s take a look at some of the best microscopy projects on Hackaday.io!
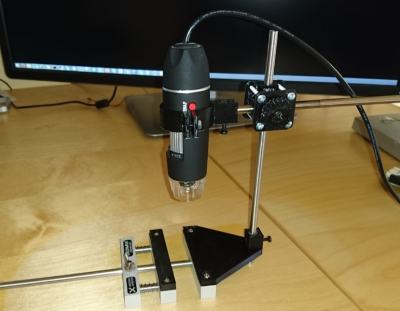
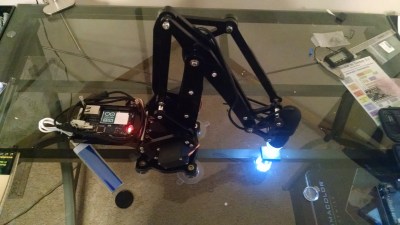
We start with [J. Kha] and Armed Microscope. [J. Kha] was one of the backers of the original uArm over at Kickstarter. He also does quite a bit of work with electronics. After fighting with a cheap USB microscope, he realized he had the perfect platform to control it. Microscopes usually are stationary, with the object being viewed moved on a stage. [J. Kha] turned things upside down by mounting the microscope on his uArm. An Arduino Yun controls the system. The Yun also allows him to stream the microscope’s video over the internet using the mjpg-streamer library. [J. Kha] did have some power issues at first, but he’s got his regulators all sorted out now.
Next we have [andyhull] with Adding a light touch to a “classic” microscope. A lucky dumpster find netted [Andy] a pile of old broken microscopes. From this he was able to build a working classic stereo scope. This was a Gillet & Sibert stereo compound scope. Like most microscopes of its time, the old GS used standard incandescent or halogen lights for illumination. The old bulbs were long gone, and would have been a pain to replace. [Andy] switched his scope over to LED illumination. He ended up using a commercially available LED “bulb” designed to replace type 1157 automotive tail light bulbs. This type of LED is designed to run on 12 volt power which simplifies the wiring. The small LED flashlight in a custom mount also provides a bit of help for opaque subjects.
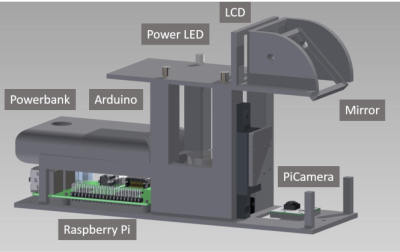
Next up is [Andre Maia Chagas] with Flypi – cheap microscope/experimental setup. Flypi is [Andre’s] entry in the 2106 Hackaday Prize. Flypi is more than just a microscope, it’s a 3D printed data collection and image analysis device for hackers and scientists alike. A Raspberry Pi 2 or 3 controls the show. Images come in through Pi Camera with an M12 lens. The Pi runs some open source Python code allowing it to acquire and analyze images. It also has an Arduino as a co-processor to handle anything a particular experiment may need – like RGB LEDs, heaters, manipulators, you name it. Andre sees Flypi as having uses in everything from fluorescence imaging to optogenetics and thermogenetics.
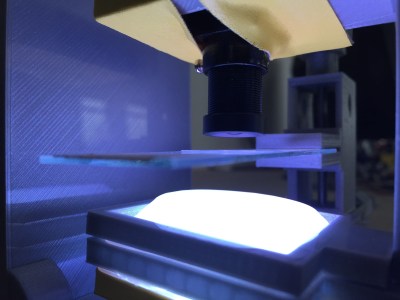
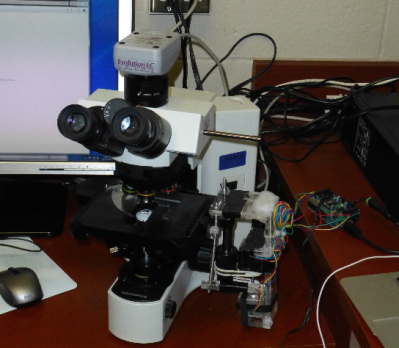
Finally we have [Jarred Heinrich] with Stagmo: Microscope Stage Automator. Positioning samples under high magnification requires a steady hand. Trying to image them makes things even harder. To help with this, microscopes have stages. Fine lead screws manually controlled by knobs allow the user to precisely position any subject. Automated stages are available as well, but they can get quite expensive. [Jarred] recognized that the microscope stage is an X-Y platform like any CNC, laser, or 3D printer. He used an Arduino and a motor shield to control a couple of stepper motors. The motors are coupled to the stage knobs with rubber belts. While the mounting system looks a little wobbly, but it got the job done, and didn’t require any modifications to the microscope itself.
Optical microscopes are just one type of scope you’ll find on Hackaday.io. There are also atomic force microscopes, scanning electron microscopes, and more! I’ll cover those on a future Hacklet. If you want to see more awesome optical microscopy projects, check out our new optical microscope projects list! If I missed your project, don’t be shy, just drop me a message on Hackaday.io. That’s it for this week’s Hacklet. As always, see you next week. Same hack time, same hack channel, bringing you the best of Hackaday.io!
If you can’t tell, we’re on a roll with 3D printers and printed projects this month. So far, we’ve covered printers, and simple functional 3D prints. This week we’re taking a look at some of the awesome complex 3D printed projects on Hackaday.io.
Complex 3D printed projects are things like robots, quadcopters, satellite tracking systems, and more. So let’s jump in and look at some of the best complex 3D printed projects on Hackaday.io!
We start with [Alberto] and Dtto v1.0 Modular Robot. Dtto is [Alberto’s] entry in the 2016 Hackaday Prize. Inspired by Bruce Lee’s famous water quote, Dtto is a modular snake-like robot. Each section of Dtto is a double hinged joint. When two sections come together, magnets help them align. A servo controlled latch solidly docks the sections, which then work in unison. Dtto can connect and separate segments autonomously – no human required. [Alberto] sees applications for a robot like [Dtto] in search and rescue and space operations. Continue reading “Hacklet 109 – Complex 3D Printed Projects”→
The modern office has become a sea of LCD monitors. It’s hard to believe that only a few years ago we were sitting behind Cathode Ray Tubes (CRTs). People have already forgotten the heat, the dust, and the lovely high frequency squeal from their flyback transformers.
Image by Søren Peo Pedersen via wikipedia
There was one feature of those old monitors which seems to be poorly understood. The lowly degauss button. On some monitors it was a physical button. On others, it was a magnet icon on the On Screen Display (OSD). Pressing it rewarded the user with around 5 seconds of a wavy display accompanied by a loud hum.
But what exactly did this button do? It seems that many never knew the purpose of that silly little button, beyond the light-and-sound show. The truth is that degaussing is rather important. Not only to CRTs, but in many other electronic and industrial applications.
Of Shadow Masks and Aperture Grilles
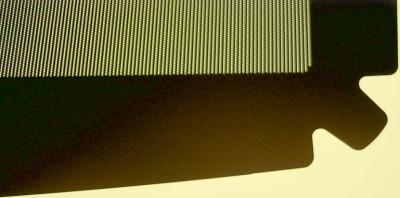
Close up of a shadow mask by Rauenstein via Wikipedia
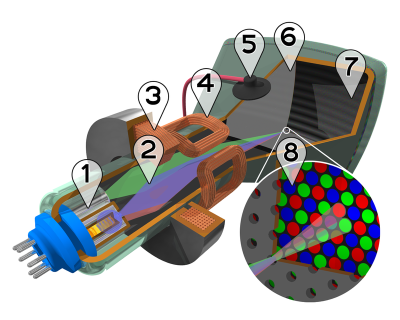
A CRT has quite a few components. There are three electron guns as well as steering and convergence coils at the rear (yoke) of the tube. The front of the tube has a phosphor-coated glass plate which forms the screen. Just behind that glass is a metal grid called the shadow mask. If you had enough money for a Sony screen, the shadow mask was replaced by the famous Trinitron aperture grille, a fine mesh of wires which performed a similar function. The shadow mask or aperture grille’s job is to ensure that the right beams of electrons hit the red, green, or blue phosphor coatings on the front of the screen.
This all required a very precise alignment. Any stray magnetic fields imprinted on the mask would cause the electron beams to bend as they flew through the tube. Too strong a magnetic field, and your TV or monitor would start showing rainbows like something out of a 1960’s acid trip movie. Even the Earth’s own magnetic field could become imprinted on the shadow mask. Simply turning a TV from North to East could cause problems. The official term for it was “Color Purity”.
These issues were well known from the early days of color TV sets. To combat this, manufacturers added a degaussing coil to their sets. A coil of wire wrapped around the front of the tube, just behind the bezel of the set. When the set was powered on, the coil would be fed with mains voltage. This is the well-known ‘fwoomp and buzz’ those old TV sets and monitors would make when you first turned them on. The 50 Hz or 60 Hz AC would create a strong moving magnetic field. This field would effectively erase the imprinted magnetic fields on the shadow mask or aperture grille.
Running high current through the thin degaussing coil would quickly lead to a fire. Sets avoided this by using a Positive Temperature Coefficient (PTC) thermistor in-line with the coil. The current itself (or a small heating coil) would heat up the PTC, causing resistance to increase, and current through the coil to drop. After about 5 seconds, the coil was completely shut down, and the screen was (hopefully) degaussed.
As time went on monitors became embedded systems. The PTC devices were replaced by transistors controlled by the monitor’s main microcontroller. Monitor manufacturers knew that their sets were higher resolution than the average TV set, and thus even more sensitive to magnetic fields. Users are also more likely to move a monitor while using it. This lead the manufacturers to add a degauss button to the front of their sets. A push of the button would energize the coil for a few seconds under software control. Some monitors would also limit the number of times a user could push the button, ensuring the coil didn’t get too hot.
Holding a magnet near the front of a black and white (or a monochrome ‘green screen’) CRT created visible distortion, but no lasting damage. Mid-century hackers who tried the same trick with their first color TV quickly learned that the rainbow effect stayed long after the magnet was moved away. In extreme cases like these, the internal degaussing coil wouldn’t be strong enough to clear the shadow mask.
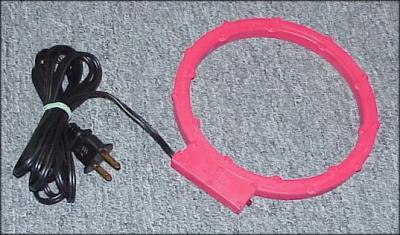
Commercial degaussing coil
When all else failed, a handheld degaussing coil or wand could be used. Literally waving the magic wand in front of the screen would usually clear things up. It was of course possible to permanently damage the shadow mask. Back in 2007, I was working for a radar company which had been slow to switch to LCD monitors. Being a radar shop, we had a few strong magnetron magnets lying around. One of these magnets was passed around among the engineers. Leaving the magnet under your monitor overnight would guarantee rainbows in the morning, and a shiny new LCD within a few days.
Queen Mary, showing her degaussing coil
CRTs aren’t the only devices which use degaussing coils. The term was originally coined in 1945 by Charles F. Goodeve of the Royal Canadian Naval Volunteer Reserve (RCNVR). German mines were capable of detecting the magnetic fields in a naval ship’s steel hull. Coils were used to mask this field. The Queen Mary is one of the more famous ships fitted with a degaussing coil to avoid the deadly mines.
Even mechanical wristwatches can benefit from a bit of degaussing. A watch which has been magnetized will typically run fast. Typically this is due to the steel balance spring becoming a weak magnet. The coils of the spring stick together as the balance wheel winds and unwinds each second. A degaussing coil (or in this case, more properly a demagnetizer) can quickly eliminate the problem.
A story on degaussing wouldn’t be complete without mentioning magnetic media. Handheld or tabletop degaussing coils can be used to bulk erase floppy disks, magnetic tape, even hard disks. One has to wonder if the degaussing coils in monitors were responsible for floppy disks becoming corrupted back in the old days.
So there you have it. The magic degaussing button demystified!
We featured 3D printer projects on last week’s Hacklet. This week, we’re looking at a few awesome projects created with those printers. Trying to pick great 3D printed projects on Hackaday.io is a bit like staring at the sun. There are just way too many to choose from. To make things a bit easier, I’ve broken things down into categories. There are artistic prints, complex mechanical or electronic prints, and then there are simple functional prints, which is the topic we’re featuring today. Simple functional prints are designs which perform some function in the world. By simple, I mean they have only a few moving parts or electronic components. Let’s get right to it!
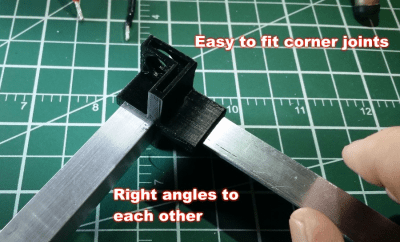
We start with [Scott] and L Extrusion Endcaps. Every Home Depot, Lowes, or hardware store has a selection of extruded aluminum. Typically there are a few flat bars, and some L brackets. L brackets are great, but they can be a pain to work with. Most of us don’t have the skills or the tools to weld aluminum, so nuts and bolts are the only way to go. [Scott’s] given us another option. He’s designed a set of 3D printable brackets that slip onto the ends of the brackets. The brackets make quick work of building boxes, racks, or anything with 90° or 45° angles.
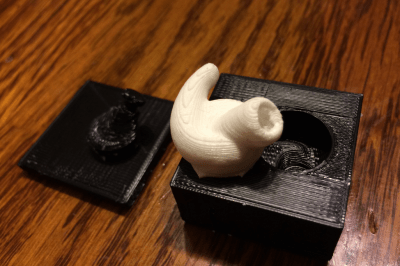
Next up is [Joe M] with 3D Printed Molds: Custom Silicone Earbuds. [Joe] had a set of Bluetooth earbuds he enjoyed, but the rubber tips left a bit to be desired. Not a problem when you have a 3D printer on hand. [Joe] measured the plastic part of his earbuds and the rubber tips from a different set he liked. A bit of CAD magic later, and he had a model for the perfect earbud tip. While he could have directly printed the tip in a flexible filament like NinjaFlex, [Joe] opted for a pure silicone tip. He printed molds, then mixed silicone caulk with cornstarch (as a catalyst). The resulting earbuds sound and feel great!
Next we have [Jetty] with Highly Configurable 3D Printed Helmholtz Coil. Helmholtz coils are used to create uniform magnetic fields. Why would you want to do that? It could be anything from measuring magnets to cancelling out the effect of the earth’s magnetic field on a device being tested. [Jetty’s] wrote an OpenScad program which allows the user to enter parameters for their coil. [Jetty’s] program then calculates the coil’s magnetic properties, and outputs a printable .stl file. Building the coil is as simple as printing it and wrapping some copper wire. [Jetty] found that his coil was within 60nT (nanoTesla) of the expected value. Not bad for a bit of plastic and wire!
Finally we have StickScope, [SUF’s] entry in the 2016 Hackaday Prize. Like many of us, [SUF] loves his StickVise. Sometimes you need a bit of magnification to see those tiny 0201 resistors though. [SUF] had a cheap USB microscope on hand, so he designed StickScope, a USB microscope mount designed especially for the StickVise. Two 6mm steel rods are the backbone of the design. 3D printed clamps hold the system together like a miniature boom microscope. This is actually the third revision of the design. [SUF] found that the original design couldn’t be used with parts close to the bar which holds the microscope. A small jaw extender was the perfect tweak.
If you want to see more simple functional 3D printed projects, check out our new simple functional 3D prints list! If I missed your project, don’t be shy, just drop me a message on Hackaday.io. That’s it for this week’s Hacklet. As always, see you next week. Same hack time, same hack channel, bringing you the best of Hackaday.io!
Everyone who’s donated blood, gotten an intravenous (IV) line put in, or has taken a blood test knows that little bit of anxiety before the needle goes in. Will this be a one stick operation, or will the phlebotomist do their impression of drilling for oil while trying to find a vein? Some of us are blessed with easy to find blood vessels. Others end up walking out looking like they’ve been in a fight with a needle.
[Alex’s] wife girlfriend is a nurse who’s had trouble finding veins in the past. [Alex] is an automotive engineer by trade, more acquainted with oil lines than veins and arteries. While he couldn’t help her himself, [Alex] designed this 3D printed vein finder to help his wife girlfriend out at work. He started by studying devices on the market. Products like Veinlite use LEDs to illuminate the skin. Essentially these products are a string of LEDs and a battery. They are patented, FDA approved, and will set you back between $188 and $549 USD. [Alex] and his wife girlfriend couldn’t afford that kind of cost, so he built his own. Continue reading “DIY Vein Finder Shows You Where To Stick It”→


 These issues were well known from the early days of color TV sets. To combat this, manufacturers added a degaussing coil to their sets. A coil of wire wrapped around the front of the tube, just behind the bezel of the set. When the set was powered on, the coil would be fed with mains voltage. This is the well-known ‘fwoomp and buzz’ those old TV sets and monitors would make when you first turned them on. The 50 Hz or 60 Hz AC would create a strong moving magnetic field. This field would effectively erase the imprinted magnetic fields on the shadow mask or aperture grille.