Man holding brass bar stock with several polygons turned on end

Polygons On A Lathe

Most professionals would put a polygon on the end of a turned part using a milling machine. But many a hobbyist doesn’t have a mill. And if the polygon needs to be accurately centered, remounting the stock costs accuracy.

[Mehamozg] demonstrates you can turn a polygon on a lathe.

Polygons on shaft ends are surprisingly common, whether you are replacing a lost chuck key, need an angular index, or need a dismountable drive. As the video shows, you can definitely make them on the lathe.

But how the heck does this work? It seems like magic.

Lets start by imagining we disengage and lock the rotating cutter in [Mehamozg]’s setup and run the lathe. If the tool is pointed directly at the center we are just turning normally.  If we angle the tool either side of center we still get a cylinder, but the radius increases by the sin of the angle.

Now, if we take a piece of stock with a flat on it and plot radius versus angle we get a flat line with a sin curve dip in it. So if we use [Mehamozg]s setup and run the cutter and chuck at the same speed, the cutter angle and the stock angle increase at the same time, and we end up with a flat on the part.  If the cutter is rotating an even multiple of the chuck speed, we get a polygon.

The rub in all this is the cutter angle.. At first we were convinced it was varying enormously. But the surface at the contact point is not perpendicular to  the radius from center to contact. So it cancels out, we think.  But our brains are a bit fried by this one. Opinions in the comments welcomed.

We like this hack. It’s for a commonly needed operation, and versatile enough  to be worth fiddling with the inevitable pain of doing it the first time.  For a much more specialized machining hack, check out  this tool that works much the same in the other axis.

A thickness gauge, letter scale, push stick, and dial caliper

Measure Three Times, Design Once

Most of the Hackaday community would never wire a power supply to a circuit without knowing the expected voltage and the required current. But our mechanical design is often more bodged. We meet folks who carefully budget power to their microcontroller, sensors, and so on, but never measure the forces involved in their mechanical designs. Then they’re surprised when the motor they chose isn’t big enough for the weight of their robot.

An obstacle to being more numbers oriented is lack of basic data about the system. So, here are some simple tools for measuring dynamic properties of small mechanisms; distances, forces, velocities, accelerations, torques, and other things you haven’t thought about since college physics. If you don’t have these in your toolkit, how do you measure?

Continue reading “Measure Three Times, Design Once”

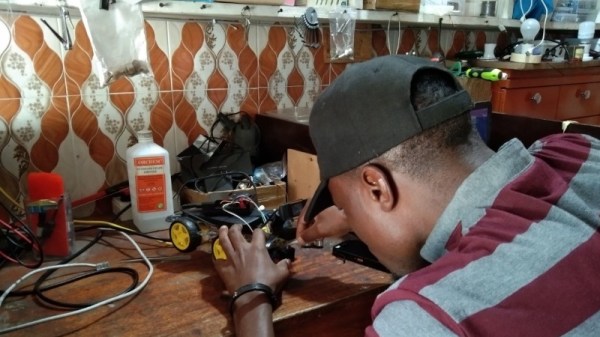
African man hunched over a small robot car chassis

The Dar Es Salaam Hacker Scene And Gamut Detection

We’re on a sort of vacation in Tanzania at the moment and staying in a modest hotel away from the tourist and government district. It’s a district of small shops selling the same things and guys repairing washing machines out on the sidewalk. The guys repairing washing machines are more than happy to talk. Everybody’s amazingly friendly here, the hotel guy grilled us for an hour about our home state. But I really didn’t expect to end up in a conversation about computer vision.

In search of some yogurt and maybe something cooler to wear, we went on a little walk away from the hotel. With incredible luck we found a robotics shop a few blocks away. Mecktonix is a shop about two meters each way, stuffed full of Arduinos, robots, electronics components, servos, and random computer gear, overseen by [Yohanna “Joe” Harembo]. Nearby is another space with a laser engraver and 3D printer. The tiny space doesn’t stop them from being busy. A constant stream of automotive tech students from the nearby National Institute of Transport shuffle in for advice and parts for class assigned projects.

In between students, Joe demos an autonomous car he’s working on. In classic hacker fashion, he first has to reattach the motor driver board and various sensors, but then he demos the car and its problem –  the video frame rate is very slow. We dive in with him and try to get some profiling using time.monotonic_ns(). He’s never done profiling before, so this is a big eye opener. He’s only processing one video frame every 4.3 seconds, using YOLO on a Pi 3, and yup, that’s the problem.  I suggest he change to gamut detection or a Pi 4. Continue reading “The Dar Es Salaam Hacker Scene And Gamut Detection”

small actor on giant table

NERF – Neural Radiance Fields

Making narrative film just keeps getting easier. What once took a studio is now within reach of the dedicated hobbyist. And Neural Radiance Fields are making it a dramatic step easier. The guys from [Corridor Crew] give an early peek.

Filming and editing have reached the cell phone and laptop stage of easy. But sets, costumes, actors, lighting, and so on haven’t gotten substantially cheaper, and making your own short film is still a major project.

Enter 3D graphics. With a good gaming laptop, anybody can make a photorealistic scene in Blender and place live action actors in it. But it takes both a lot of skill and work. And often, the scene you’re making is available as  a real place, but you can’t get permission to film or haul actors, props, crew, and so on to the set.

A new technology, NERF, for “NEural Radiance Fields”, has decreased the headaches a lot.  Instead of making a 3D model of the scene and using that to predict what reaches the camera, the software starts with video of the scene and machine learns a “radiance field” – a model of how light is reflected by the scene. Continue reading “NERF – Neural Radiance Fields”

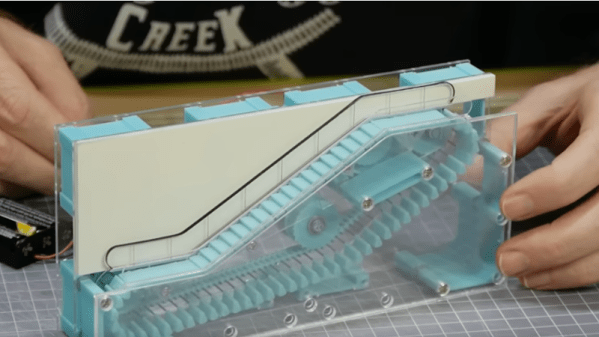
3d printed escalator, from side, showing mechanism

Tiny 3D Printed HO Scale Escalator That Works

[Luke Towan] has a cool HO scale Escalator mostly made of 3D printed parts, with some laser cut acrylic, for a station on his HO model railroad.

Escalators are mesmerizing to watch – there’s something magical about the stairs unfolding at the bottom and folding up at the top. But they’re very hard to model.

[Luke Towan] has done it – his 3D printed version closely resembles the real thing mechanically. Pins are carried around, cantilevered out from a 3D printed chain. A stair swivels on each pin – at the bottom each stair’s free end rests on a ‘bottom’ far enough down for the stairs to be level, while on the incline the ‘bottom’ is just below the pins. It’s a tricky build.

If you like pushing the envelope of what 3D printing can do this is an interesting project, even if you’re not planning to build an escalator. There are lots of tips for making small mechanisms with 3D printing, and for making small mechanisms that work reliably without stuttering.

He’s not the first to build an escalator. Back in 2015 we covered this wooden escalator for slinkies,  and just recently this 3D printed version from [AlexY].


I See By Your Tattoo That You Are A Hacker

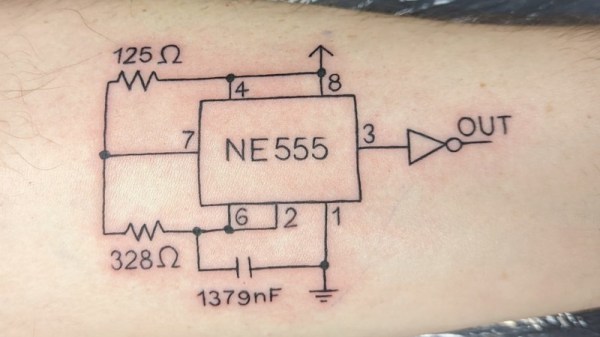
We spotted [Segfault]’s new tattoo on a fast failing bird app a few days ago. We thought it was nice looking piece of skin art, but without a write up couldn’t cover it. The bearer of the tattoo pointed us to this blog post about the tattoo, and now we really like it.

It’s fun on it’s own, but when you start staring at it you realize it’s full of hidden jokes and meanings. If you like puzzles, go hunting for them before you read the blog post. We also liked the reminiscence about [Segfault]’s early electronics experimentation days, and how the 555 timer IC figured prominently in them.

We’ve not covered a lot of tattoos here at Hackaday.  Mostly we cover the technology behind skin fused or embedded hacks. But occasionally some tattoo art catches our eye, as it did in this interesting barcode tattoo.

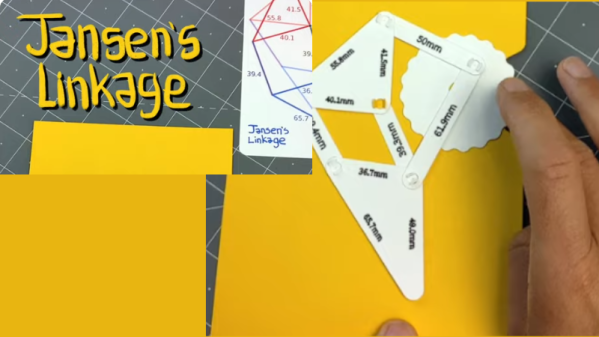
Jansen's linkage, paper model of a bar linkage

Making Paper Strandbeesten

We love the artistry of paper mechanisms.  Simple tools and techniques creating humor, beauty, and amazement.

[Federico Tobon] from [Wolfcat Workshop] makes amazing automata, crosses between cut paper art, origami, and traditional carved wood automata.  He’s put out a useful new video on making linkages in paper parts.

In this short video, [Federico] shows us how to make a paper version of the leg mechanism for [Theo Jansen]’s classic Strandbeest, which we’ve covered in many variations.

Rotating joints in paper automata are sometimes done with a mechanical fastener like a post screw, but it violates the simplicity of the affair and often looks clunky.  [Federico] uses a simple self fastener. A 5 mm hole in one part mates with two “flaps” in the other part. He’s made a separate video covering how to make the fastenings. He’s using a paper crafter’s Cricut-type machine to cut the parts.  Pretty cool.

We’ve covered lots of other cool stuf from [Wolfcat Workshop]. If you want more of his automata eye candy, check out Simple Automata Extravaganza.