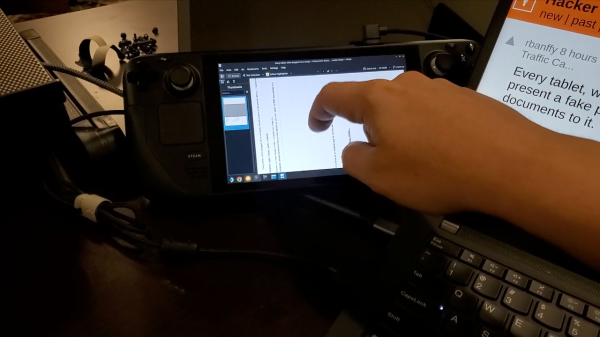
SteamDeck connected to a laptop with a USB cable, showing the 'printed-out' document on its screen inside a PDF reader

SteamDeck: Become Printer

Wonderful things happen when we read the documentation. For instance, we’ve all seen a Raspberry Pi work as an Ethernet adapter over USB, or a ESP32-S2 presenting as a storage device. Well, [parkerlreed] has made his Steam Deck work as a USB printer after reading the Linux kernel docs on the USB gadget configuration, and all it took was some C code and a BIOS setting change.

“Wouldn’t it be cool if our USB tablets exposed a fake printer interface and saved the received documents as PDF?” With a SteamDeck, you can do just that – thanks to the g_printer kernel module. The C code is fairly straightforward, and even lets you configure some aspects of the printer device.

Of course, there’s gotta be a cherry on the cake, and [parkerlreed]’s shell script hides an addition that makes your PDF printing experience all that more realistic! Not to spoil it too much – you should watch the video of the script in action, showcasing both the ease of use and the added realism.

Jokes aside, the usefulness of this script is undeniable, and owners of USB-device-capable portable Linux devices will find this script a must-have. It’s seriously cool when someone dives into documentation and pulls out a clever solution to a “wouldn’t it be cool” idea – fundamentally, it is the same mindset that gave us the venerable RTL-SDR. What’s your favourite ‘dig into docs and figure out a clever feature’ hack?

We thank [Myself] for sharing this with us on the Hackaday Discord!
Continue reading “SteamDeck: Become Printer” →

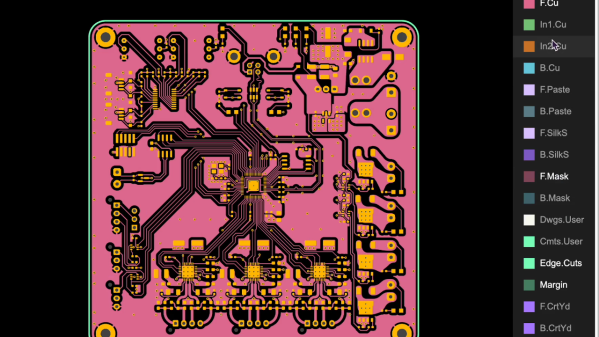
Showing KiCanvas board viewer component inside a browser window, with a board being displayed and toggleable layers

KiCanvas Helps Teach And Share KiCad Projects In Browsers

KiCad is undeniably the hacker favourite when it comes to PCB design, and we’ve built a large amount of infrastructure around it – plugins, integrations, exporters, viewers, and much more. Now, [Stargirl Flowers] is working on what we could call a web viewer for KiCad files – though calling the KiCanvas project a “KiCad viewer” would be an understatement, given everything it aims to let you do. It will help you do exciting things like copy-pasting circuits between KiCad and browser windows, embed circuits into your blog and show component properties/part numbers interactively, and of course, it will work as a standalone online viewer for KiCad files!

Continue reading “KiCanvas Helps Teach And Share KiCad Projects In Browsers” →

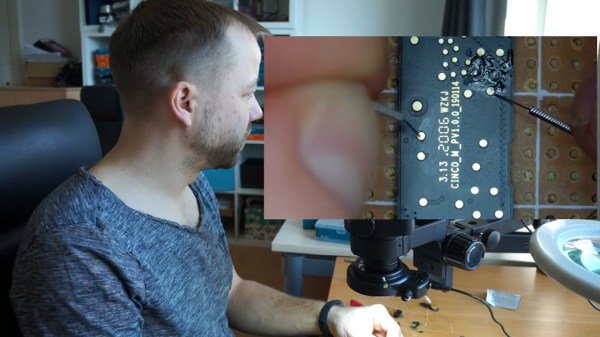
The hack's author performing the operation described at his workdesk, with a separate camera window showing the acupuncture needles being used to touch the board points

Find SWD Points Quickly, No Extra Hardware Needed

Say you’re tinkering with a smart device powered by a CPU that uses Serial Wire Debug (SWD), but doesn’t mark the testpoints. Finding SWD on a board — how hard could it be? With [Aaron Christophel]’s method, you can find the SWD interface on a PCB within a few minutes’ time. All you need is two needles, a known-to-be-ground connection, an SWD dongle of some kind, and a computer with an audio output. What’s best — you could easily transfer the gist of this method to other programming interface types!

The idea is simple: you wire the ground up, connect the needles to SWDIO and SWCLK, launch [Aaron]’s Python script, then start poking around all the unnamed test points. The script runs JLink software to probe for SWD devices attached to the probes — if an SWD interface isn’t found, it beeps idly, but as soon as the device is detected, your computer will start beeping at you in a lively manner. In this way, you don’t have to re-scan devices manually, solder to any test points except the GND one, or try and hold both probes on test points with one hand – the scanning process itself is hands-free.

Depending on how many points your board has and whether you try to optimize the process by probing points closest to the SWD pins on the CPU, you might hit the jackpot immediately, or you might have to poke around for a minute-two. That said, [Aaron]’s method seems to be the best you can do while remaining relatively extra-hardware-free, and if you want to make it a tinge more permanent, clothespins are there for you.

In case you don’t mind extra hardware – could we interest you in some 3D printed needle probe desks? There’s a wide variety of those, whether you’d like some tentacle-like ones, or ones that make your desk look like like an acupuncture table. Or, say, would you like a more automatic method of finding all kinds of debug interfaces? Then JTAGulator might be what you’re looking for.

Continue reading “Find SWD Points Quickly, No Extra Hardware Needed” →

All About USB-C: Pinecil Soldering Iron

As many people have pointed out, what matters with USB-C isn’t just the standard, it’s the implementations. After all, it’s the implementations that we actually have to deal with, and it’s where most of the problems with USB-C arise. There is some fault to the standard, like lack of cable markings from the get-go, but at this point, I’m convinced that the USB-C standard is a lot better than some people think.

I’d like to walk you through a few USB-C implementations in real, open-source, adjacent, and just interesting products. They’re all imperfect in some way – it can’t be otherwise, as they have to deal with the messy real world, where perfection is a rarity.

Today, let’s check out the Pinecil. A soldering iron by Pine64, released a few years ago, keeping the price low and quality high. It sports both a barrel jack and a USB-C port for its power input – a welcome departure from the Miniware iron strategy, where neither the barrel-jack-only TS100 nor the low-power proprietary-tip TS80 irons quite did it. And, given its design around TS100 T12-style tips, it’s no wonder Pinecil took a well-deserved spot in hobbyist world.

Can’t Just Pull The Trigger

Now, you might be thinking that Pinecil ought to be a simple device. The usual way to get high power out of a USB-C port is a Power Delivery (PD) trigger IC, and you could merely use that. However, if you’ve read the USB-C power article, you might remember the 45 W vs 60 W charger scenario, where such an arrangement would fail immediately. Overall, the configurability of trigger ICs is quite low, and when encountering a PD compatibility problem with some PSU, you can’t do anything about it except replace the IC with a slightly-different-logic IC- if a replacement even exists, and it usually does not. This is costly and limiting for a real-world use product. Continue reading “All About USB-C: Pinecil Soldering Iron” →

All About USB-C: Framework Laptop

Talking about high-quality USB-C implementations, there’s a product that has multiple selling points designed around USB-C, and is arguably a shining example of how to do USB-C right. It’s the Framework laptop, where the USB-C expansion cards take the center stage.

Full disclosure – this article is being typed on a Framework laptop, and I got it free from Framework. I didn’t get it for Hackaday coverage – I develop Framework-aimed hardware as hobby, specifically, boards that hack upon aspects of this laptop in fun ways. As part of their community developer support effort, they’ve provided me with a laptop that I wouldn’t otherwise be able to get for such a hobby. By now, I’m part of the Framework community, I have my own set of things I like about this laptop, and a set of things I dislike.

This is not an article about how I’m satisfied or dissatisfied with the Framework laptop – there’s plenty of those around, and it would not be fair for me to write one – I haven’t paid for it in anything except having lots of fun designing boards and hanging out with other people designing cool things, which is something I do willingly. I’m an all-things-laptops enthusiast, and the reason I’d like to talk about Framework is that there is no better example of USB-C, and everything you can do with it, in the wild. Continue reading “All About USB-C: Framework Laptop” →

All About USB-C: High-Speed Interfaces

One amazing thing about USB-C is its high-speed capabilities. The pinout gives you four high-speed differential pairs and a few more lower-speed pairs, which let you pump giant amounts of data through a connector smaller than a cent coin. Not all devices take advantage of this capability, and they’re not required to – USB-C is designed to be accessible for every portable device under the sun. When you have a device with high-speed needs exposed through USB-C, however, it’s glorious just how much USB-C can give you, and how well it can work.

The ability to get a high-speed interface out of USB-C is called an Alternate Mode, “altmode” for short. The three altmodes you can encounter nowadays are USB3, DisplayPort and Thunderbolt, there’s a few that have faded into obscurity like HDMI and VirtualLink, and some are up and coming like USB4. Most altmodes require digital USB-C communication, using a certain kind of messages over the PD channel. That said, not all of them do – the USB3 is the simplest one. Let’s go through what makes an altmode tick. Continue reading “All About USB-C: High-Speed Interfaces” →

All About USB-C: Power Delivery

USB-C eliminates proprietary barrel plug chargers that we’ve been using for laptops and myriads of other devices. It fights proprietary phone charger standards by explicitly making them non-compliant, bullying companies into making their devices work with widely available chargers. As a hobbyist, you no longer need to push 3 A through tiny MicroUSB connectors and underspecced cables to power a current-hungry Pi 4. Today, all you need is a USB-C socket with two resistors – or a somewhat special chip in case the resistors don’t quite get you where you want to be.

You get way more bang for your buck with USB-C. This applies to power too; after all, not all devices will subsist on 15 W – some will want more. If 15 W isn’t enough for your device, let’s see how we can get you beyond.

Reaching Higher

USB-C power supplies always support 5 V and some are limited to that, but support for higher voltages is where it’s at. The usual voltage steps of USB-C are 5 V, 9 V, 15 V and 20 V ; 12V support is optional and is more of a convention. These steps are referred to as SPR, and EPR adds 28 V, 36 V and 48 V steps into the mix – for up to 240 W; necessitating new cables, but being fully backwards and forwards compatible, and fully safe to use due to cable and device checks that USB-C lets you perform.

A charger has to support all steps below its highest step, which means that 20 V-capable chargers also have to support 5 V, 9 V, and 15 V as well – in practice, most of them indeed do, and only some might skip a step or two. You can also get voltages in-between, down to 3.3 V, even, using a PD standard called PPS (or the AVS standard for EPR-range chargers) – it’s not a requirement, but you’ll find that quite a few USB-C PSUs will oblige, and PPS support is usually written on the label. Continue reading “All About USB-C: Power Delivery” →