OpenSCAD Gives You Parametric Boxes

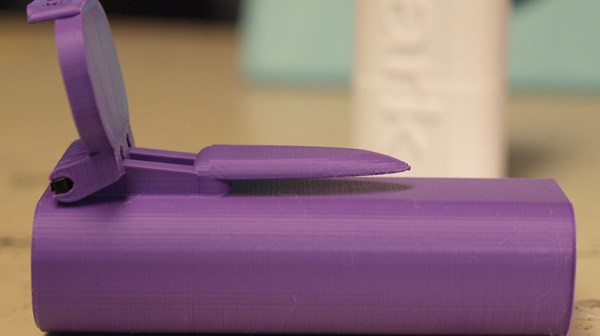
OpenSCAD is one of the most powerful 3d modeling applications around. Its beauty is in its simplicity; if you need a box, you can just write the code for a box. If you need some bit of plastic to keep your 3D printer running, you can just write the code for that bit of plastic. Like all programming languages, OpenSCAD is only really powerful if you have a huge back-catalog of various components ready for reuse. That’s where [Mark]’s library for hinged boxes comes in handy. Every type of box you would ever want to create, from boxes with covers, magnet closures, or cases for your glasses is easily accessible with just a few lines of code.

The work presented here is an OpenSCAD script to generate two-piece hinged boxes, with rounded corners, a lid, interlocking rims, and optional snap fit, magnet, or screw closures. As you would expect from OpenSCAD, everything in this script is parametric. You can change any measurement or simply delete entire sections of the box.

The included examples consist of a small mini-Altoids tin-sized ‘Bee Box’ with a snap-fit lid. All of the relevant dimensions of the snap-fit lid are variables. Other examples include an eyeglass case and a box for small parts storage that interlock. If you have a few rolls of filament, a lot of time on your hands, and want to organize your workbench, you could do worse than checking out a few of these OpenSCAD boxes.

Miniature 3D Printed Forklift Is Quite Pallet-able

If you have a small logistics problem, we have the solution for you. [Leon] built a tiny little forklift with LED lighting, working forks, and remote control using a combination of 3D printing tech, some CNC work, and fine soldering skills.

The electronics for this build are based around a few servos and a pair of geared DC motors and are driven via an Arduino Mega. Connectivity and remote controllability are what you would expect from an Arduinified project. There’s an HC-05 Bluetooth module on the board and remote control is handled by a custom Android app.

Of note in this project are the forks that actually work, almost like a real forklift. This allows the mini Arduino forklift to pick up mini pallets, drop them somewhere, and have mini DIY enthusiasts come up to build mini-furniture for mini-Etsy, which will be prominently featured in the mini foyer of a mini two-story walkup. No, it’s not mini-gentrification; this mini forklift is helping the mini local economy.

You can check out the entire build video below, filmed in the usual maker demo method of speeding up the entire build process but somehow keeping the no-talking audio. We have a lot to thank [Jimmy DiResta] for, and it’s not just cinematography. All the files for this forklift are up on the Github should you want to build your own.

Continue reading “Miniature 3D Printed Forklift Is Quite Pallet-able”

Hackaday Links Column Banner

Hackaday Links: March 10, 2019

Do you like hamburgers? Everyone likes hamburgers. Inspired by a phone you could buy at Spencers in 1991, [Love Hulten] built a Game Burger Advance. The guts are a Raspberry Pi Zero, a standard LCD display and what appears to be a USB control pad. The fabrication is where this one really goes crazy. It’s a significant amount of laser-cut plywood or MDF stacked together into a laminate then sanded and painted to look like a hamburger. Actually, it’s a cheeseburger, but we don’t deal with the prescriptivist view of linguistics and Wendy’s doesn’t sell hamburgers, they sell cheeseburgers without cheese. Hamburgers are not cheeseburgers without cheese but I digress… Just be glad this links post isn’t me going off for two thousand words talking about language and cheeseburgers.

If you have a 2012 MacBook Pro, congratulations, you have one of the last good laptops Apple will ever build. [Docatl] over on Reddit has one of these fine machines, but found it was overheating. This Genius did what anyone would do — drilled some vents in the bottom of the laptop. The results are impressive, with stock temperatures climbing to 80º C when rendering video, and the post-drilled temps cooling down to a balmy 65º.

Here’s a Kickstarter for you. It’s an Arduino Zero in a narrow DIP-16 package, albeit with a USB connector hanging over the outline of a normal DIP-16 footprint. The specs are an ATSAMD21 Cortex-M0+ running at 48 MHz, 256kB of Flash, 32k of RAM, and an integrated bootloader.

Ha ha Tim Cook changed his name to Tim Square because Apple users are squares amirite?

We’re not going to get into a discussion about mental health or anything here, but TheFlightChannel just published a flight sim reenactment of the SeaTac Dash-8 Horizon Air incident from last summer. This video is absolutely fantastic.

The Sipeed K210 is a chip you should know about. It’s a RISC-V microcontroller that’s right up there with the fastest, most powerful STM32 chips, but it’s RISC-V and it costs eight dollars. Also, it has neural networks, because. We first heard about this chip as a preorder on Taobao (?!), but now it’s getting a slightly more official release. Seeed is working on a Raspberry Pi Hat for this chip, and they want your input. Right now we’re looking at two versions, one with WiFi and one without, and both can either work with a Raspberry Pi or as a standalone board. They have the basic layout, but they’d like to know what features the community would want.

Component Video For The Commodore 64

Of all the retro systems, the Commodore 64 had the best video system. The VIC-II chip in the C64 was the best example of why Commodore was the best, but in terms of video output, the C64 was still a consumer device: the only output was S-video, or composite video, or something like it. The professional stuff uses YPbPr, an RGB video signal that separates the red, green, and blue colors. On a modern LCD, the difference between composite and YPbPr is noticeable, and if you’re going to run your C64 on the big screen, it would be very helpful to use a professional video standard.

In an effort to bring the C64 into the future, [c0pperdragon] created an FPGA-based modification for the VIC-II chip. The end result is getting YPbPr signals directly from the computer, and outputting it to a TV in glorious 480p.

Inside the Commodore 64, the VIC-II creates the chrominance signal in a way that is impossible to convert it back to any form of RGB. The solution to get RGB out of this information is to listen in to 22 pins of the VIC-II to determine what signals it intends to generate. This is done with a smallish Altera FPGA connected to the VIC-II through a ribbon cable. On the FPGA, the luminescence and all the color information is generated, then converted into true YPbPr. For the complete mod, the RF modulator is removed, and the original A/V jack is still functional. This is effectively a very in-depth mod that rids the C64 of the TV connector and channel selector (that no one uses anymore) and replaces it with a professional-grade video output.

When it comes to C64 mods, we thought we’ve seen it all. We’ve seen C64s resurrected from the dead, and we’ve seen drop-in replacements for the SID that still don’t have working filters oh my god. This is on another level. This is using FPGAs to drag the C64 into the modern era, and if you don’t care about the rusting RF box, it’s a reversible mod.

Truly Random MIDI Control

Generating random data is incredibly hard, and most of the random data around you isn’t truly random, but merely pseudo-random. For really random data, you’ll have to look at something like radioactive decay or *holds up spork* something like this. YouTube commenters will also suffice. The idea of using random data for generating musical notes is nothing new, but [Danny]’s experimental MIDI controller is something else. It’s a MIDI controller with the control removed, generating random musical notes based on radioactive decay.

The design of this controller is based on an off-the-shelf Geiger counter kit attached to an Arduino. The Arduino code simply counts up in a loop, and when the Geiger tube is triggered, an interrupt sets off a bit of code to generate a MIDI note. That’s simple enough, but where this project excels is its documentation. There’s a zine going through all the functions of this MIDI controller. There are single note or sequencer functions, a definable root note and scale type, an octave range, and velocity of the note can be set.

This is just a MIDI controller and doesn’t generate any noise on its own, but the video of the device in action shows off the range. [Danny] is getting everything from driving bass lines to strange ambient music out of this thing with the help of some synths and samplers. All the code and necessary files are available on the GitHub, with the video available below.

Continue reading “Truly Random MIDI Control”

Creating Lenses On Cheap CNC Machines

There are a lot of CNC machines sitting around in basements and garages, but we haven’t seen anything like this. It’s making lenses using a standard CNC machine and a lot of elbow grease.

The process of making a lens with a CNC machine begins by surfacing a waste board and taping an 8mm sheet of cast acrylic down with double-stick tape. The lens is then cut out with an 8mm endmill, removed from the stock material, and wet sanded to remove the tool marks. Wet sanding begins at 400 grit and progresses to 2000 grit, after which the lens is polished with a polishing compound meant for high-gloss car finishes. This was done by hand, but in this instance there’s no shame in using a real buffing wheel.

Several other lenses are demonstrated, including a cylindrical convex lens, but these are only planoconvex lenses, or lenses that are flat on one side. Biconvex lenses can be constructed by gluing two planoconvex lenses back to back, which is done with an acrylic glue, in this case Acrifix adhesive. The result is remarkable: with a lot — and we mean a lot — of sanding and polishing, you can make an acrylic lens on a cheap hobby CNC machine. The trick is just a very small stepover on your CNC path.

There are a few more videos planned in this series, including one on using Fusion 360 on defining the shape of the lens to have the right focal length. We can’t wait to see that.

Continue reading “Creating Lenses On Cheap CNC Machines”

Our Right To Repair Depends On A Minimally Viable Laptop

It’s never been harder to repair your electronics. When the keyboard in your shiny new MacBook dies, you’ll have to send it to a Genius. When the battery in your iPhone dies, you’ll have to break out the pentalobe screwdrivers. Your technology does not respect your freedom, and this is true all the way down to the source code: the Library of Congress is thankfully chipping away at the DMCA in an effort that serves the Right to Repair movement, but still problems remain.

The ability — or rather, right — to repair will inevitably mean using electronics longer, and keeping them out of the garbage. That’s less e-waste, but it’s also older, potentially slower and less powerful portable workstations. This is the question: how long should you keep your electronics running? When do you start getting into the false economy of repairing something just because you can? What is the minimally viable laptop?

Continue reading “Our Right To Repair Depends On A Minimally Viable Laptop”