THP Semifinalist: Level, The Ultrawideband Radio Module

LEVEL

When you start looking into the Internet of Things, the first thing you realize is that despite there being grand ideas for Internet connected everything, nobody knows how these things will actually connect to the Internet. There are hundreds of different radio protocols being pushed, and dozens of networking schemes currently in development. The solution to this is a radio module that can do them all, talking to all these modules and serving them up to the Internet. This is the idea of [Hunter Scott]’s Level, a radio module with a frequency range of 30 MHz to 4.4 GHz. That’ll cover just about everything, including some interesting applications in the TV whitespace.

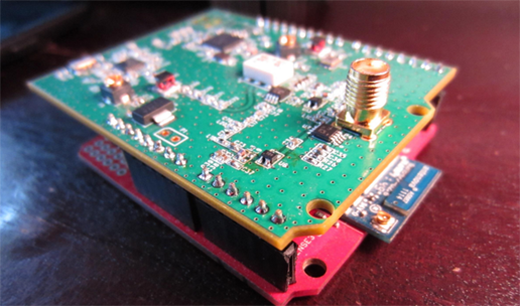
[Hunter]’s module is based around TI’s CC430, basically an MSP430 microcontroller and a CC1101 transceiver smooshed together into a single piece of silicon. There’s bit of filtering that makes this usable in the now sorta-empty TV whitespace spectrum, something that a lot of IoT and wireless networking protocols are looking at.

If the form factor of the device looks familiar, that’s because it is; the board itself is Arduino compatible, but not with Arduinos themselves; it will accept shields, though, meaning building a bridge to Ethernet or WiFi to whatever radios this board is talking to is really just a change in firmware.

This board is excellent for experimenting with different radio modules, yes, but it’s also great for experimenting with different radio protocols. [Hunter] has been looking around at different mesh networking protocols.

You can check out [Hunter]’s two minute video overview, along with a more detailed overview of the schematic below.


SpaceWrencherThe project featured in this post is a semifinalist in The Hackaday Prize.

Continue reading “THP Semifinalist: Level, The Ultrawideband Radio Module”
THP Semifinalist: Theta Printer

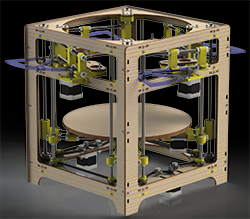
thetaThe early 3D printers of the 80s and 90s started off as cartesian bots, and this is what the RepRap project took a cue from for the earliest open source 3D printer designs. A bit later, the delta bot came on the scene, but this was merely a different way to move a toolhead around build plate. We haven’t really seen a true polar coordinate 3D printer, except for [Tyler Anderson]’s incredible Theta printer.
[Tyler]’s theta printer is designed to print in as many different materials as possible, without the reduction in build volume that comes with multiple toolheads on more traditional printers. It will be able to lay down different colors of plastic in a huge build volume, and even some of the weirder filaments out there, all in a single print.

The theta printer is based on a polar coordinate system, meaning instead of moving a hot end around in the X and Y axes, the build plate rotates in a circle, and the extruders move along the radius of the circle. This spinning, polar coordinate printer is the best way we’ve seen to put multiple extruders on a printer, and has the added bonus of being a great platform for a 3D scanner as well.

With four extruders, four motors to control the position of each extruder, a rotation motor, and the Z axis (that’s 10 steppers if you’re counting), this is very likely the greatest number of motors ever put in a 3D printer. Most electronics boards don’t support that many stepper drivers, and the one that will won’t be ready for the end of The Hackaday Prize. Right now, [Tyler] is running a fairly standard RAMPS board, running two extruders and R axes in parallel. Still, it’s good enough for a proof of concept.

One interesting aspect of [Tyler]’s design is something even he might not have realized yet: with a single bed and four extruders, he’s effectively made a 3D printer geared for high-volume production; simply by printing the same part with all the extruders, he’s able to quadruple the output of a 3D printer with the same floor space as a normal one. This may not sound like much, but when you realize Lulzbot has a bot farm producing all their parts, the Theta printer starts to look like a very, very good idea.

Videos of [Tyler]’s Theta below.


SpaceWrencherThe project featured in this post is a semifinalist in The Hackaday Prize.

Continue reading “THP Semifinalist: Theta Printer”

Stupid Security In A Security System

alarm

[Yaehob]’s parents have a security system in their house, and when they wanted to make a few changes to their alarm rules – not arming the bathroom at night – an installer would come out, plug a box into the main panel, press a few buttons, and charge 150 €. Horrified at the aspect of spending that much money to flip a few bits, [yaehob] set out to get around the homeowner lockout on the alarm system, and found security where he wasn’t expecting.

Opening the main panel for the alarm system, [yaehob] was greeted with a screeching noise. This was the obvious in retrospect tamper-evident seal on the alarm box, easily silenced by entering a code on the keypad. The alarm, however, would not arm anymore, making the task of getting ‘installer-level’ access on the alarm system a top priority.

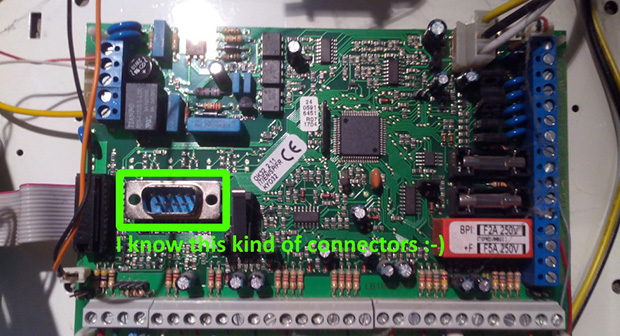
After finding a DE-9 serial port on the main board, [yaehob] went to the manufacturer’s website thinking he could download some software. The website does have the software available, but only for authorized distributors, installers, and resellers. You can register as one, though, and no, there is no verification the person filling out a web form is actually a distributor, installer, or reseller.dist

Looking at the installer and accompanying documentation, [yaehob] could see everything, but could not modify anything. To do that would require the installer password, which, according to the documentation was between four and six characters. The system also responded quickly, so brute force was obviously the answer here.

After writing up a quick script to go through all the possible passwords, [yaehob] started plugging numbers into the controller board. Coming back a bit later, he noticed something familiar about what was returned when the system finally let him in. A quick peek at where his brute force app confirmed his suspicions; the installer’s code was his postal code.

From the installer’s point of view, this somewhat makes sense. Any tech driving out to punch a few numbers into a computer and charge $200 will always know the postal code of where he’s driving to. From a security standpoint, holy crap this is bad.

Now that [yaehob]’s parents are out from under the thumb of the alarm installer, he’s also tacked on a little bit of security of his own; the installer’s code won’t work anymore. It’s now changed to the house number.

Reverse Engineering A Huge LED Display

muchosLEDs
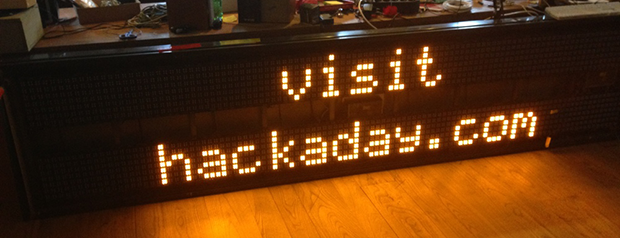
In a fit of awesome salvaging, [Piet] picked up a huge, 16 character, 2 line display. It’s monstrous, designed for outdoor installations; road signs, train stations, and the like. It also draws 23 Watts when nothing is being displayedmaking this the perfect piece of salvaged equipment to reverse engineer.

The display was originally connected to a computer running proprietary software. The protocol between the display and computer is also proprietary, giving [Piet] the choice of either reverse engineering the protocol, or reverse engineering the hardware and building a new driver board. For anyone with a soldering iron, the second option is the simplest.

Disassembling the display, [Piet] found each character in the display was its own board with a 7×14 array of pixels, each with four LEDs. The rows and columns of each character are addressed with a shift register, and with an Arduino, [Peit] got a single character working.

The Arduino would struggle to display all the characters in the display, so a Raspi was pulled out, a driver and frame generator written, and the whole thing connected to Twitter It’s a beautifully display that draws 200 Watts when its scanning the pixels, and a wonderful reuse of disused hardware. Video below.

Continue reading “Reverse Engineering A Huge LED Display”

DEFCON: Blackphone

Despite being full of techies and people doing interesting things with portable devices, you don’t want to have an active radio on you within a quarter-mile of DEFCON. The apps on your phone leak personal data onto the Internet all the time, and the folks at DEFCON’s Wall Of Sheep were very successful in getting a few thousand usernames and passwords for email accounts.

Blackphone is designed to be the solution to this problem, so when we ran into a few members of the Blackphone crew at DEFCON, we were pretty interested to take a quick peek at their device.

The core functionality for the Blackphone comes from its operating system called PrivatOS. It’s a fork of Android 4.4.2 that is supposed to seal up the backdoors found in other mobile phones. There’s also a bundle of apps from Silent Circle that give the Blackphone the ability to make encrypted phone calls, texts (with file sharing), and encrypted and password protected contact lists.

The hardware for the Blackphone is pretty impressive; a quad-core Nvidia Tegra provides all the power you need for your apps, video, and playing 2048, a 2000mAh battery should provide enough juice to get you through a day or two (especially since you can turn off cores), and the usual front/rear cameras, GPS, 802.11bgn and GSM and HSPA+/WCDA radios means this phone will be useable on most networks.

THP Semifinalst: Laser Solder Paste

laser

A relative latecomer to The Hackaday Prize, [AltMarcxs] has nevertheless come up with a very interesting tool for fabrication, the likes of which no one has ever seen before. It’s a rotating laser soldering paste applicator, meant to be an add-on to a CNC machine. What does it do? RIght now it looks extremely cool while being an immense time sink for [AltMarcxs], but the potential is there for being much more than that, ranging from a pick and place machine that also dispenses solder paste, to the closest thing you’ll ever get to a carbon fiber printer.

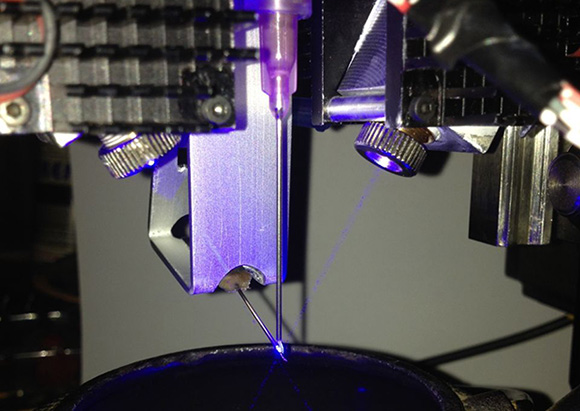
[AltMarcxs]’s build consists of two 3W laser diodes focused just beyond the tip of the syringe. The syringe dispenses solder paste, and rotating the diodes around, [Alt] is able to put a melted solder blob anywhere on a piece of perfboard. He put up a reasonably well focused video demonstrating this.

With a few homebrew pick and place machines making the semifinalist cut for The Hackaday Prize, it’s easy to see the utility of something like this: Putting a board in a machine, pressing a button, and waiting a bit for a completely populated and soldered board is a dream of the electronic hobbyist rivaled only by a cheap and easy way to make PCBs at home. [AltMarxcs]’s machine could be one step on the way to this, but there are a few other ideas he’d like to explore first.

The build also has wire feeders that allow a bit of copper wire to be soldered to the newly formed metal blob. There are plans to replace this with a composite fiber, replace the paste in the syringe with a UV resin, cut the fiber and cure the resin with the laser, and build something much better than other carbon fiber 3D printers we’ve seen before.


SpaceWrencherThe project featured in this post is a semifinalist in The Hackaday Prize. 

New Chip Alert: The ESP8266 WiFi Module (It’s $5)

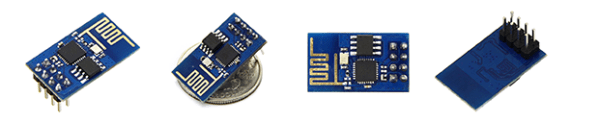
Every so often we run across something in the Hackaday tip line that sends us scurrying to Google, trying to source a component, part, or assembly. The ESP8266 WiFi module is the latest, made interesting because it pretty much doesn’t exist outside China.

Why is it cool? It’s a WiFi module with an SOC, making it somewhat similar to TI’s CC300 in conception (A.K.A. the thing that makes the Spark Core so appealing), in that a microcontroller on the module takes care of all the WiFi, TCP/IP stack, and the overhead found in an 802.11 network. It’s addressable over SPI and UART, making this an exceptionally easy choice for anyone wanting to build an Internet of Things thing; you can simply connect any microcontroller to this module and start pushing data up to the Internet. Oh, it’s also being sold for $5 in quantity one. Yes, for five dollars you can blink a LED from the Internet. That’s about half the price as the CC3000 itself, and a quarter of the price if you were to build a CC3000 breakout board.

There’s a catch, right, there’s always a catch. Yep. About two hours after this post is published it will be the number one English language Google result for “ESP8266.” As far as the English-speaking world is concerned, there is absolutely nothing to be found anywhere on the Internet on this module.

Seeed Studio recently sold a few of these modules for $7 and has some documentation, including a full datasheet and an AT command set. All the documentation is in Chinese. There’s also an “ESP8266 IoT SDK”, but from a quick glance at the code, this appears to be an SDK for the SOC on the module, not a simple way to connect the module to a microcontroller.

Anyone wanting to grab one of these modules can do so on Ali Express. Anyone wanting to do something with one of these modules will have a much more difficult time, most likely poking and prodding bits randomly with the help of Google translate. Should someone, or even a group of people, want to take up the task of creating a translation of the datasheet and possibly a library, we have a pretty collaborative project hosting site where you can do that. You may organize in the comments below; we’ll also be taking bets as to when a product using the ESP8266 will be found on Kickstarter. My guess is under a month.

EDIT: Here’s a translation of the datasheet and AT command set.

Edit two: [bafeigum] is writing a library go help him out.

Thanks [Liam] for the tip.