The 30th Anniversary Macintosh

It’s been just over thirty years since the original Macintosh was released, and [hudson] over at NYC Resistor thought it would be a good time to put some old hardware to use. He had found an all-in-one Mac SE “on the side of a road” a while ago (where exactly are these roads, we wonder), and the recent diamond anniversary for the original mac platform convinced him to do some major hardware hacking.

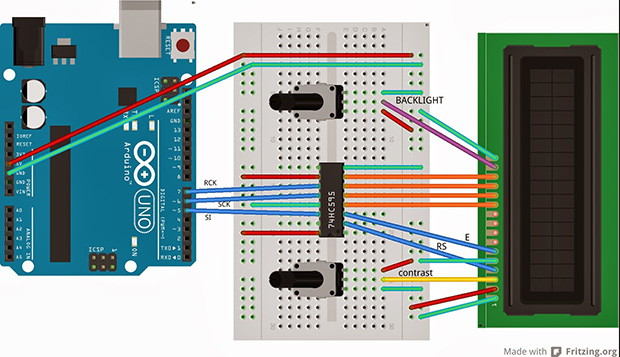
Inspired by a six-year-old project from a NYC Resistor founder aptly named the 24th anniversary Mac, [hudson] decided to replace the old hardware with more powerful components – in this case, a BeagleBone Black. Unlike the earlier build, though, the original CRT would be salvaged; the analog board on the Mac SE has pins for video, hsync, vsync, and power.

To get a picture on the old CRT, [hudson] needed to write a software video card that used the BeagleBone’s PRU. The CRT isn’t exactly “modern” tech, and everything must be clocked at exactly 60.1 Hz lest the CRT emit a terrible buzzing sound.

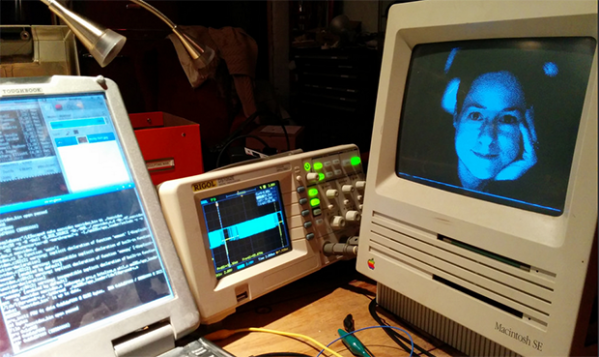
With a software video card written for the old CRT, the BeagleBone becomes the new brains of this beige box. It runs all the classic Linux GUI apps including XEyes and XScreenSaver, although flying toasters might be out of the question. He also managed to load up the Hackaday retro site with xterm, making this one of the best ways to make an old Mac SE useful.

GPS For A Graphing Calculator

GPS 
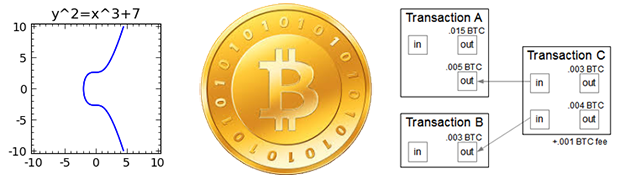
[Chris], graphing calculator hacker extrordinaire, has seen a few of his projects show up on the front page of Hackaday, mostly involving builds that turn graphing calculators like the TI-84 Plus shown above into something that copies a few features from a smartphone. His latest build, a hardware GPS module attached to the TI-84 Plus, is yet another feather in his cap of awesome and impractical addition to a classic piece of hardware.

There were two major technical challenges behind adding GPS to a graphing calculator. The first of these was powering a GPS sensor. Many a calculator modder has put a lot of work into documenting the USB port on the 84 Plus, revealing it is a USB OTG port, capable of serving as a host or device. It also supplies 5V of power to just about anything, burning through batteries as a result.

The next challenge was reading the data coming off the GPS sensor at 4800bps.The TI-84 Plus series of calculators have a series of interrupts that can fire at fractions of the 15MHz clock. By setting the timer up to fire every 197 clock ticks and dividing again by 16, [Chris] can read data at 4758.9bps. It’s close enough to get most of the data, and the checksum included in the NMEA protocol allows the software to discard bad messages.

Continue reading “GPS For A Graphing Calculator”

Manual Bitcoin Transactions

bitcoin

For something that’s used for such banal transactions like buying drugs and sending the Jamaican bobsled team to the Olympics, cryptocurrencies such as Bitcoin are actually very impressive pieces of software. It’s a very ingenious solution to the Two Generals Problem, and the fact it made a few Bitcoin early adopters very, very rich doesn’t hurt either. [Ken Shirriff] decided to take a look at the Bitcoin protocol by creating a Bitcoin address and transferring a small amount of bitcoin to that address, manually. It’s a great look at how the Bitcoin protocol actually works, and how ingenious this protocol actually is.

[Ken]’s first task was to create a Bitcoin address. This is a 256-bit private key is the basis for the Bitcoin wallet private key (after being encoded as ASCII characters), and as the 512-bit public key (after being sent through an elliptic curve algorithm). The 512-bit public key is then hashed with SHA-256 and RIPEM 160 to generate the 160-bit public key hash and the Bitcoin address.

After creating a bitcoin address and wallet, [Ken] set out on manually creating a transaction. The idea was to buy a few cents (USD) from Coinbase and send them to his manually created address. This involved creating a transaction according to the Bitcoin spec and signing the transaction. Signing each Bitcoin transaction is the key to Bitcoin’s security, and is done with a small bit of code written in the Bitcoin scripting language.

With everything written in Python, [Ken] was ready to send his transaction off into the Bitcoin network. This was done by finding a few peers on the Bitcoin network and sending off a few packets. After a little bit of mining on the network, [Ken]’s transaction went through, confirmed by a deposit into his Bitcoin wallet.

It’s an awesome writeup and impressive achievement to manually send a few Bitcoins from one wallet to another. More impressively, [Ken] provided some amazing insight into how the Bitcoin protocol works, and how much work went into its creation.

Controlling Alphanumeric LCDs With Three Wires

shift

The HD44780 LCD controller is the defacto way of adding a small text display to your next project. If you need a way to display a few variables, a few lines of text, or adding a small user interface to a project, odds are you’ll be using one of these parallel LCDs. These displays require at least six control lines, and if you’re using a small microcontroller or are down to your last pins, you might want to think about controlling an LCD with a shift register.

[Matteo] used the ubiquitous ‘595 shift register configured as a serial to parallel converter to drive his LCD. Driving the LCD this way requires only three pins on the Arduino, [Matteo]’s microcontroller of choice.

For the software, [Matteo] modified the stock Arduino LiquidCrystal library and put it up on his Git. Most of the functions are left untouched, but for this build the LCD can only be used in its four bit mode. That’s not a problem for 99% of the time, but if you need custom characters on your LCD you can always connect another shift register.

If you just can’t spare three pins for a display, you could squeeze this down to just two, or add a second microcontroller for a one-wire-like interface.

Hackaday Links: February 2, 2014

hackaday-links-chain

[Michel] was in need of a 9V battery connector, and in a brilliant bit of insight realized 9V batteries will plug directly into other 9V batteries (just… don’t do that. ever.) Taking a dead 9V, he tore it open, was disappointed by the lack of AAAA cells, and soldered some wires onto the connector.

Sometimes a project starts off as a reasonable endeavour, but quickly becomes something much more awesome. [Wallyman] started off building a hammock stand and ended up making a giant slingshot. We’re not one to argue with something that just became a million times more fun.

We’ve seen solder stencils made out of laser-cut metal, photoetched metal, plastic cut on a vinyl cutter, laser-cut plastic, and now finally one made on a 3D printer. It’s a pretty simple process – get the tCream layer into a .DXF file, then subtract it from a plastic plate in OpenSCAD.

Apple loves their proprietary screws, and when [Jim] tried to open his Macbook Air with the pentalobe screwdriver that came with an iPhone repair kit, he found it was too large. No problem, then: just grind it down. Now if only someone could tell us why a laptop uses smaller screws than a phone…

[Victor] has been playing around with an RTLSDR USB TV tuner dongle for a few months now. It’s a great tool, but the USB thumb drive form factor wasn’t sitting well with him. To fix that, he stuck everything into a classy painted Hammond 1590A enclosure. It looks much cooler, and now [Victor] can waterproof his toy and add a ferrite to clean things up.

A Better USI I2C Library For The MSP430

USI

TI’s MSP430 chips are rather interesting – they’re low power, very capable, and available for under a dollar in most cases. Some of these chips, though, don’t have native SPI or I2C interfaces; instead, everything is done through a USI, or Universal Serial Interface module. [Jan] found the stock I2C USI module was a little rough around the edges, so he created his own.

[Jan] found the TI example code for using the USI as an I2C device overly complicated and something that an intern whipped up in a week and was never touched again. In response to this, he created a much, much simpler USI/I2C module that’s actually readable. It’s available over on the GitHub if you want to grab it for yourself.

Compared to the TI code, [Jan]’s library is dead simple. There are only two functions, one for initialization, and another for sending and receiving. Easy, small, and it works. Can’t do much better than that.

The Most Horrifying Use Of 3D Printing

As anyone with a Facebook account that’s over the age of 25 will tell you, 3D ultrasounds of fetuses are all the rage these days, with ultrasound pictures of the unborn recently taking the leap from black and white blobs to 3D – and 4D – images. With the advent of 3D printers, the inevitable has happened. Now you can order a 3D print of your yet-to-be-born progeny.

The company behind this – 3D Babies – takes 3D ultrasound data from weeks 24-32 and turns it into a 3D model. The printed 3D models sell for $800 for the full size version, $400 for a half-size version, and $200 for a quarter size version. It appears the 3D ultrasound data is simply wrapped around a pre-defined mesh, so while the resulting print may come out looking like your spawn, it’s still not a physical copy of the 3D/4D ultrasound data.

Despite the ‘creepy’ factor of these little bundles of plastic, we’re wondering why we haven’t seen anything like this before. Are there any obstetricians/radiologists/ultrasound techs out there that have experience with importing 3D ultrasound data into an editor of some sort? Notwithstanding any HIPAA violations, it seems it would be rather easy to turn this sort of 3D data into a printed object. 3D printing CT scans models can’t be the only other instance of this type of thing.

Thanks [Will] for the nightmares