The Beginning Of A DIY Vehicle Night Vision System

night vision car

[Stephen] has just shared with us the current progress of his night vision vehicle system, and it’s looking quite promising!

The idea of the project is to provide the driver with a high contrast image of the road, pedestrians and any other obstacles that may not be immediately visible with headlights. It’s actually becoming a feature on many luxury cars including BMW, Audi, GM and Honda. This is what inspired [Stephen] to try making his own.

The current system consists of an infrared camera, two powerful IR light spot lights, and a dashboard LCD screen to view it. It may be considered “not a hack” by some of our more exuberant readers, but [Stephen] does such a great job explaining his future plans for it, which include object recognition using OpenCV, so we felt it was more than worth a share, even at this point.

You see, the idea of vehicle night vision is not to constantly watch a little screen instead of the road — it’s designed to be there when you need it — and to let you know when you need it, [Stephen’s] planning on adding a Raspberry Pi to the mix running OpenCV to detect any anomalies on the road that could be of concern. We shudder at the amount of  training a system like that might need — well, depending on the complexity of this image recognition.

Anyway, stick around after the break to hear [Stephen] explain it himself — it is a long video, but if you want to skip to the action there are clips of it on the road at 1:53 and 26:52.

Continue reading “The Beginning Of A DIY Vehicle Night Vision System”

3D Printering: Making A Thing In FreeCAD, Part I

printering

I’ve been writing these tutorials on making an object in popular 3D modeling programs for a while now, and each week I’ve put out a call for what software I should do next. There is one constant in all those comment threads: FreeCAD. I don’t know if these suggestions reflect the popularity or difficulty of FreeCAD nevermind, it’s totally the difficulty.

FreeCAD is an amazing tool that, if used correctly, can be used to make just about any part, and do it in a manufacturing context. If you need a bauble that’s three times the size of the original, FreeCAD’s parametric modeling makes it easy to scale it up. If you’re designing a thumbscrew and want the head larger while keeping the threads the same, FreeCAD is for you. Basically, you can think of this as a graphical extension of the Thingiverse Customizer. Very powerful, very cool, and unlike a lot of CAD packages out there, free.

Our in-house, overpaid SEO expert (he’s really just a monkey someone trained to use a bullwhip) demands I link to the previous ‘Making a Thing’ tutorials:

The tutorial for FreeCAD continues below.

Continue reading “3D Printering: Making A Thing In FreeCAD, Part I”

Robot Dominates Air Hockey, Frightens John Connor, Wayne Gretzky

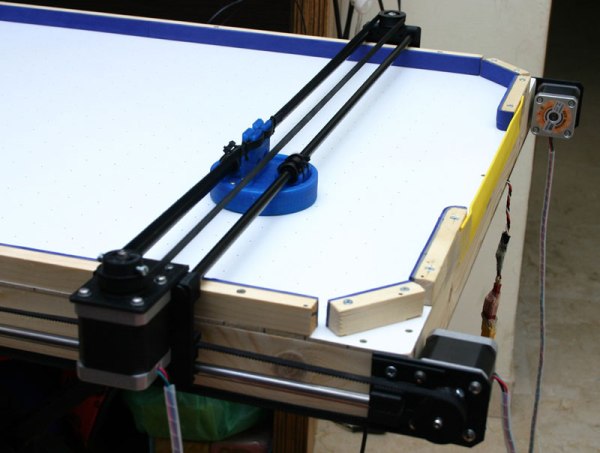
We’ve all been disappointed at some point in our lives after yearning to play air hockey and not finding anyone to play against. This is no longer a problem at [Jose]’s house. He has built a very amazing Air Hockey Playing Robot. This robot moves in 2 directions, can predict the movements of the puck and also decide to block, shoot or a do a combination of both.

Surprisingly, most of the ‘robotics’ parts are 3D printer left overs, which includes: NEMA17 stepper motors, an Arduino Mega, a RAMPS board, motor drivers, belts, bearings and rods. The bracketry, puck and paddle are all 3D printed. The air hockey table itself was built from scratch using off-the-shelf wood. Two standard 90mm PC fans are all that are responsible for creating the air pressure used to lift the puck. A PS3 camera monitors the action and is literally this robot’s eye in the sky.

Check out the video and learn more about this project after the break.

Continue reading “Robot Dominates Air Hockey, Frightens John Connor, Wayne Gretzky”

The 30th Anniversary Macintosh

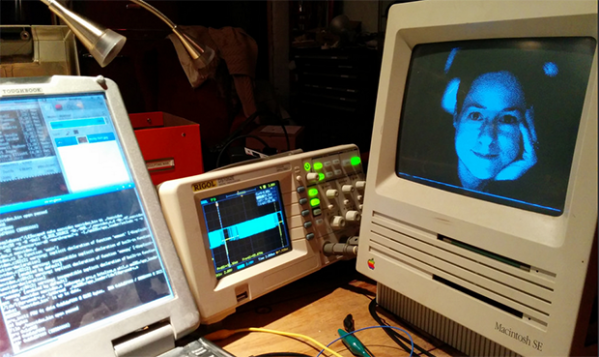
It’s been just over thirty years since the original Macintosh was released, and [hudson] over at NYC Resistor thought it would be a good time to put some old hardware to use. He had found an all-in-one Mac SE “on the side of a road” a while ago (where exactly are these roads, we wonder), and the recent diamond anniversary for the original mac platform convinced him to do some major hardware hacking.

Inspired by a six-year-old project from a NYC Resistor founder aptly named the 24th anniversary Mac, [hudson] decided to replace the old hardware with more powerful components – in this case, a BeagleBone Black. Unlike the earlier build, though, the original CRT would be salvaged; the analog board on the Mac SE has pins for video, hsync, vsync, and power.

To get a picture on the old CRT, [hudson] needed to write a software video card that used the BeagleBone’s PRU. The CRT isn’t exactly “modern” tech, and everything must be clocked at exactly 60.1 Hz lest the CRT emit a terrible buzzing sound.

With a software video card written for the old CRT, the BeagleBone becomes the new brains of this beige box. It runs all the classic Linux GUI apps including XEyes and XScreenSaver, although flying toasters might be out of the question. He also managed to load up the Hackaday retro site with xterm, making this one of the best ways to make an old Mac SE useful.

Cassapa: Augmented Pool

cassapa_4

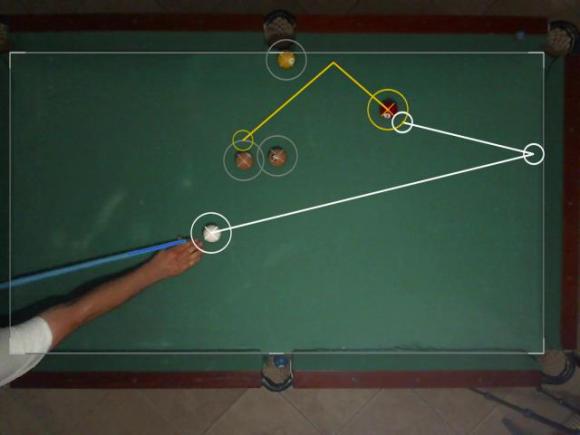
No good at pool? Never fear, Cassapa is here! [Alex Porto] has created an augmented reality system for playing pool, and it means almost anyone can make those cool trick shots!

Ca-what? Cassapa (“caçapa”) is a Portuguese word for pool table pocket. The software works by placing a webcam directly above the pool table for image recognition. Dedicated software interprets the image and identifies the position of the holes, borders, balls and the cue which can then be used to calculate game physics. A projector then projects the forecast physics and allows you to make tiny adjustments — updated in real-time — to make the perfect shot.

Unfortunately, having a big projector shining down on your pool table won’t exactly make anyone believe you’re actually good at pool. Although if you could combine this with Google Glass or any other vision augmenting goggles… that would be pretty cool. Well, you’d still be terribly dishonest and a cheater — but anyway, take a look at the video after the break.

Continue reading “Cassapa: Augmented Pool”

Software-Controlled Per-Port Power Switching For USB Hubs

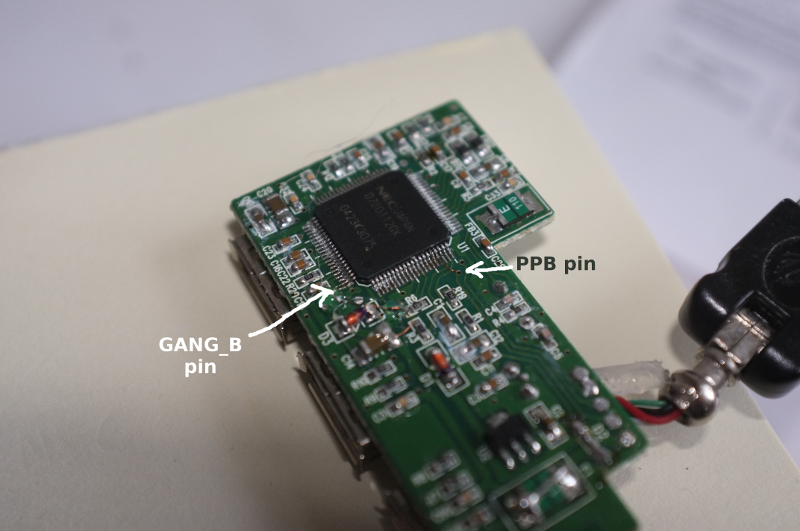
[Befi] wanted to add a second stage backup disk to his ODROID embedded-board server, which typically draws ~1.5W at idle. After adding the disk, he saw power consumption increase by 2W when the new disk wasn’t spinning. He thought about using one of those USB hubs with the adorable little rocker switches for each port and replacing them with transistors, but that was going to be messy. After some poking around in the USB standard, he found that most support per-port power switching (PPPS), and set about to hack a USB hub to enable software-controlled per-port switching.
[Befi]’s NEC hub uses a uPD720112 chip which supports PPPS according to the datasheet. After tying the configuration pin labeled GANG_B to +3.3V, the hub declared itself PPPS-compatible. Of course, the manufacturer saved a penny or two by omitting the  individual switches, so [Befi] added an open-drain NMOS to each port. He is using this program to switch the port on and off and made the switching transparent with autofs. [Befi]’s current script has the bus ID and device ID of the hub hard-coded, but he intends to update it to find them automatically. This hack saves him 10W on average, which is about €30 ($40) per year.

If your hub is under powered, you could try adding an external power supply.

Hidden Pantry Compartment Opens With A Puzzle!

winerack

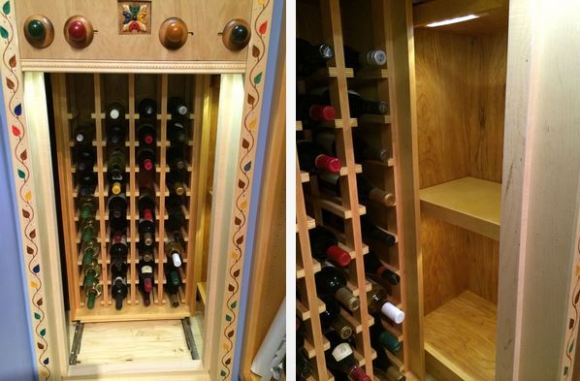
What’s the number one thing kids always dream about for when they have their own house someday? Hidden passages? Revolving bookcases? Closets that lead to Narnia? Secret compartments? Well, [TracRat] has lived out at least one of those dreams by making his very own Myst inspired hidden pantry compartment!

His pantry is located under the stairs and to make use of the awkward space, he decided to build a wine rack. He still had a lot of unused space so he decided to take it a step further. He’s built a wooden puzzle combination lock consisting of four colored knobs that slide back and forth in grooves. When the correct combination is made, pressing on the square symbol at the top rolls the entire wine rack backwards, exposing a secret side cabinet. It’s an absolutely gorgeous piece of woodwork and we’re totally impressed by the perfect execution of it.

Do you love Myst too? Check out this awesome Myst inspired Myst(ery) box [Michael] made for his girlfriend’s birthday! Or how about a leather-bound Myst book that lets you play Myst on a computer inside of it!