The Carbon Fiber Construction Of Large Propellers

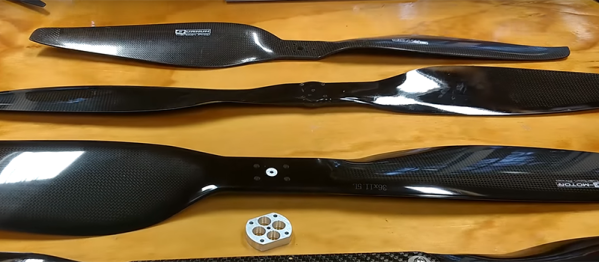
Props for your little RC airplane or drone are effectively consumables. They’re made of plastic, they’re cheap, and you’re going to break a lot of them. When you start swinging something larger than 12 inches or so, things start getting expensive. If you’re building gigantic octocopters or big RC planes, those props start adding up. You might not think you can build your own gigantic carbon fiber propellers, but [Tech Ingredients] is here to prove you wrong with an incredible video demonstration of the construction of large propellers

The key ideas behind the build are laid out in a video demonstration for building a single prop. The base begins with a CNC wire cut foam air foil. This foam airfoil is first modified for the attachment point by cutting a plug out of the root of the airfoil which is filled with epoxy.

With the skeleton of the airfoil complete, the build then moves on to laminating the foam core with carbon fiber. The epoxy itself is West Systems Pro-Set laminating epoxy, although we suspect the ubiquitous West Systems epoxy used for all those live-edge ‘river’ coffee tables will also work as well. This epoxy is spread out on a table, the carbon fiber laid over it, and a second layer of carbon fiber (check ‘yo biases!) laid over that. This is wrapped around the foam core, then cured with an electric heating pad.

Of course, this is only a demonstration of making a single blade for a prop. The next trick is turning that single blade into a propeller. This is done with a cleverly machined hub, attached through that epoxy plug placed in the foam core. The results are just as good as any large prop you could buy, and this has the added benefit of being something you made, not bought.

This is really a master class in composite construction, and well worth an hour’s of YouTube viewing. You can check out the intro video below.

Continue reading “The Carbon Fiber Construction Of Large Propellers”

Creating KiCad Parts From A PDF Automagically

For anyone out there who has ever struggled finding a part for Eagle or KiCad, there are some who would say you’re doing it wrong. You’re supposed to make your own parts if you can’t find them in the libraries you already have. This is really the only way; PCB design tools are tools, and so the story goes you’ll never be a master unless you can make your own parts.

That said, making schematic parts and footprints is a pain, and if there’s a tool to automate the process, we’d be happy to use it. That’s exactly what uConfig does. It automatically extracts pinout information from a PDF datasheet and turns it into a schematic symbol.

uConfig is an old project from [sebastien caux] that’s been resurrected and turned into an Open Source tool. It works by extracting blocks of text from a PDF, sorts out pin numbers and pin labels, and associates those by the relevant name to make pins. It’s available as a pre-built project (for Windows, even!), and works kind of like magic.

The video demo below shows uConfig importing a PDF datasheet — in this case a PIC32 — automatically extracting the packages from the datasheet, and turning that into a schematic symbol. It even looks as if it’ll work, too. Of course, this is just the schematic symbol, not the full part including a footprint, but when it comes to footprints we’re probably dealing with standard packages anyway. If you’re looking to build a software tool that takes a datasheet and spits out a complete part, footprint and all, this is the place to start.

Continue reading “Creating KiCad Parts From A PDF Automagically”

This Is Your Last Chance To Enter The Hackaday Prize

For the last seven months, we’ve been running the world’s greatest hardware competition. The Hackaday Prize is the Academy Awards of Open Hardware, and a competition where thousands of hardware hackers compete to build a better future. The results have already been phenomenal, but all good things must come to an end: we’re wrapping up the last challenge in the Hackaday Prize, after which the finalists of the five rounds will move on, with the ultimate winner being announced next month at the Hackaday Superconference.

We’re in the final hours of the Musical Instrument Challenge, where we’re asking everyone to build the next evolution of modern music instrumentation. We’re looking for the next electric guitar, theremin, synthesizer, violin, or an MPC. What we’ve seen so far is, quite simply, amazing. One of the finalists from the five challenges in this year’s Hackaday Prize will win $50,000 USD, but twenty projects from the Musical Instrument Challenge will each win $1000. We’ll be figuring out those winners on Monday, where they’ll move onto the final round, refereed by our fantastic judges.

It’s still not too late to get in on the action in this year’s Musical Instrument Challenge. We’re looking for the best musical projects out there, but time is of the essence. This round closes on October 8th at 07:00 PDT. There’s still time, though, so start your entry now.

Continue reading “This Is Your Last Chance To Enter The Hackaday Prize”

We Got Your Sega Chiptunes Right Here

Chiptunes are cool, but when you get into it, you realize you’re mostly dealing with Commodore SID tunes, Atari POKEY tracks for the cool kids, bleeps and bloops from a Game Boy, and maybe some NES tracks thrown in for good measure. There’s another option out there – the sound chip in the Sega Genesis. This thing could do drums, man, and [Aidan Lawrence] built the perfect player for the tuneful silicon tucked inside the classic 16-bit console.

[Aidan] had previously built a tiny little music player based on the YM3812 chip, the Yamaha chip found in SoundBlaster and Adlib sound cards. The chip inside the Sega Genesis, the Yamaha YM2612, is a bit different. The killer feature of this chip, PCM waveforms, aren’t stored as simple, small bits of code. These are massive blobs of binary data sent to the chip’s DAC. The SEGGGGAAAA intro of Sonic the Hedgehog, for example, used an eighth of the the cartridge space. You’re not going to build a Sega chiptune player with a tiny little microcontroller and 20kB of RAM.

The solution came in the form of an external SPI RAM device. The 23LC1024 is a full 1 Megabit in size, and since it’s SPI, it’s more than fast enough to keep up with the sample speed. The rest of the circuit including the mixer, preamp and power amp are based on the Genesis’ actual schematics, with an SD card and OLED thrown in for good measure. How does it sound? There’s a great video below the break and yes, the soundtrack from Sonic 3 sounds just as good as it did twenty years ago.

Continue reading “We Got Your Sega Chiptunes Right Here”

New Part Day: The Fifty Cent USB Chip

If you want to plug a USB cable into your next project, you’ve got a problem. USB is not UART, and UART is what every microcontroller serial port wants. To add USB to your microcontroller project, you’ll need to add a support chip, probably from FTDI, although there are a multitude of almost-FTDI clones available from the other parts of the Internet. These parts are slightly expensive, and they require some support circuitry. What you really need is a simple device that requires minimal external components, takes in serial from your microcontroller and spits out USB, and costs no more than a dollar. Bonus points if it’s hand-solderable.

The CH330 is apparently the answer to this problem (That’s a TaoBao link, this is probably going to be the best link going forward). It’s a dead simple chip with eight pins. Two are the data lines on a USB cable, and two are TX and RX for your microcontroller. The other pins are just power, ground, and an RTS line. Best of all, it only costs about fifty cents. You’ve never heard about it, because a few hours after this post is published, it will be the most information you’re going to get on this chip in the English-speaking world.

As far as we can tell, the CH330 is the smallest in a line of USB to UART converters from WCH, although the part isn’t even on the company’s website. The first reference to the phrase ‘CH330’ in reference to a USB chip appeared about a month ago, at the beginning of September. There’s a GitHub for someone who is apparently using this chip in a Pine64 board, but that’s about it. There’s no more information.

Right now, the only documentation for this chip is a single Chinese-language datasheet with an example schematic showing this chip connected to a MAX232 as a USB to RS232 converter. This is it. You’re looking at all the information that exists on this chip in the English-speaking version of the Internet.

The idea of a cheap, small chip that easily turns USB into UART would be great for thousands of projects. An FTDI chip will work, yes, but if you’re making thousands of a thing you might want to go with the fifty cent part over the two dollar part. That said, we’re in untested waters with this part, and you can’t even find it on AliExpress.

Let us know if you’ve gotten your hands on one of these devices. This has the potential to be really useful in a lot of projects and products, and we’re eager to see what the community comes up with. Thanks to [acabx] for sending this one in on the tip line.

Friday Hack Chat: Is There Life On Mars?

Mars ain’t the kind of place to raise a kid. In fact, it’s cold as hell. There’s no one there to raise them if you did, or is there? Is there life on Mars? That’s the question NASA has been trying to answer for the last forty years, and with the new Mars rover, we might get closer to an answer. For this week’s Hack Chat, we’re going to be talking with the people responsible for some interesting instruments flying on the Mars 2020 rover.

Our guest for this week’s Hack Chat will be [Matteo Borri], an Italian engineer who’s been living in the US for the better part of a decade now. He’s had various projects ranging from robotics — including a BattleBot — AI, and aerospace. [Matteo] is also one of the engineers behind the Vampire Charger, a winner in the Power Harvesting Module Challenge in this year’s Hackaday Prize.

Right now, [Matteo] is working on an interesting project that’s going to fly on the next Mars rover. He’s developed a chlorophyll spectroscope for NASA and the Mars Society. This week, [Matteo] is going to share the details of how this device works and how it was developed.

During this Hack Chat, we’re going to be discussing various technology that’s going into the search for life on Mars and elsewhere in the galaxy such as:

  • Chlorophyll detection
  • Mars Rovers
  • Various other hardware hacks

You are, of course, encouraged to add your own questions to the discussion. You can do that by leaving a comment on the Hacking with Fire event page and we’ll put that in the queue for the Hack Chat discussion.

join-hack-chat

Our Hack Chats are live community events on the Hackaday.io Hack Chat group messaging. This week we’ll be sitting down on Friday, October 5th, at noon, Pacific time. We have some amazing time conversion technology.

Click that speech bubble to the right, and you’ll be taken directly to the Hack Chat group on Hackaday.io.

You don’t have to wait until Friday; join whenever you want and you can see what the community is talking about.

An Unmanned Ground Vehicle, Compatable With An Arduino

Building your own robot is something everyone should do, and [Ahmed] has already built a few robots designed to be driven around indoors. An indoor robot is easy, though: you have flat surfaces to roll around on, and the worst-case scenario you have a staircase to worry about. An outdoor robot is something else entirely, which makes this project so spectacular. It’s the M1 Rover, an unmanned ground vehicle, built around the Arduino platform.

The design goal of the M1 Rover isn’t just to be a remote-controlled car that can be driven around indoors. This robot is meant for rough terrain, and is a robot that can be programmed, can also be driven around by a computer, a video game controller, or custom joysticks.

To this end, the M1 rover is designed around high-quality laser cut plywood, powered by a few DC motors controlled through a dual H-bridge, and loaded up with sensors, including a front-mounted ultrasonic sensor. All the electronics are tucked away in the chassis, and the software is just fantastic. In fact, with the addition of a smartphone skillfully mounted to the top of the chassis, this little robot can became an autonomous rover, complete with a webcam. It’s one of the better robotic rover projects we’ve seen, and amazing addition to this year’s Hackaday Prize.