ESP8266 Clock Puts Time In A Jar

Ironically, with the wide availability of modular electronic components today, the hardest part of constructing your latest gadget might just end up being able to find a decent looking enclosure for it. Project boxes will only get you so far, and let’s be honest, they aren’t exactly the most attractive things in the world. But if you’re willing to think outside the box (get it?) there are some unconventional options out there that might fit the bill.

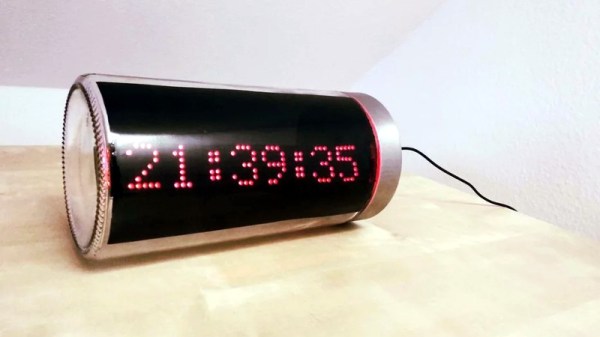
Take for example this ESP8266 clock by [ZaNgAbY] that’s housed in a glass pasta jar. With the addition of some window tint film for the LED display to shine through, the final result could nearly pass as modern art. Even if you don’t need an extra clock around the house, this same general principle could be used to create a slick-looking ticker for all sorts of information, from the weather to server uptime with just some adjustments to the code.

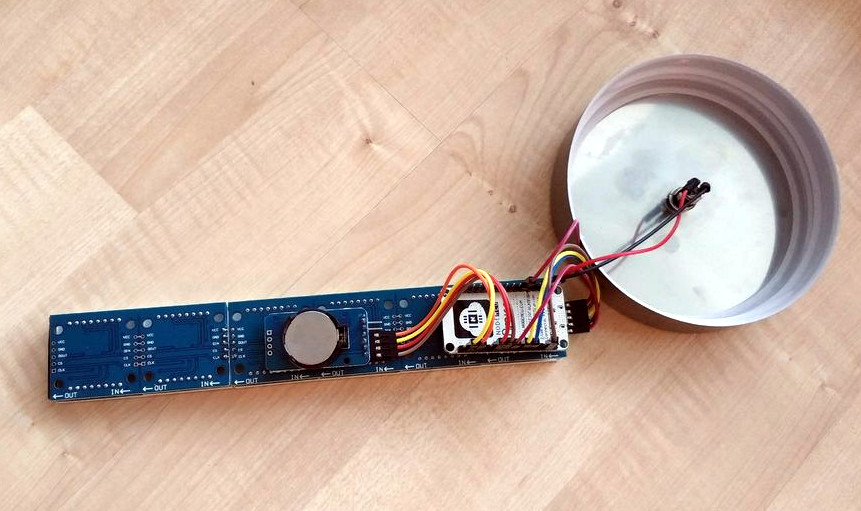
Inside the jar there’s six 8×8 MAX7219 LED matrix modules tacked together to create one long strip, with a NodeMCU board stuck to the back with double-sided tape. There’s also a DS3231 RTC module so the clock can keep halfway decent time, but depending on how aggressively you are willing to pull down the current time from NTP, that may or may not be required. A simple barrel jack is popped through the metal lid of the jar for power, and represents the only physical connection the internals have to the outside world.

For the next iteration [ZaNgAbY] is thinking of adding a temperature and humidity sensor, and a light sensor that can dim the LED display depending on the ambient light. While the environmental sensors will have to go on the outside of the lid if there’s any hope of pulling useful readings from them, the clear glass will allow him to keep the light sensor internal to the clock.

Believe it or not, this isn’t the first time we’ve seen somebody give their electronics the pickle treatment. We’ve previously played host to a server that “preserves” files in a Mason jar, as well as a gorgeous display of an iPod under glass.

Continue reading “ESP8266 Clock Puts Time In A Jar”

Bus Raider Allows Classic Micro Emulation On An RC2014

If you were lucky enough to own one of the crop of 1980s 8-bit computers, did you ever pause to consider how its graphics worked? Maybe the really expensive ones had dedicated CRT controller subsystems akin to the graphics cards you’d have found on a PC a few years later, but most of the affordable models would have stopped what they were doing every TV line interval period to allow access to their memory for their graphical output to be created.

The RC2014 retrocomputer dodges all this, by using a serial port as an interface and expecting your serial terminal to handle the screen. But what if it could produce its graphics directly as the machines of old did? [Rob Dobson] set out to achieve this, and not only did he succeed but he also found a way to directly emulate some classic machines along the way.

His RC2014 card which he calls the Bus Raider started as an attempt to use a Raspberry Pi to commandeer the RC2014 memory and read it via its GPIO lines, interpreting the graphics for its own screen. But even with bare metal Pi programming he couldn’t achieve the complex timing required for that, so he took an alternative approach. He ended up with an ESP32 that emulates a custom part of the RC2014 memory map and generates a display from there. Having created a custom memory map and hardware emulator for his RC2014, he then had the revelation that he could emulate any memory map, and thus he could make the retrocomputer perform natively as though it were any of a selection of classic micros. So far as well as a straight serial terminal he has a Sinclair ZX Spectrum and a Radio Shack TRS-80 running, as well as his own custom Z80 environment. And since the ESP32 also has WiFi, he can even connect to it through that medium.

Retrocomputers are something in which you might think that everything possible would already have been done, but projects like this one never cease to amaze us with their ingenuity. If you’d like to read more about the RC2014, we reviewed an earlier model back in 2016.

Amplifier Controlled Motorized Display

It’s easy to get jaded by gadgets like the Chromecast or Sonos, which let the user control AV equipment remotely from a mobile device or computer. You can pick something to play from your phone and send it off to your speakers via the magic of Wi-Fi. But it’s still nice to have a display to look at for music visualizations and that sort of thing, at least occasionally.

To address this only occasional desire to have a display on your media setup, you could follow in the footsteps of [Steven Elliott] and create a DIY motorized display which only pops up when needed. Inspired by seeing videos of TVs rising out of cabinets and other such trickery, he decided to create his own version using an old computer monitor he had lying around.

The monitor is lifted with a beefy linear actuator, which has been placed inside of a square metal fence post to keep from rotating. It already had a power supply and control board with relays for extending and retracting, so [Steven] just needed to find a convenient way of firing them off.

The answer came from a somewhat unconventional source: his amplifier. [Steven] explains that many amplifiers feature a “Trigger Output”, which uses a standard stereo 3.5mm connector and sends a 12V pulse to connected device. This is generally used to turn on downstream devices when the amplifier switches to the respective input. It’s too short and not nearly powerful enough to close the actuators relays, but it’s easy enough to detect.

[Steven] uses a LeoStick microcontroller to wait for the pulse from the amplifier, and then use that to raise or lower the display depending on the selected input. There’s also a SPST momentary switch which can be used to trigger the actuator manually. Beyond the fact the linear actuator is a bit loud, he says the setup works very well and prevents him from having to start up his projector if he just wants to take a quick glance at what’s playing or program his DVR.

We don’t see many motorized display lifts like this anymore, not since wall mounted LCDs became popular anyway. But it’s still a cool effect, and today made quite a bit easier thanks to the fact that TVs and monitors no longer weigh as much as a small car.

[Thanks to Baldpower for the tip.]

Challenge Your Perception Of Reality With Emotional Sunglasses

The Peril-Sensitive sunglasses of Hitchhiker’s Guide fame directly affect the user’s response to a stimulus, turning completely opaque in response to danger. That’s a great idea, but what if sunglasses could affect your emotions? That’s what the EmotiGlass project in this year’s Hackaday Prize is doing. It’s a concept that allows a computer to change the user’s emotional perception of reality.

The key idea behind the EmotiGlass comes from a paper published by a researcher at the University of London just this year. Apparently, your emotional reaction to an image can be controlled depending on the point in time during your heartbeat cycle the image is presented. For example, researchers found the perception of pain depended on the point in the cardiac cycle the stimulus was delivered.

In an effort to test out this hypothesis with some Open Source hardware, [David Prutchi] and [Jason Meyers] created a pair of sunglasses with liquid crystal lenses that can either be clear or opaque. With the addition of ECG sensors to detect the cardiac cycle and a microcontroller to tie everything together, you get a device that is the emotional equivalent of Peril-Sensitive sunglass.

This is a great project that won $1000 for making it to the finals of the Hackaday Prize, and we’re proud to have this project in the running for the Grand Prize of $50,000 USD.

The Carbon Fiber Construction Of Large Propellers

Props for your little RC airplane or drone are effectively consumables. They’re made of plastic, they’re cheap, and you’re going to break a lot of them. When you start swinging something larger than 12 inches or so, things start getting expensive. If you’re building gigantic octocopters or big RC planes, those props start adding up. You might not think you can build your own gigantic carbon fiber propellers, but [Tech Ingredients] is here to prove you wrong with an incredible video demonstration of the construction of large propellers

The key ideas behind the build are laid out in a video demonstration for building a single prop. The base begins with a CNC wire cut foam air foil. This foam airfoil is first modified for the attachment point by cutting a plug out of the root of the airfoil which is filled with epoxy.

With the skeleton of the airfoil complete, the build then moves on to laminating the foam core with carbon fiber. The epoxy itself is West Systems Pro-Set laminating epoxy, although we suspect the ubiquitous West Systems epoxy used for all those live-edge ‘river’ coffee tables will also work as well. This epoxy is spread out on a table, the carbon fiber laid over it, and a second layer of carbon fiber (check ‘yo biases!) laid over that. This is wrapped around the foam core, then cured with an electric heating pad.

Of course, this is only a demonstration of making a single blade for a prop. The next trick is turning that single blade into a propeller. This is done with a cleverly machined hub, attached through that epoxy plug placed in the foam core. The results are just as good as any large prop you could buy, and this has the added benefit of being something you made, not bought.

This is really a master class in composite construction, and well worth an hour’s of YouTube viewing. You can check out the intro video below.

Continue reading “The Carbon Fiber Construction Of Large Propellers”

Soft Robotic Jellyfish Get Pumped In The Atlantic

In a recent paper in Bioinspiration & Biomimetics, researchers at Florida Atlantic University describe the process of building and testing five free-swimming soft robotic jellyfish. The paper contains build details and data on how three different variables – tentacle stiffness, stroke frequency, and stroke amplitude – affect the swimming characteristics of each bot. For a more in-depth build log, we found the original masters thesis by Jennifer Frame to be very thorough, including processes, schematics, parts lists, and even some Arduino code.

Though a landlubber may say the robots look more like a stumpy octopus than a jellyfish, according to the paper the shape is actually most similar to a juvenile “ephyra stage” moon jellyfish, with 8 short tentacles radiating from a central body. The flexible tentacles are made of a silicon rubber material from Smooth-On, and were cast in 3D printed molds. Inside the waterproof main body is a Teensy 3.2 microcontroller, some flash memory, a nine-axis IMU, a temperature sensor, and a 9 V battery.

There are two flexible resistors embedded in the body to measure tentacle flex, and the actual flexing is done by pumping seawater through open circuit hydraulic channels cast into the tentacles. Two 3 V mini pumps are sufficient for pumping, and the open circuit means that when the pumps turn off, the tentacles bleed off any remaining pressure and quickly snap back to their “neutral” position without the use of complicated valves.

Another simple feature is two hall effect sensors that were mounted in the body to enable waterproof “wireless communication” with the microcontroller. The wireless protocol of choice: manually waving magnets over the sensors to switch the robot between a few predefined operating modes.

There’s a soothing, atmospheric video after the break, where you can see the robots in action off the coast of Florida.

Continue reading “Soft Robotic Jellyfish Get Pumped In The Atlantic”

Smartphone Mod Goes Out On A Limb

The modern smartphone has a variety of ways to interact with its user – the screen, the speakers, and of course, the vibration motor. But what if your phone could interact physically? It might be unnerving, but it could also be useful – and MobiLimb explores exactly this possibility.

Yes, that’s right – it’s a finger for your mobile phone. MobiLimb has five degrees of freedom, and is built using servomotors which allow both accurate movement as well as positional feedback into the device. Additionally, a touch-sensitive potentiometer is fitted, allowing the robofinger to respond to touch inputs.

The brains behind the show are provided by an Arduino Leonardo Pro Micro, and as is usual on such projects, the mechanical assembly is 3D printed – an excellent choice for producing small, complex parts. Just imagine the difficulty of trying to produce robotic fingers with classic machine tools!

The project video shows many different possibilities for using the MobiLimb – from use as a basic notification device, to allowing the smartphone to crawl along a table. We frankly can’t wait until there’s a fully-functional scorpion chassis to drop an iPhone into – the sky really is the limit here.

Interested in other unique ways to interact with your smartphone? Check out these nifty 3D printed physical buttons.