Homebrew Linear Actuators Put The Moves On This Motion Simulator

Breaking into the world of auto racing is easy. Step 1: Buy an expensive car. Step 2: Learn how to drive it without crashing. If you’re stuck at step 1, and things aren’t looking great for step 2 either, you might want to consider going with a virtual Porsche or Ferrari and spending your evenings driving virtual laps rather than real ones.

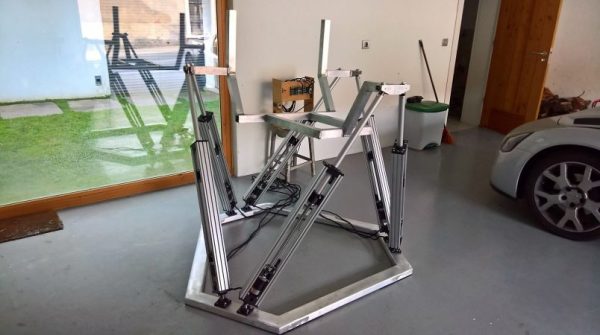
The trouble is, that can get a bit boring after a while, which is what this DIY motion simulator platform is meant to address. In a long series of posts with a load of build details, [pmvcda] goes through what he’s come up with so far on this work in progress. He’s building a Stewart platform, of the type we’ve seen before but on a much grander scale. This one will be large enough to hold a race car cockpit mockup, which explains the welded aluminum frame. We were most interested in the six custom-made linear actuators, though. Aluminum extrusions form the frame holding BLDC motor, and guide the nut of a long ball screw. There are a bunch of 3D-printed parts in the actuators, each of which is anchored to the frame and to the platform by simple universal joints. The actuators are a little on the loud side, but they’re fast and powerful, and they’ve got a great industrial look.

If car racing is not your thing and you’d rather build a full-motion flight simulator, here’s one that also uses DIY actuators.

Continue reading “Homebrew Linear Actuators Put The Moves On This Motion Simulator”

We Got Your Sega Chiptunes Right Here

Chiptunes are cool, but when you get into it, you realize you’re mostly dealing with Commodore SID tunes, Atari POKEY tracks for the cool kids, bleeps and bloops from a Game Boy, and maybe some NES tracks thrown in for good measure. There’s another option out there – the sound chip in the Sega Genesis. This thing could do drums, man, and [Aidan Lawrence] built the perfect player for the tuneful silicon tucked inside the classic 16-bit console.

[Aidan] had previously built a tiny little music player based on the YM3812 chip, the Yamaha chip found in SoundBlaster and Adlib sound cards. The chip inside the Sega Genesis, the Yamaha YM2612, is a bit different. The killer feature of this chip, PCM waveforms, aren’t stored as simple, small bits of code. These are massive blobs of binary data sent to the chip’s DAC. The SEGGGGAAAA intro of Sonic the Hedgehog, for example, used an eighth of the the cartridge space. You’re not going to build a Sega chiptune player with a tiny little microcontroller and 20kB of RAM.

The solution came in the form of an external SPI RAM device. The 23LC1024 is a full 1 Megabit in size, and since it’s SPI, it’s more than fast enough to keep up with the sample speed. The rest of the circuit including the mixer, preamp and power amp are based on the Genesis’ actual schematics, with an SD card and OLED thrown in for good measure. How does it sound? There’s a great video below the break and yes, the soundtrack from Sonic 3 sounds just as good as it did twenty years ago.

Continue reading “We Got Your Sega Chiptunes Right Here”

Fully 3D Printed And Metalized Horn Antennas Are Shiny And Chrome

We’ve seen our share of 3D printed antennas before, but none as well documented and professionally tested as [Glenn]’s 3D printed and metalized horn antennas. It certainly helps that [Glenn] is the principal engineer at an antenna testing company, with access to an RF anechoic chamber and other test equipment.

Horn antennas are a fairly simple affair, structurally speaking, with a straight-sided horn-shaped “cone” and a receptacle for standardized waveguide or with an appropriate feed, coaxial adapters. They are moderately directional and can cover a wide range of frequencies. These horns are often used in radar guns and as feedhorns for parabolic dishes or other types of larger antenna. They are also used to discover the cosmic microwave background radiation of our universe and win Nobel Prizes.

[Glenn]’s antennas were modeled in Sketchup Make, and those files plus standard STL files are available for download. To create your own horn, print the appropriate file on a normal consumer-grade fused deposition printer. For antennas that perform well in WiFi frequency ranges you may need to use a large-format printer, as the prints can be “the size of a salad bowl”. Higher frequency horns can easily fit on most print beds.

After printing, [Glenn] settled on a process of solvent smoothing the prints, then metalizing them with commonly available conductive spray paints. The smoothing was found to be necessary to achieve the expected performance. Two different paints were tested, with a silver-based coating being the clear winner.

The full write-up has graphs of test results and more details on the process that led to these cheap, printed antenna that rival the performance of more expensive commercial products.

If you’re interested in other types of 3D printed antenna, we’ve previously covered a helical satcom feed, a large discone antenna, and an aluminum-taped smaller discone antenna.

Tiny Plotter Is Made Of Strings And Cardboard

If you’ve been hanging around Hackaday for any length of time, you’ve undoubtedly seen the work of [Niklas Roy]. A prolific maker of…everything, we’ve covered his projects for over a decade now. He’s one of an elite group of hackers who can say they’ve been around since Hackaday was still using black & white pictures. Yet sometimes projects fall through the cracks.

Thanks to a tip sent in from one of our beloved readers, we’re just now seeing this incredible cardboard plotter [Niklas] made for a workshop he ran at the University of Art and Design Offenbach several years ago. The fully manual machine is controlled with two rotary dials and a switch, and it even comes with a book that allows you to “program” it by dialing in specific sequences of numbers.

Not that it detracts from the project, but its worth mentioning that the “cardboard” [Niklas] used is what is known as Finnboard, a thin construction material made of wood pulp that looks similar to balsa sheets. The material is easy to work with and much stronger than what we’d traditionally think of as cardboard. Beyond the Finnboard, the plotter uses welding rods as axles and slide rails, with glue, tape, and string holding it all together.

The dials on the control panel correspond to the X and Y axes: turning the X axis dial moves the bed forward and backward, and the Y dial moves the pen left and right. The switch above the dial lowers and raises the pen so it comes into contact with the paper below. With coordination between these three inputs, the operator can either draw “freehand” or follow the sequences listed in the “Code Book” to recreate stored drawings and messages.

Believe it or not, this isn’t the first time we’ve seen somebody made a plotter out of cardboard. Though previous entries into this specific niche did use servos to move around.

Continue reading “Tiny Plotter Is Made Of Strings And Cardboard”

SENSEation Shows The Importance Of Good Physical Design

Sensor network projects often focus primarily on electronic design elements, such as architecture and wireless transmission methods for sensors and gateways. Equally important, however, are physical and practical design elements such as installation, usability, and maintainability. The SENSEation project by [Mario Frei] is a sensor network intended for use indoors in a variety of buildings, and it showcases the deep importance of physical design elements in order to create hardware that is easy to install, easy to maintain, and effective. The project logs have an excellent overview of past versions and an analysis of what worked well, and where they fell short.

One example is the power supply for the sensor nodes. Past designs used wall adapters to provide constant and reliable power, but there are practical considerations around doing so. Not only do power adapters mean each sensor requires some amount of cable management, but one never really knows what one will find when installing a node somewhere in a building; a power outlet may not be nearby, or it may not have any unoccupied sockets. [Mario] found that installations could take up to 45 minutes per node as a result of these issues. The solution was to move to battery power for the sensor nodes. With careful power management, a node can operate for almost a year before needing a recharge, and removing any cable management or power adapter meant that installation time dropped to an average of only seven minutes.

That’s just one example of the practical issues discovered in the deployment of a sensor network in a real-world situation, and the positive impact of some thoughtful design changes in response. The GitHub repository for SENSEation has all the details needed to reproduce the modular design, so check it out.

How Precise Is That Part? Know Your GD&T

How does a design go from the computer screen to something you hold in your hand? Not being able to fully answer this question is a huge risk in manufacturing because . One of the important tools engineers use to ensure success is Geometric Dimensioning and Tolerancing (GD&T).

A good technical drawing is essential for communicating your mechanical part designs to a manufacturer. Drafting, as a professional discipline, is all about creating technical drawings that are as unambiguous as possible, and that means defining features explicitly. The most basic implementation of that concept is dimensioning, where you state the distance or angle between features. A proper technical drawing will also include tolerances for those dimensions, and I recently explained how to avoid the pitfall of stacking those tolerances.

Dimensions and tolerances alone, however, don’t tell the complete story. On their own, they don’t specify how closely the geometric form of the manufactured part needs to adhere to your perfect, nominal representation. That’s what we’re going to dig into today with GD&T.

Continue reading “How Precise Is That Part? Know Your GD&T”

Supercon: How Many Hardware Talks Can Be Packed Into One Conference?

How can we fit so many impressive talks onto two stages at the Hackaday Superconference? We’ll be bursting at the seams in November as the hardware world gathers in Pasadena for this annual pilgrimage. This year’s Supercon will have more talks and workshops than ever before!

This is the Ultimate Hardware Conference and you need to be there! We’ll continue to announce speakers and workshops as final confirmations come in. Supercon will sell out so grab your ticket now before it’s too late.

Ken Shirriff
Studying Silicon: Reverse Engineering Integrated Circuits

From the outside, integrated circuits are mysterious black boxes. Here’s how to open up some famous analog and digital chips including 8008 microprocessor, 555 timer, the first FPGA chip, Intel’s first RAM, the 76477 sound effects chip, and a counterfeit RAM chip.

Jennifer Wang
Building IMU-based Gesture Recognition

If you combine IMUs with machine learning (ML), you can detect gestures! Experimenting with these devices that sense both motion and orientation is a great way to get ML into your hacker toolkit.

Michael Schuldt
Adventures in Manufacturing Automation

A software engineer explores manufacturing automation, featuring complex software solutions and redemption in the form of reusable hardware components.

Adam McCombs
A Hacker’s Guide to Electron Microscopy

Working on electron microscopes means learning about everything from analog and digital circuit repairs, to how to rig and transport scopes, servicing 120KV+ high voltage tanks, and working on complex high vacuum systems.

Justin McAllister
Simple Antennas to Survive the Zombie Apocalypse

From $10 USB software defined radios to cheap imported transceivers, it’s easier than ever to have a multi-purpose radio in your lab. Low cost antennas can be built by beginners easily to send and receive radio signals from frequencies covering worldwide HF to local VHF, UHF, and microwave.

Alex Glow
What Went Wrong with Archimedes (the Robot Owl)?

Building a wearable, AI-powered robotic owl, is both easier and harder than it looks. Explore the challenges of 3D printing, coding, and how to confront them with creativity.

Kerry Scharfglass
The Economics of Conference Badges at Medium Scale

Discover manufacturing processes and make decisions with an eye towards economics. Buying 30,000 RGB LEDs, using big red arrows to communicate through a translator, and more!


Jeremy Hong
Electronic Warfare: A Brief Overview of Weaponized RF Designs

Whether you are trying to avoid having a multi-million dollar fighter jet from being shot down or avoid a speeding ticket from law enforcement , the same radar and electronic warfare equations and concepts apply.

We Want You at Supercon!

The Hackaday Superconference is a can’t-miss event for hardware hackers everywhere. Join in on three amazing days of talks and workshops focusing on hardware creation. This is your community of hardware hackers who congregate to hack on the official hardware badge and on a slew of other projects that show up for the fun. Get your ticket right away!