Edge-lit Nixie Tube Is Sheer Brilliance

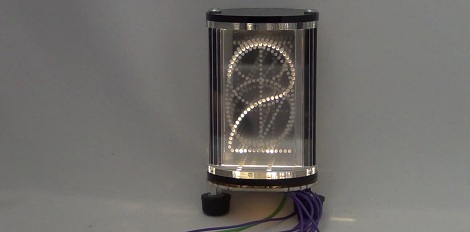
It’s not often that we see something so brilliantly simple we’re left reaching for our checkbooks while wondering exactly how we never though of that before. [Jürgen]’s edge-lit Nixie display is one of those builds.

[Jürgen]’s modern take on a Nixie display uses ten laser-engraved pieces of acrylic to emulate a Nixie numerical display. In the base of the display are 10 LEDs, each shining onto the side of a piece of acrylic. When an LED lights up, you can clearly see the corresponding number. Edge-lit displays are old hat, but talking about the possibility of an RGB Nixie-style display is really neat.

The build was inspired by an antique edge-lit display that performed the same function as the ever-popular Nixie tube with 10 miniature light bulbs and light pipes. The ancient edge-lit displays came in a rectangular enclosure that worked very well for panel-mount uses, but [Jürgen] stuck to a more traditional cylindrical orientation. All we want to know is when a manufacturer in China is going to start building these. Check out the demo of the edge-lit Nixie after the break.

Continue reading “Edge-lit Nixie Tube Is Sheer Brilliance”

Build An Electric Motorcycle

On the list of things we’ll build ‘when we get a few free weekends,’ an electric motorcycle is right at the top. With a 20-mile range, they may not be as  versatile as a car or truck, but we can’t imagine a vehicle better suited for making a quick jaunt around town. [Ben Nelson] just finished his electric motorcycle and put up a great Instructable on converting an ’81 Kawasaki KZ440 to battery power.

After going over the rarely mentioned aspects of license, registration, and insurance, [Ben] started his build by pulling the engine from his bike and installing an electric motor. The batteries used weren’t insanely expensive LiPo cells, but instead cheap lead-acid units. The calculated range with the lead-acid batteries was 26 miles – perfect for a trip to the next town over and back.

After everything was cabled up, chain wrapped around sockets, and an awesome yellow paint job applied, [Ben] finally took his bike for a test drive. Check out the videos after the break for an idea of how fast [Ben]’s bike can go.

Continue reading “Build An Electric Motorcycle”

3d Printer Software Tutorials

It’s no secret that the 3D printer community is extremely fragmented. With three models of RepRaps, three printer kits from Makerbot, and hundreds of ‘printers of the week,’ it’s extremely frustrating for beginners to wrap their heads around the pros and cons of each machine. The software for these printers is segmented nearly as much as the hardware itself, but thankfully [Mike] has put up a series of videos so beginners can wrap their head around all the software packages.

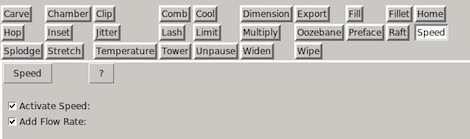
[Mike] used Alibre 3D CAD software to generate the .stl files for all his printable objects. These .stl files were converted into printer-readable GCode by the very popular Skeinforge. The GCode is sent over to [Mike]’s SUMPOD with ReplicatorG, an awesome program that serves as the front end to a printer.

Although we’d like to see a tutorial for Sfact, the new hotness in .stl to GCode conversion, [Mike] does a very good job at breaking down the complexity of Skeinforge into manageable bites.

Building A Keyboard From Scratch

After over a year of work, [dmw] is nearly done with his Humble Hacker Keyboard. It’s a keyboard that has been influenced by some pretty crazy looking designs, but meets all of [dmw]’s needs for a compact, programmer-oriented key layout that’s easy to type on.

[dmw] posted a pseudo-build log  over at the geekhack keyboard forums. Every single part of this keyboard is custom-made. The key caps were made by Signature Plastics, the case was made by Shapeways, and the custom PCB for the key switches came directly from Express PCB. The key switches are blue Alps sliders (one of the best key switches available) with a few white Alps switches taken from an old Apple keyboard.

After soldering a hundred diodes and switches, [dmw] installed a Teensy++ to convert the closing key switches to something his computer can understand. This turned out to be a perfect of the Teensy because of the USB peripheral libraries that already exist. The source is up on github, so if you’ve ever wanted to replace your Model M with something more ergonomic, here’s your chance.

Take A Picture Of A Bang With A Camera Sound Trigger

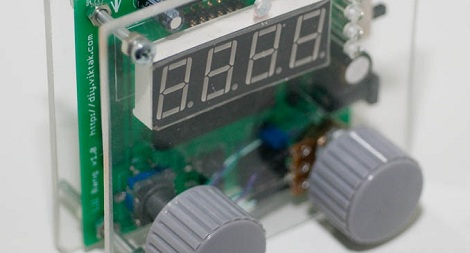
We’ve featured dozens of digital camera triggers over the years. Very rarely do we come across one as well designed as [Viktor]’s ‘lil bang sound trigger that snaps a picture whenever a microphone picks up a loud noise.

[Viktor]’s build is based around a PIC16F microcontroller with an LM386 amp connected to a microphone. On the front of the device, the right knob controls the sensitivity of the microphone and the left knob sets the delay between detection and the trigger.

The ‘lil bang trigger connects to the camera through an opto-isolated 3.5 mm jack that is compatible with all the fancy Canon and Nikon DSLRs. The delay between sound detection can be changed from 0 to 255 ms, allowing for precise control over a high-speed photography rig.

All this work comes after the  light-activated trigger [Viktor] built for taking pictures of lightning. The sound-activated version wouldn’t work for lightning pics, but he thinks it could be useful for collision or explosion photographic studies. Check out the video of [Viktor]’s ‘lil Bang in action after the break.

Continue reading “Take A Picture Of A Bang With A Camera Sound Trigger”

Share A Light-up LED Heart With Your Valentine

It’s not roses or jewelry, but we hope [Erik]’s light-up USB heart will be appreciated by his significant other. When the two heart pieces come in contact with each other, each side lights up.

[Erik] started his build by cutting two half-heart shaped pieces out of polycarbonate. After drilling a few holes for LEDs and wires, magnets and reed switches were installed along the ‘broken’ side of the heart. Whenever the hearts come in contact with each other, the magnets trip the reed switches and light up both sides of the heart.

There is USB flash drive embedded in each heart half is loaded with a portable Dropbox. When the USB drive is plugged into a computer, the dropbox steps into action and synchronizes the photo album stored in each heart half. No matter how far apart they are, [Erik] and his SO can share pictures through their glowing LED hearts. Not to come off as a hopeless romantic, but this sounds like something we’d like for Valentine’s day. We’re hoping [Erik]’s SO thinks that as well.

Wireless Controllers For All Your Retro Systems

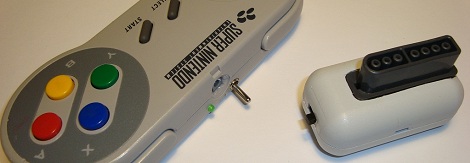
Remember those old wireless controllers made for the consoles of our youth like the NES and Super Nintendo? They didn’t work well, mostly owing to the fact they were built using the same infrared technology that is found in a remote control. Now that all the modern consoles are wireless, [micro] over at the nftgames forum decided to update his classic systems for wireless control.

The transmitters and receivers are built around an nRF24L01+ radio module that operates in the 2.4 GHz band. [micro] has the process of converting his controllers down to a science. He cuts the cord and wires the controller up to an AVR running at 16 MHz. The AVR sends this to the receiver where the button presses are sent through the original controller port. Basically, [micro] recreated a WaveBird controller for his NES, SNES, Saturn and N64.

The controllers are powered by internal lithium batteries, but the charging ICs are too expensive to put in each controller. To solve this problem, [micro] crafted a small external charging circuit that plugs into a 3.5mm jack on each controller. Check out [micro]’s controller demo after the break.

Continue reading “Wireless Controllers For All Your Retro Systems”