Fail Of The Week: An Electric Bicycle, Powered By AA Batteries

Very slowly, some very cool parts are coming out on the market that will make for some awesome builds. Supercapacitors are becoming a thing, and every year, the price of these high power supercaps go a little lower, and the capacity gets a little higher. It’s really only a matter of time before someone hacks some supercaps into an application that’s never been seen before. The Navy is doing it with railguns, and [David] is building an electric bike, powered by AA batteries. While [David]’s bike technically works with the most liberal interpretation of ‘technically’, it’s the journey that counts here.

This project began as an investigation into using supercapacitors in an electric bicycle. Supercaps have an energy density very much above regular capacitors, but far behind lithium cells. Like lithium cells, they need a charge balancer, but if you manage to get everything right you can trickle charge them while still being able to dump all that power in seconds. It’s the perfect application for a rail gun, or for slightly more pedestrian applications, an electric bike with a hill assist button. The idea for this build would be to charge supercaps from a bank of regular ‘ol batteries, and zoom up a hill with about fifteen seconds of assistance.

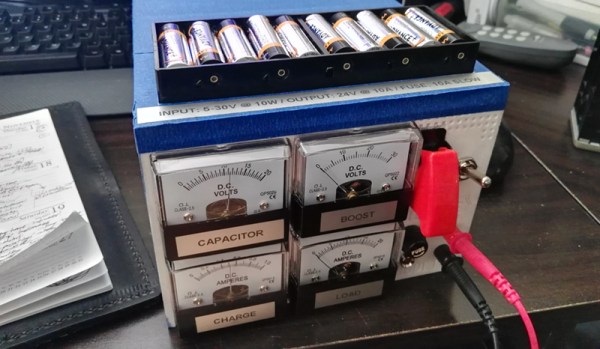
The design of the pulsed power DC supply is fairly straightforward, with a mouthful of batteries feeding the supercap array through boost regulators, and finally going out to the motor through another set of regulators. Unfortunately, this project never quite worked out. Everything worked; it’s just this isn’t the application for the current generation of supercapacitors. There’s not enough energy density in [David]’s 100F supercaps, and the charging speed from a bunch of AA batteries is slow. For fifteen minutes of charging, [David] gets about fifteen seconds of boost on his bike. That’s great if you only ever have one hill to climb, but really useless in the real world.

That doesn’t mean this project was a complete failure. [David] now has a handy, extremely resilient array of supercaps that will charge off of anything and provide a steady 24V for a surprising amount of time. Right now, he’s using this scrapped project as a backup power supply for his 3D printer. That 100 Watt heated bed slurps down the electrons, but with this repurposed supercap bank, it can survive a 20 second power outage.

It’s a great project, and even if the technology behind supercaps isn’t quite ready to be used as a boost button on an electric bike, it’s still a great example of DIY ingenuity. You can check out [David]’s demo of the supercap bank in action below.

Continue reading “Fail Of The Week: An Electric Bicycle, Powered By AA Batteries”

Reprogramming Cheap WiFi Outlets

If you want to retrofit your home with smart outlets and lightbulbs, bust out your wallet. You can easily spend forty dollars for a smart light bulb at your local home supply store, and strips of smart sockets could cost sixty. When [coogle] found a WiFi-enabled four-outlet power strip on Amazon, he couldn’t resist. Sure, the no-name strip would be locked down behind a stupid iPhone interface and will probably turn your house into a botnet, but never mind that: you can easily reprogram these power strips to be whatever you want.

After receiving these power strips and tearing them open, [coogle] found exactly what you would expect from a no-name white goods manufacturer. There’s a board with an Espressif chip and a WiFi antenna, and a second board with a few relays, with a few wires connecting the two. You only need to browse AliExpress for a few minutes to figure out what’s going on here. The brains of the outfit are in the ESP8266, and if you can control that, you have your own Internet of Power Strips.

The problem, then, was reprogramming the ESP8266. This was a version of the chip [coogle] hadn’t seen before, but a quick query with the Google Mother Brain revealed it was a WT8266-S1 module, with all the pins required for programming easily accessible on a convenient header. After connecting this header up to an ESP programming board, [coogle] had all the relevant information including the capacity of the Flash. There’s still a bit more work to make this a functional WiFi power outlet, namely figuring out which GPIOs and wires connect to which relays, but this is effectively a completely Open IoT device right now. All you have to do is bring your own firmware.

Hackaday Links Column Banner

Hackaday Links: April 15th, 2018

San Fransisco is awash in electric scooters. Three companies — Lime, Bird, and Spin — have been dumping ‘smart’ electric scooters on the sidewalks of San Fransisco over the last few weeks. The business plan for all these companies is to allow anyone to ride them via an app. $1 unlocks the scooter, and rides are fifteen cents a minute. No one, it appears, is looking at the upside of abandoned, dead electric scooters: they’re a remarkable source of lithium batteries and brushless motors. Hello, my name is Mr. Cyberpunk. My friends and I drive around the city collecting abandoned electric scooters to harvest their batteries and motors. A quick hit from a drill in the middle of the top panel of a Bird scooter disables the cellular modem, but then you don’t get to harvest the Particle dev board. You’re welcome, Mr. Doctorow, for the scene in your next novel.

There are a huge number of tips and tricks that are obvious if you already know them, and genius if you don’t. Working with wood? Need to hide a gap? Use sawdust and wood glue to make DIY wood filler. The trick here is using sawdust from whatever you’re trying to hide a gap in, but it’s not a bad idea to keep a few small containers of different sawdusts if you’re working with exotic tropical hardwoods. Titebond III, mango.

Ever since the Bayeux tapestry meme generator of 2003, embroidery has been recognized as a legitimate art form. [Irene Posch] is using traditional embroidery skills to create a computer. Conductive thread exists, but you can’t make a computer out of just wire; you need some sort of switching element. This is a relay computer, with the relays built out of beads, coils of conductive thread, and a tiny flippy bit. This is the best picture you’re going to get of the relay. This is still a work in progress and the density of components means this will probably never meet any reasonable definition of ‘computer’, but it is digital logic, done completely with tools in the embroidery toolset.

You know what’s awesome? Hashtag Badgelife. What is Badgelife? It’s the hardware demoscene of independent electronic conference badges, mostly going down at DEF CON every year. This year, Badgelife is bigger than ever. Want proof? AND!XOR, the folks behind the infamous Bender badge and last year’s Hunter S. Rodriguez badge have unleashed this year’s design. It was a Kickstarter, until it sold out. The DC Furs have launched their pre-order whatever for a badge filled with LEDs and fleas. Most surprisingly, there will now be an official mini-village of Badgelife at this year’s Defcon! This is a hardware demoscene, people, and if you want to be as cool as the guys rocking Amiga homebrew in 1993, you gotta get on board with the badgelife.

Rotary Encoders Become I2C Devices

Rotary encoders are the bee’s knees. Not only do you get absolute positioning, you can also use a rotary encoder (with a fancy tact button underneath) for an easy UI for any electronics project. There’s a problem with rotary encoders, though: it’s going to use Gray code or something weird, and getting a rotary encoder to work with your code isn’t as easy as a simple button.

For his Hackaday Prize project, [fattore.saimon] has come up with the solution for using multiple rotary encoders in any project. It’s a board that turns a rotary encoder into an I2C device. Now, instead of counting rising and falling edges, adding a rotary encoder to a project is as easy as connecting four wires.

The project is built around the PIC16F18344, a small but surprisingly capable microcontroller that reads a rotary encoder and spits data out as an I2C slave device. Also on board are a few pins for an RGB LED, general purpose pins, the ability to set all seven bits of the I2C address (who wants 127 rotary encoders?), and castellated holes for connecting several boards together.

This project is an update of [fattore]’s earlier I2C Encoder, and there are a lot of improvements in the current version. It’s slightly smaller, has better connectors, and uses a more powerful microcontroller. That’s just what you need if you want a ton of rotary encoders for all those cool interactive projects.

Resuming Failed 3D Prints Automatically

What happens to your 3D printer if the power goes out? What happens if there’s a jam in the nozzle? What happens if your filament breaks, runs out, or turns into a plate of spaghetti? For all these situations, the print fails, wasting plastic and time. For his Hackaday Prize entry, [robert] has come up with a tiny device that saves all those failed prints, and it does it without batteries or a UPS.

The idea behind [robert]’s box is to monitor all the G-code being sent to the printer, and allow a print to be resumed after a failure. The design is simple enough — just a USB mini port on one end, a USB A port on the other, and three buttons in between. This box logs the G-code, and if the printer happens to fail, the box will spring into life allowing you to resume a print from any Z position.

Already [robert] has tested this box on a number of printers including the Prusa i3, the Creality CR-10, and the ever-popular, explodey Anet A8. The project has already gone through a few hardware revisions and there is, of course, a fancy 3D printed enclosure for the board. It’s a great project, and one of the more interesting 3D printing tools we’ve seen in this year’s Hackaday Prize.

Making Custom Silicon For The Latest Raspberry Pi

The latest Raspberry Pi, the Pi 3 Model B+, is the most recent iteration of hardware from the Raspberry Pi Foundation. No, it doesn’t have eMMC, it doesn’t have support for cellular connectivity, it doesn’t have USB 3.0, it doesn’t have SATA, it doesn’t have PCIe, and it doesn’t have any of the other unrealistic expectations for a thirty-five dollar computer. That doesn’t mean there wasn’t a lot of engineering that went into this new version of the Pi; on the contrary — the latest Pi is filled with custom silicon, new technologies, and it even has a neat embossed RF shield.

On the Raspberry Pi blog, [James Adams] went over the work that went into what is probably the most significant part of the new Raspberry Pi. It has new, custom silicon in the power supply. This is a chip that was designed for the Raspberry Pi, and it’s a great lesson on what you can do when you know you’ll be making millions of a thing.

The first few generations of the Raspberry Pi, from the original Model B to the Zero, used on-chip power supplies. This is what you would expect when the RAM is soldered directly to the CPU. With the introduction of the Raspberry Pi 2, the RAM was decoupled from the CPU, and that meant providing more power for more cores, and the rails required for LPDDR2 memory. The Pi 2 required voltages of 5V, 3.3V, 1.8V, and 1.2V, and the sequencing to bring them all up in order. This is the job for a power management IC (PMIC), but surprisingly all the PMICs available were more expensive than the Pi 2’s discrete solution.

The MXL7704, with four switching power supplies. The four symmetric gray and brown bits are inductors.

However, where there are semiconductor companies, there’s a possibility of having a custom chip made. [James] talked to [Peter Coyle] of Exar in 2015 (Exar was then bought by MaxLinear last year) about building a custom chip to supply all the voltages found in the Raspberry Pi. The result was the MXL7704, delivered just in time for the production of the Raspberry Pi 3B+.

The new chip takes the 5V in from the USB port and converts that to two 3.3V rails, 1.8V and 1.2V for the LPDDR2 memory, 1.2V nominal for the CPU, which can be raised and lowered via I2C. This is an impressive bit of engineering, and as any hardware designer knows, getting the power right is the first step to a successful product.

With the new MXL7704 chip found in the Raspberry Pi 3B+, the Pi ecosystem now has a simple and cheap chip for all their future revisions. It might not be SATA or PCIe or eMMC or a kitchen sink, but this is the kind of engineering that gives you a successful product rather than a single board computer that will be quickly forgotten.

Friday Hack Chat: Talking MQTT With The Community

The Internet of Things is just around the corner, and somehow or another, all these bits of intelligent dust and juice bag squeezers will have to talk to one another. One of the better ways to get IoT bits talking to each other is MQTT, Message Queuing Telemetry Transport, a protocol designed for small code footprints and limited network bandwidth. It gets a lot of IoT hype, but it’s a great alternative to HTTP for your own small projects, so that’s what we’re talking about during this week’s Hack Chat.

MQTT is a machine-to-machine connectivity protocol, very useful in remote locations, where a small code footprint is required, where bandwidth is at a premium, or for turning a lamp on and off from your phone, while sitting in the same room. It’s ideal for mobile applications, and in the twenty or so years since its creation, MQTT has made inroads into all those ‘smart’ devices around your house.

MQTT is based on a very simple publish and subscribe model with ‘topics’ that allow you to configure where messages should be sent. It is an extremely simple protocol, but with MQTT, you can set up a complete home automation system that opens the garage door, turns on a lamp, or pings a few weather sensors.

For this week’s Hack Chat, we’re going to be discussing MQTT with the entire Hackaday.io community. There are dozens of people who have built MQTT-based projects that frequent the Hack Chat, and hundreds more that want to learn. Want to get in on the ground floor of the Internet of Things? This is the Hack Chat you want to check out. It’s a community pow-wow around connected devices.

join-hack-chat

Our Hack Chats are live community events on the Hackaday.io Hack Chat group messaging. This week the crew is going to sit down around the campfire around noon, Pacific time, Friday, April 13th (oooh, spooky). Want to know what time this is happening in your neck of the woods? Have a countdown timer!

Click that speech bubble to the right, and you’ll be taken directly to the Hack Chat group on Hackaday.io.

You don’t have to wait until Friday; join whenever you want and you can see what the community is talking about.