Machinists are expected to make functional items from stock material, at least hat’s the one-line job description even though it glosses over many important details. [Eclix] wanted a birthday gift for his girlfriend that wasn’t just jewelry, indeed he wanted jewelry made with his own hands. After all, nothing in his skillset prohibits him from making beautiful things. He admits there were mistakes, but in the end, he came up with a recipe for two pairs of earrings, one set with sapphires and one with diamonds.
He set the gems in sterling silver which was machined to have sockets the exact diameter and depth of the stones. The back end of the rods were machined down to form the post for the clutch making each earring a single piece of metal and a single gemstone. Maintaining a single piece also eliminates the need for welding or soldering which is messy according to the pictures.
Recent news reports have claimed that an MIT headset can read your mind, but as it turns out that’s a little bit of fake news. There is a headset — called AlterEgo — but it doesn’t actually read your mind. Rather, it measures subtle cues of you silently vocalizing words. We aren’t sure exactly how that works, but the FAQ claims it is similar to how you experience reading as a child.
If you read much science fiction, you probably recognize this as subvocalization, which has been under study by the Army and NASA. However, from what we know, the positioning of sensor electrodes is crucial and can vary not only by speaker, but also change for the same speaker. Perhaps the MIT device has found a way around that problem. You can see a video of the system, below.
Nostalgia is a funny thing. That desire we all get to relive past memories can make you do things that in any other scenario would be out of the question. The effect seems even stronger when it comes to old video games. How else can you explain buying the same games over and over every time they get “remastered” for the next generation of consoles? But what if those remasters aren’t good enough?
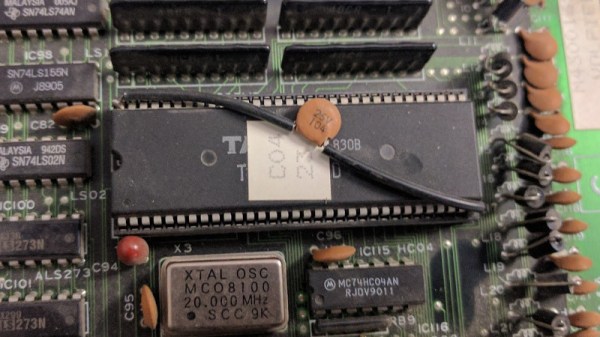
If you have a burning desire to play a 100% accurate version of certain old arcade games, you might have your work cut out for you. Getting precise ROMs from some of these machines is exceptionally difficult, and as explained on the [CAPS0ff] blog, sometimes requires nearly superhuman feats of engineering.
As explained in the blog post, less invasive methods of getting inside the Taito C-Chip had already been examined and come up lacking. Despite best efforts, sending the unlock command to the chip didn’t yield the desired effect. If you can’t read the ROM the usual way, you need to get a little creative.
The process starts by milling down the case of the chip until the integrated circuit is just starting to become visible. Then acid is used to fully expose the traces. The traces are then tinned, and some very fine soldering is done to get the chip wired up to the reader. All told it takes about three hours from start to finish to pull a ROM using this method. But it’s all worth it in the end when you can play that 100% accurate version of Rainbow Islands. Or so we’ve been told.
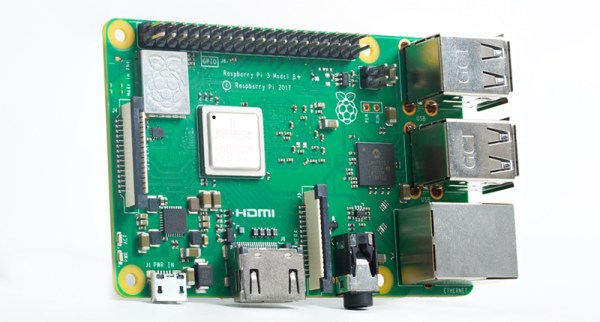
The latest Raspberry Pi, the Pi 3 Model B+, is the most recent iteration of hardware from the Raspberry Pi Foundation. No, it doesn’t have eMMC, it doesn’t have support for cellular connectivity, it doesn’t have USB 3.0, it doesn’t have SATA, it doesn’t have PCIe, and it doesn’t have any of the other unrealistic expectations for a thirty-five dollar computer. That doesn’t mean there wasn’t a lot of engineering that went into this new version of the Pi; on the contrary — the latest Pi is filled with custom silicon, new technologies, and it even has a neat embossed RF shield.
On the Raspberry Pi blog, [James Adams] went over the work that went into what is probably the most significant part of the new Raspberry Pi. It has new, custom silicon in the power supply. This is a chip that was designed for the Raspberry Pi, and it’s a great lesson on what you can do when you know you’ll be making millions of a thing.
The first few generations of the Raspberry Pi, from the original Model B to the Zero, used on-chip power supplies. This is what you would expect when the RAM is soldered directly to the CPU. With the introduction of the Raspberry Pi 2, the RAM was decoupled from the CPU, and that meant providing more power for more cores, and the rails required for LPDDR2 memory. The Pi 2 required voltages of 5V, 3.3V, 1.8V, and 1.2V, and the sequencing to bring them all up in order. This is the job for a power management IC (PMIC), but surprisingly all the PMICs available were more expensive than the Pi 2’s discrete solution.
The MXL7704, with four switching power supplies. The four symmetric gray and brown bits are inductors.
However, where there are semiconductor companies, there’s a possibility of having a custom chip made. [James] talked to [Peter Coyle] of Exar in 2015 (Exar was then bought by MaxLinear last year) about building a custom chip to supply all the voltages found in the Raspberry Pi. The result was the MXL7704, delivered just in time for the production of the Raspberry Pi 3B+.
The new chip takes the 5V in from the USB port and converts that to two 3.3V rails, 1.8V and 1.2V for the LPDDR2 memory, 1.2V nominal for the CPU, which can be raised and lowered via I2C. This is an impressive bit of engineering, and as any hardware designer knows, getting the power right is the first step to a successful product.
With the new MXL7704 chip found in the Raspberry Pi 3B+, the Pi ecosystem now has a simple and cheap chip for all their future revisions. It might not be SATA or PCIe or eMMC or a kitchen sink, but this is the kind of engineering that gives you a successful product rather than a single board computer that will be quickly forgotten.
A reasonable selection of the Hackaday readership will have had their first experiences of computing on an 8-bit machine in a black case, with the word “Sinclair” on it. Even if you haven’t work with one of these machines you probably know that the man behind them was the sometimes colourful inventor Clive (now Sir Clive) Sinclair.
The finest in 1950s graphic design, applied to electronics books.
He was the founder of an electronics company that promised big results from its relatively inexpensive electronic products. Radio receivers that could fit in a matchbox, transistorised component stereo systems, miniature televisions, and affordable calculators had all received the Sinclair treatment from the early-1960s onwards. But it was towards the end of the 1970s that one of his companies produced its first microcomputer.
At the end of the 1950s, when the teenage Sinclair was already a prolific producer of electronics and in the early stages of starting his own electronics business, he took the entirely understandable route for a cash-strapped engineer and entrepreneur and began writing for a living. He wrote for electronics and radio magazines, later becoming assistant editor of the trade magazine Instrument Practice, and wrote electronic project books for Bernard’s Radio Manuals, and Bernard Babani Publishing. It is this period of his career that has caught our eye today, not simply for the famous association of the Sinclair name, but for the fascinating window his work gives us into the state of electronics at the time.
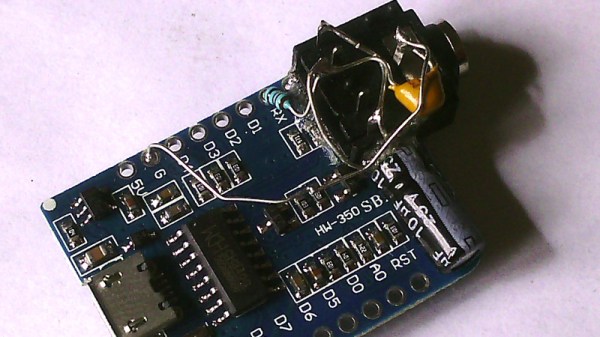
If you study the specifications of the ESP8266 WiFi-enabled microcontroller, you will notice that it features an I2S audio interface. This is a high-speed serial port designed to deliver 16-bit audio data in a standard format, and has its origins in consumer audio products such as CD players. It would be usual to attach a dedicated DAC to an I2S interface to produce audio, but [Jan Ostman]’s synthesiser projects eschew that approach, and instead do the job in software. His I2S interface pushes out a pulse density modulated data stream in the same manner as a 1-bit DAC, meaning that the only external components required to produce audio are a simple low-pass filter. He’s posted a video of the synth in action, which we’ve placed below the break.
The example he gives us is a basic clone of a Roland 909 drum machine, and he takes us through the code with extensive examples including MIDI. He’s using the Wemos D1 Mini board, but the same could be replicated with many other ESP8266 platforms.
We recently posted about a spectacular 3D-printer fire that was thankfully caught and extinguished before spreading to the hacker’s house or injuring his family. Analyzing the remains of the printer, the hacker determined that the fire was caused when a loose grub screw let the extruder’s heater cartridge fall out and touch the ABS fan shroud. It ran full-on and set things on fire.
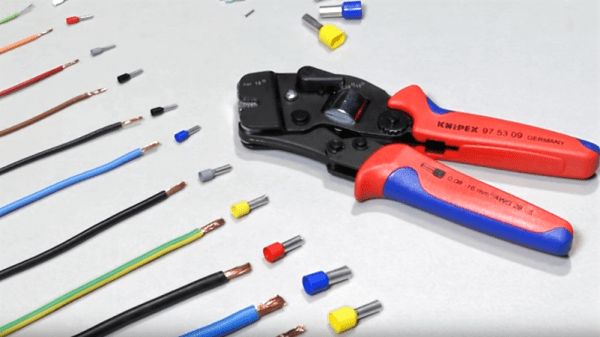
A number of us have similar 3D printers, so the comments for this article were understandably lively, but one comment stood out by listing a number of best practices for wiring, including the use of ferrules. In particular, many 3D printers connect the heated bed, which draws a lot of current, with screw terminals to the motherboard. While not the cause of the fire in the original post, melted terminal blocks are a common complaint with many DIY 3D printer kits, and one reason is that simply jamming thick stranded wire into a screw terminal and hoping for the best can result in increased resistance, and heat, at the joint. In such situations, the absolutely right thing to do is to crimp on a ferrule. So let’s talk about that.