Tool Rolls, The Fabric Design Challenge That Can Tidy Up Any Workshop

You’ve designed PCBs. You’ve cut, drilled, Dremeled, and blow-torched various objects into project enclosurehood. You’ve dreamed up some object in three dimensions and marveled as the machine stacked up strings of hot plastic, making that object come to life one line of g-code at a time. But have you ever felt the near-limitless freedom of designing in fabric?

I don’t have to tell you how satisfying it is to make something with your hands, especially something that will get a lot of use. When it comes to that sweet cross between satisfaction and utility, fabric is as rewarding as any other medium. You might think that designing in fabric is difficult, but let’s just say that it is not intuitive. Fabric is just like anything else — mysterious until you start learning about it. The ability to design and implement in fabric won’t solve all your problems, but it sure is a useful tool for the box.

WoF? Fat quarter? How much is a yard of fabric, anyway?

To prove it, I’m going to take you through the process of designing something in fabric. More specifically, a tool roll. These two words may conjure images of worn, oily leather or canvas, rolled out under the open hood of a car. But the tool roll is a broad, useful concept that easily and efficiently bundles up anything from socket wrenches to BBQ utensils and from soldering irons to knitting needles. Tool rolls are the best in flexible, space-saving storage — especially when custom-designed for your need.

In this case, the tools will be pens, notebooks, and index cards. You know, writer stuff. But the same can just as easily organize your oscilloscope probes. It’s usefully and a great first foray into building things with fabric if this is your first time.

Continue reading “Tool Rolls, The Fabric Design Challenge That Can Tidy Up Any Workshop”

Superbly Synchronized Servos Swaying Softly

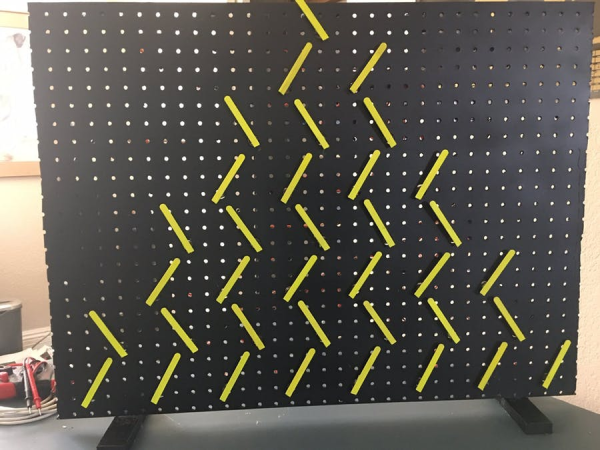
LEDs and blinky projects are great, and will likely never fade from our favor. But would you look at this sweeping beauty? This mesmerizing display is made from 36 micro servos with partial Popsicle sticks pasted on the arms. After seeing a huge display with 450 servos at an art museum, [Doug Domke] was inspired to make a scaled-down version.

What [Doug] didn’t scale down is the delightful visuals that simple servo motion can produce. The code produces a three-minute looping show that gets progressively more awesome, and you can stare at that after the break. Behind the pegboard, a single, hardworking Arduino Uno controls three 16-channel PWM controllers that sweep the servos. We like to imagine things other than Popsicle sticks swirling around, like little paper pinwheels, or maybe optical illusion wheels for people with strong stomachs.

You won’t see these in the video, but there are five ultrasonic sensors mounted face-up on the back of the pegboard. [Doug] has optional code built in to allow the servo sticks to follow hand movement. We hope he’ll upload a demo of that feature soon.

Servos can be hypnotic as well as helpful, as we saw in this 114-servo word clock.

Continue reading “Superbly Synchronized Servos Swaying Softly”

Pizza Oven Build Exercises Forgotten Gym Ball

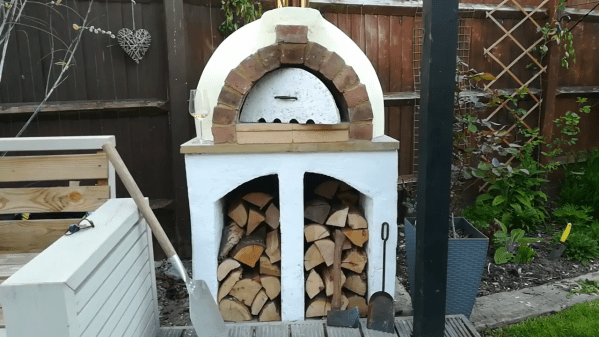
See, this is what happens when pizza lovers follow their dreams. It probably started innocently enough for [phammy57]—he got a pizza stone, then maybe one of those big rocking pizza cutters. Maybe he even learned how to toss the dough high in the air. But every time [phammy57] slid one of those homemade pies into the electric oven, the nagging feeling grew a little stronger. Eventually, he gave in to making pizza the way it’s supposed to be made, and built a wood-fired oven.

The most intriguing thing about this build is also the most important: this pizza preparer pivots on a gym ball, which served as the base for forming the oven. To do this, [phammy57] pushed the ball halfway through a hole in a big piece of plywood, effectively creating the world’s largest Pogo Bal (remember those?). Then he applied plastic wrap to the ball as a mold release, and laid down a thick mixture of vermiculite, cement, and water.

[phammy57] built the base from lightweight blocks, sculpting a nice arch for the top of the wood storage area. Once the dome was fastened to the base with the opening cut and outlined with brick, he cut a vent hole and built the chimney. Finally, it was time to add insulating blanket material, chicken wire, more vermiculite, and coat of plaster to finish. Take a brief look inside after the break.

It’s a long process of building, curing, and burning in, but the end result looks fantastic. We bet it pizzas like a champ, too. Probably gives this 45-second pizza oven a run for its money.

[Ed Note: If you’re still having trouble parsing the title, try it out with “build” as a noun and “exercises” as a verb.]

Continue reading “Pizza Oven Build Exercises Forgotten Gym Ball”

Grey Water Toilet Helps Keep You Flush

The average first world household swims in an ocean of non-potable water from things like HVAC condensation, shower drains, and periods of rain. All of it just goes to waste. These same households pay the city to deliver drinkable water to places that don’t need it, like the toilet tanks. Isn’t it time to put all that perfectly good grey water to use? With a zero city water toilet, you can give that slightly-used H₂O one last hurrah before flushing it down the drain.

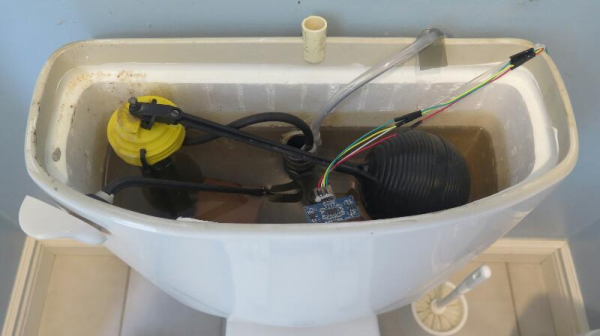
When the toilet is flushed, an ultrasonic sensor in the toilet tank monitors the change in water level and triggers a pump to fill the toilet back up from a barrel in the basement. A clear plastic tube inserted into the toilet tank does double duty as both the water source and tank overflow drain point.

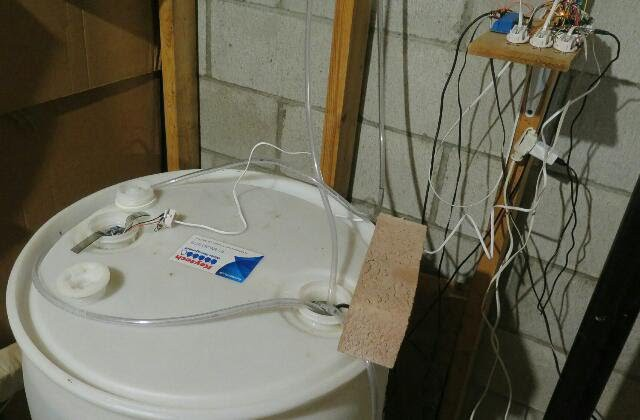
The 55-gallon plastic barrel in the basement collects water from both a shallow well and condensation from [nodemcu12ecanada]’s gas furnace. A NodeMCU controls the 12V submersible pump to send water up to the toilet, and another ultrasonic sensor monitors the water level in the barrel.

This setup doesn’t require changes to any of the existing plumbing, and reverting back is easy. We particularly like the use of phone plugs and jacks as quick connectors, and will likely steal the idea. You can get more information about this and [nodemcu12ecanada]’s other home-automation projects here.

Over-Engineered Cat Door Makes Purrfect Sense

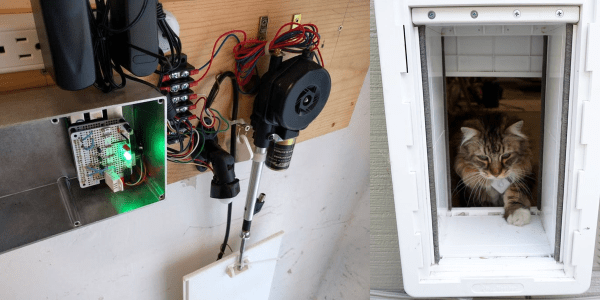
On paper, pet doors are pretty great. You don’t have to keep letting the cat in and out, and there should be fewer scratches on the door overall. Unfortunately, your average pet door is indiscriminate, and will let any old creature waltz right in. Well, [Jeremiah] was tired of uninvited critters, so he built a motorized door with a built-in bouncer. Now, only animals with pre-approved BLE tags can get in.

The bouncer is a Raspi 3 running Node-RED, which scans continuously for BLE advertisements from the cats’ collars. [Jeremiah] settled on Tile tags because they’re reliable and cat-proof. The first version used an Arduino and RFID tags for the cats, but they had to get too close to the door to trigger it.

We love [Jeremiah]’s choice of door actuator, a 12V retractable car antenna. [Jeremiah] uses the antenna itself to lift and lower the removable lockout panel that comes with the door. He removed the circuit that retracts the antenna when power is lost, so that power outages don’t become free-for-alls for shelter-seeking animals.

There’s also a nice feature for slow creatures—the door won’t close until 15 seconds after the last BLE ad, so they cats won’t ever have to Indiana Jones it through the opening. Magnetic switches currently limit the door travel at the top and bottom, though [Jeremiah] will eventually replace them with standard switches. Paw at the break until you get a walk-through video.

Cats will be cats, and the ones that go outside will probably rack up a body count. Here’s a cat door that looks for victims clenched between cat jaws and starts a 15-minute lockout period.

Continue reading “Over-Engineered Cat Door Makes Purrfect Sense”

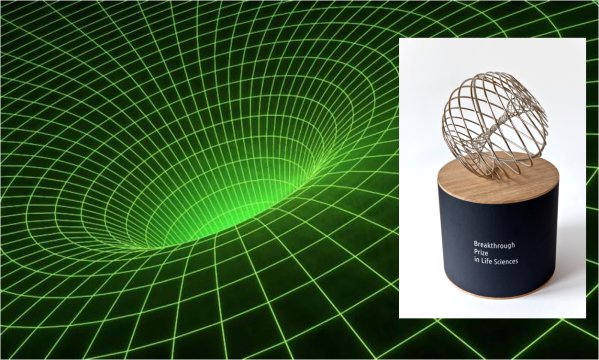
Black Hole Imaging Scientists Win 2020 Breakthrough Prize

Making a monumental scientific breakthrough is really kind of its own reward. Even so, it’s always nice to get extra recognition in the form of unexpected money. For the 347 scientists around the world who made history when they captured the first image of a black hole, the event itself is pretty sweet. The cake of notoriety recently gained some icing, because the group has been awarded a $3 million Breakthrough Prize.

The prize, known as “the Oscars of science”, was created eight years ago with the goal of furthering scientific advancements in the areas of physical science, mathematics, and life science. Created by tech investor Yuri Milner, the Breakthrough Prize is funded by other deep-pocketed notables like Sergey Brin and the Zuckerbergs. This year’s theme is “seeing the invisible”. Prizes will also be awarded for discoveries toward non-opioid pain relievers and the study of neuro-degenerative disorders.

Each of the black hole imaging scientists will receive $8,645.53 when the prize is awarded in a televised ceremony on November 3rd, which is going down at NASA’s Ames Research Center in Mountain View, CA. In lieu of parading all 347 scientists across the stage, [Shep Doeleman] of the Harvard-Smithsonian Center for Astrophysics and Director of the Event Horizon Telescope project, will accept the award on their behalf.

What exactly are black holes, and how did they come about? Explore their origins with [Will Sweatman] in this feature from 2018.

Black hole wire frame CC0 Public Domain via Phys.org

Black hole image via NASA

Smart Buoy Rides The Citizen Science Wave

Those beautiful and dangerous ocean waves that beckon us to the coast are more than just a pretty sight. They can tell us a lot about weather patterns and what the sea itself is doing. As vital as this information is, the existing methods of doing wave research are pretty expensive. The team at [t3chflicks] wanted to show it can be done fairly cheaply, to encourage more citizen scientists to contribute. More data means a better understanding, and open research benefits even those who don’t actively participate.

They have developed a smart buoy that collects wave data and transmits it back to a base station for real-time display. The buoy runs on an 18650 that gets recharged by four 5V solar panels situated around the top half of the 3D-printed hull. An Arduino inside the buoy controls the sensors, most of which are baked into the GY-86 10-DOF module. The antenna on top sends the data back to a Raspi Zero base station, which charts wave height, wave period, wave power, water and air temperature, and barometric pressure in real-time on a spiffy Vue JS dashboard.

The team had their ups and downs during this project. They wanted to measure wave direction, but it proved a bit too complicated. And memory issues prevented them from backing up the data to an on-buoy SD card. You can catch the more in-depth hardware and software videos on their YouTube channel. We’ve got the smart buoy summary video tied up and floating just after the break.

Want to help buoy wave research, but don’t have a 3D printer? Sealed PVC makes a fine flotation device, as we saw in this water quality-sensing buoy.

Continue reading “Smart Buoy Rides The Citizen Science Wave”