Hooking up a laser to a CNC gantry isn’t exactly an Earth-shattering innovation, but it does make for a useful tool. Even a cheap diode laser mounted to an old 3D printer can do engraving, marking, or even light-duty cutting. But what about a laser engraver without the laser? Can that be of any use?
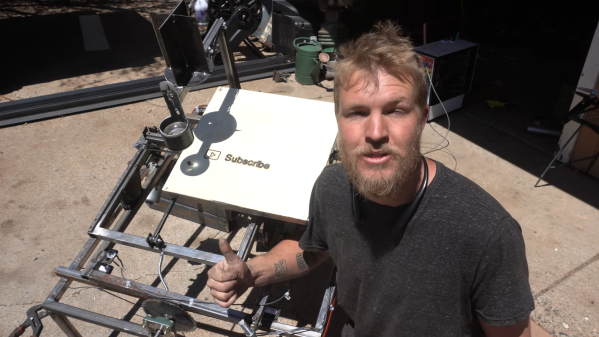
Apparently, the answer is yes, if you can harness the power of the sun. That’s what [Lucas] did with his solar-tracking CNC engraver, the build of which is shown in the video below. The idea is pretty simple — mount a decent-sized magnifying lens where the laser optics would normally go on a laser engraver, and point the thing at the sun. But as usual, the devil is in the details. The sun has a nasty habit of moving across the sky during the day, or at least appearing to, so [Lucas] has to add a couple of extra degrees of freedom to a regular X-Y CNC rig to track the sun. His tracking sensor is simplicity itself — four CdS photocells arranged with a pair of perpendicular shades, and an Arduino to drive the gimbals in the correct direction to keep all four sensors equally illuminated. He had some initial problems getting the jerkiness out of the control loop, but the tracker eventually kept the whole thing pointing right at the Sun.
So how does it work? Not bad, actually — [Lucas] managed to burn some pretty detailed designs into a piece of wood using just the sun. He mentions adding a shutter to douse the cutting beam to allow raster patterns, but even better might be a servo-controlled iris diaphragm to modulate beam intensity and control for varying sun conditions. He might also check out this solar engraver we covered previously for some more ideas, too.
Imagine, if you will, the perfect electronics lab. Exactly how it looks in your mind will depend a lot upon personal preferences and brand loyalty, but chances are good it’ll be stocked to the gills with at least one every conceivable type of high-precision, laboratory-grade instrument you can think of. It’ll have oscilloscopes with ridiculously high bandwidths, multimeters with digits galore, logic analyzers, waveform generators, programmable power supplies, spectrum analyzers — pretty much anything and everything that can make chasing down problems and developing new circuits easier.
Alas, the dream of a lab like this crashes hard into realities like being able to afford so many instruments and actually finding a place to put them all. And so while we may covet the wall of instruments that people like Marco Reps or Kerry Wong enjoy, most of us settle for a small but targeted suite of instruments, tailored to our particular needs and budgets.
It doesn’t necessarily need to be that way, though, and with software-defined instrumentation, you can pack a lab full of virtual instruments into a single small box. Software-defined instrumentation has the potential to make an engineering lab portable enough for field-service teams, flexible enough for tactical engineering projects, and affordable for students and hobbyists alike.
Ben Nizette is Product Manager at Liquid Instruments, the leader in precision software-defined instrumentation. He’s the engineer behind Moku:Go, the company’s first consumer product, which squeezes eleven instruments into one slim, easily transported, affordable package. He’s been in the thick of software-defined instrumentation, and he’ll drop by the Hack Chat to talk about the pros and cons of the virtual engineering lab, what it means for engineering education, and how we as hobbyists can put it to work on our benches.
Wait, what? Is it possible that a tech company just killed off a product with a huge installed base of hardware and a community of dedicated users, and it wasn’t Google? Apparently not, if the stories of the sudden demise of Insteon are to be believed. The cloud-based home automation concern seems to have just disappeared — users report the service went offline at the end of last week, and hasn’t been back since. What’s more, the company’s executives removed Insteon from their LinkedIn profiles, and the CEO himself went so far as to remove his entire page from LinkedIn. The reasons behind the sudden disappearance remained a mystery until today, when The Register reported that Smartlabs, Inc., the parent company of Insteon, had become financially insolvent after an expected sale of the company failed in March. The fact that the company apparently knew this was going to happen weeks ago and never bothered to give the community a heads up before pulling the switches has led to a lot of hard feelings among the estimated 100,000 Insteonhub users.
Then again, with a comet the size of Rhode Island heading our way, a bunch of bricked smart bulbs might just be a moot point. The comet, known as C/2014 UN271, has a nucleus that is far larger than any previously discovered comet, which makes it a bit of an oddball and an exciting object to study. For those not familiar with the United States, Rhode Island is said to be a state wedged between Connecticut and Massachusetts, but even having lived in both those states, we couldn’t vouch for that. For scale, it’s about 80 miles (128 km) across, or a little bit bigger than Luxembourg, which we’re pretty sure is mythical, too. The comet is a couple of billion miles away at this point; it may never get closer than a billion miles from the Sun, and that in 2031. But given the way things have been going these last few years, we’re not banking on anything.
From the “Answering the Important Questions” file, news this week of the Massachusetts Institute of Technology’s breakthrough development of the “Oreometer,” a device to characterize the physical properties of Oreo cookies. The 3D printed device is capable of clamping onto the wafer parts of the popular sandwich cookie while applying axial torque. The yield strength of the tasty goop gluing the two wafers together can be analyzed, with particular emphasis on elucidating why it always seems to stay primarily on one wafer. Thoughtfully, the MIT folks made the Oreometer models available to one and all, so you can print one up and start your own line of cookie-related research. As a starting point, maybe take a look at the shear strength of the different flavors of Oreo, which might answer why the world needs Carrot Cake Oreos.
And finally, since we mentioned the word “skiving” last week in this space, it seems like the all-knowing algorithm has taken it upon itself to throw this fascinating look at bookbinding into our feed. We’re not complaining, mind you; the look inside Dublin’s J.E. Newman and Sons bookbinding shop, circa 1981, was worth every second of the 23-minute video. Absolutely everything was done by hand back then, and we’d imagine that very little has changed in the shop over the ensuing decades. The detail work is incredible, especially considering that very few jigs or fixtures are used to ensure that everything lines up. By the way, “skiving” in this case refers to the process of thinning out leather using a razor-sharp knife held on a bias to the material. It’s similar to the just-as-fascinating process used to make heat sinks that we happened upon last week.
In everyday life, the largest moving object most people are likely to encounter is probably a train. Watching a train rolling along a track, it’s hard not to be impressed with the vast amount of power needed to put what might be a mile-long string of hopper cars carrying megatons of freight into motion.
But it’s the other side of that coin — the engineering needed to keep that train under control and eventually get it to stop — that’s the subject of this gem from British Transport Films on “The Power to Stop.” On the face of it, stopping a train isn’t exactly high-technology; the technique of pressing cast-iron brake shoes against the wheels was largely unchanged in the 100 years prior to the making of this 1979 film. The interesting thing here is the discovery that the metallurgy of the iron used for brakes has a huge impact on braking efficiency and safety. And given that British Railways was going through about 3.5 million brake shoes a year at the time, anything that could make them last even a little longer could result in significant savings.
It was the safety of railway brakes, though, that led to research into how they can be improved. Noting that cast iron is brittle, prone to rapid wear, and liable to create showers of dangerous sparks, the research arm of British Railways undertook a study of the phosphorus content of the cast iron, to find the best mix for the job. They turned to an impressively energetic brake dynamometer for their tests, where it turned out that increasing the amount of the trace element greatly reduced wear and sparking while reducing braking times.
Although we’re all for safety, we have to admit that some of the rooster-tails of sparks thrown off by the low-phosphorus shoes were pretty spectacular. Still, it’s interesting to see just how much thought and effort went into optimizing something so seemingly simple. Think about that the next time you watch a train go by.
A little backstory may be in order for those who don’t follow [Jeroen Vleggaar]’s Huygens Optics channel on YouTube. A few months ago, he released a video discussing monolithic telescopes, where all the reflective and refractive surfaces are ground into a single thick block of glass. Fellow optical engineer [Rik ter Horst] had built a few tiny monolithic Schmidt-Cassegrain reflectors for use in cube sats, so [Jeroen] decided to build a scaled-up version himself.
The build starts with a 45 mm thick block of crown glass, from which a 50 mm cylinder is bored with a diamond hole saw. The faces of the blank are then ground into complex curves to reflect incoming light, first off the parabolic rear surface and then onto the hyperbolic secondary mirror ground into the center of the front face. A final passage through a refracting surface in the center of the rear face completes the photons’ journey through the block of glass, squeezing a 275 mm focal length into a compact package.
All this, of course, vastly understates the work required to pull it off. Between the calculations needed to figure out the surface shapes in the first place to the steps taken to machine a famously unforgiving material like glass, every step is fraught with peril. And because the design is monolithic, any mistakes mean starting all over again. Check out the video below and marvel at the skills needed to get results like this.
What strikes us most about [Jeroen]’s videos is the mix of high-tech and age-old methods and materials used in making optics, which we’ve seen him put to use to make everything from tiny Tesla valves to variable-surface mirrors.
Crystals, at least those hawked by new-age practitioners for their healing or restorative powers, will probably get a well-deserved eye roll from most of the folks around here. That said, there’s no denying that crystals do hold sway over us with the almost magical power of their beauty, as with these home-grown copper acetate crystals.
The recipe for these lovely giant crystals that [Chase Lean] shares is almost too simple — just scrap copper, vinegar, and a bit of hydrogen peroxide — and just the over-the-counter strength versions of those last two. The process begins with making a saturated solution of copper acetate by dissolving the scrap copper bits in the vinegar and peroxide for a couple of days. The solution is concentrated by evaporation until copper acetate crystals start to form. Suspend a seed crystal in the saturated solution, and patience will eventually reward you with a huge, shiny blue-black crystal. [Chase] also shares tips for growing crystal clusters, which have a beauty of their own, as do dehydrated copper acetate crystals, with their milky bluish appearance.
One of the knocks that woodworkers get from the metalworking crowd is that their chosen material is a bit… compliant. Measurements only need to be within a 1/16th of an inch or so, or about a millimeter, depending on which side of the Atlantic you’re on. And if you’re off a bit? No worries, that’s what sandpaper is for.
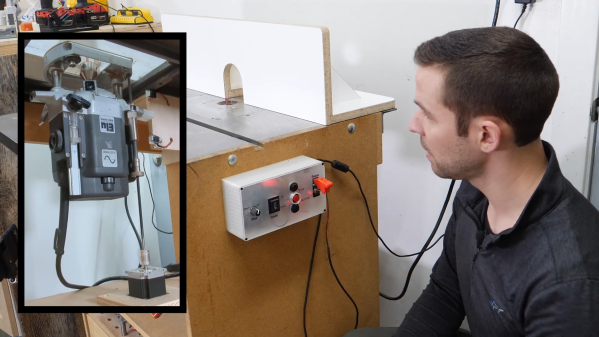
This electronic router lift is intended to close the precision gap and make woodworking a bit less subjective. [GavinL]’s build instructions are clearly aimed at woodworkers who haven’t dabbled in the world of Arduinos and stepper motors, and he does an admirable job of addressing the hesitancy this group might feel when tackling such a build. Luckily, a lot of the mechanical side of this project can be addressed with a commercially available router lift, which attaches to a table-mounted plunge router and allows fine adjustment of the cutting tool’s height from above the table.
What’s left is to add a NEMA 23 stepper to drive the router lift, plus an Arduino to control it. [GavinL] came up with some nice features, like a rapid jog control, a fine adjustment encoder, and the ability to send the tool all the way up or all the way down quickly. Another really nice touch is the contact sensor, which is a pair of magnetic probes that attach temporarily to the tool and a height gauge to indicate touch-off. Check the video below to see it all in action.
One quibble we have with [GavinL]’s setup is the amount of dust that the stepper will be subjected to. He might need to switch out to a dustproof stepper sooner rather than later. Even so, we think he did a great job bridging the gap between mechatronics and woodworking — something that [Matthias Wandel] has been doing great work on, too.