Processing Audio With The RP2040

The Raspberry Pi, although first intended as an inexpensive single-board computer for use in education, is now ubiquitous in electronics communities. Its low price as well as Linux platform and accessible GPIO make it useful in many places outside the classroom. But, if you want to abandon the ease-of-use in favor of an even lower price, the Raspberry Pi foundation makes that possible as well with the RP2040 chip, commonly found on the Pico. [Jason] shows us one way to make use of this powerful chip by putting one in an audio digital signal processing board.

While development boards are available for this chip, [Jason] has opted instead for a custom PCB which he designed himself and includes an integrated headphone amplifier and 3.5 mm audio jacks. To do the actual DSP work, the RP2040 chip uses three 12-bit ADC channels and 16 controllable PWM channels. The platform is also equipped with the TLV320AIC3254 codec from Texas Instruments. With all of this put together, he has a functioning open-source platform he calls the DS-Pi.

[Jason] has built this as a platform for guitar effects and as a customizable guitar amp modeler, but with a platform that is Arduino-compatible and fairly easy to program it could be put to use for anything involving other types of music or audio processing, like this specialized MIDI-compatible guitar effects platform which is built around the same processor.

An unfastened piece of pipe in a drill press, rotating away

Drill Press Piece Fastening 101

What are the options you have for securing your workpiece to the drill press table? [Rex Krueger] shows us that there’s plenty, and you ought to know about them. He goes through the disadvantages of the usual C-clamps, and shows options like the regular drill press vice and a heavy-duty version that even provides a workpiece tilting mechanism, and points out small niceties like the V-grooves on the clamps helping work with round stock. For larger pieces, he recommends an underappreciated option — woodworkers’ wooden handscrew clamps, which pair surprisingly well with a drill press. Then, he talks about the hold-down drill press clamps, a favourite of his, especially when it comes to flat sheets of stock like sheet metal or plastic.

As a bonus for those of us dealing with round stock, he shows a V-block he’s made for drilling into its side, and round stock clamp, made by carefully drilling a pair of wooden hand screw clamps, for when you need to drill into a dowel from its top. The ten-minute video is a must watch for anyone not up to speed on their drill press piece fastening knowledge, and helps you improve your drilling game without having skin in it.

We’ve covered a few ingenious and unconventional drill piece fastening options before, from this wise held down by repurposed bicycle quick-release parts, to an electromagnetic wise that left our readers with mixed opinions.

Continue reading “Drill Press Piece Fastening 101”

Hackaday Links Column Banner

Hackaday Links: April 17, 2022

There are plenty of stories floating around about the war in Ukraine, and it can be difficult to sort out which ones are fact-based, and which are fabrications. Stories about the technology of the war seem to be a little easier to judge, and so stories about an inside look at a purported Russian drone reveal a lot of interesting technical details. The fixed-wing UAV, reported to be a Russian-made “Orlan,” looks quite the worse for wear as it’s given a good teardown by someone wearing Ukraine military fatigues. In fact, it looks downright homemade, with a fuel tank made from what looks like an old water bottle, liberal use of duct tape to hold things together, and plenty of hot glue sprinkled around — field-expedient repairs, perhaps? The big find, though, is that the surveillance drone carried a rather commonplace — and cheap — Canon EOS Rebel camera. What’s more, the camera is nestled into a 3D printed cradle, strapped in with some hook-and-loop tape, and its controls are staked in place with globs of glue. It’s an interesting collection of hardware for a vehicle said to cost the Russian military something like $100,000 to field. The video below shows a teardown of a different Orlan with similar results, plus a lot of dunking on the Russians by a cheery bunch of Ukrainians.

Continue reading “Hackaday Links: April 17, 2022”

The 555 Gives The CarolinaCon Badge Life

For the electronic badge enthusiast, these last two years have seen something of a famine. While the pandemic may not be over yet, we’re learning to live with it in 2022, and there’s the prospect of a flush of new badges even if not all events are in-person yet. First to reach us is the Carolinacon Online 2 badge, a fairly simple affair which naturally has us pleased as punch because it incorporates the only chip that’s guaranteed to get you through the semiconductor shortage, an NE555 timer. It’s got everything, a flashing LED, and, well, that’s it because with the best will in the world a 555 is no powerhouse on its own. As a memento and a way to support the event it fits the bill, but it’s fair to say that this is no electronic tour de force.

Carolinacon Online 2 launches on Friday 29th of April, and features a schedule of talks and a set of merch including the badge. If you’re thinking of previous Carolinacon badges, this event has always taken the simple-but-effective route. The version they produced in 2021 for example had a hidden message behind the silkscreen, revealed through clever placement of LEDs controlled by an ATtiny microcontroller.

A handheld device to measure electromagnetic fields

Measuring Electromagnetic Fields With Just An Arduino And A Piece Of Wire

Electromagnetic interference problems can be a real headache to debug. If you need to prove what causes your WiFi to slow down or your digital TV signal to drop, then the ability to measure electromagnetic fields (EMF) can be a big help. Professional equipment is often very expensive, but building an EMF detector yourself is not even that difficult: just take a look at Arduino expert [Mirko Pavleski]’s convenient hand-held electromagnetic field detector.

The basic idea is quite simple: connect an antenna directly to an Arduino’s analog input and visualize the signal that it measures. Because the input of an ADC is high impedance, it is very sensitive to any stray currents that are picked up by the antenna. So sensitive in fact, that a resistor of a few mega-Ohms to ground is required to keep the sensor from triggering on any random kind of noise. [Mirko] made that resistance adjustable with a few knobs and switches so that the detector can be used in both quiet and noisy environments.

Making the whole device work reliably was an interesting exercise in electromagnetic engineering: in the first few iterations, the detector would trigger off its own LEDs and buzzer, trapping itself in a never-ending loop. [Mirko] solved this by encasing the Arduino inside a closed, grounded metal box with only the required wires sticking out. The antenna’s design was largely based on trial-and-error; the current setup with a 7 cm x 3 cm piece of aluminium sheet seemed to work well.

While this is not a calibrated professional-grade instrument, it should come in handy to find sources of interference, or even simply to locate hidden power cables. You can view this as a more advanced version of [Mirko]’s Junk Box EMF Detector; if you have a second Arduino lying around, you can use that one to generate interference instead. Continue reading “Measuring Electromagnetic Fields With Just An Arduino And A Piece Of Wire”

Solaris Might Be Free If You Want It

There was a time when “real” engineering workstations ran Linux Unix. Apollo and Sun were big names and Sun’s version was Solaris. Solaris has been an iffy proposition since Oracle acquired Sun, but Oracle announced last month that you can download and use Solaris 11.4 CBE free for non-production use.

Do you care? If you ever wanted to run “real” Unix this is an option although, honestly, so is Free BSD and it probably has better community support. On the other hand, since you can virtualize a machine to spin up, it might be worth a little time to install it.

On the other hand, if you have an old SPARC machine — this could be big news. We aren’t sure how far back the hardware this will support will go, but this could be just what you need to breathe new life into that eBay pizza box from Sun you’ve had in the basement. Of course, if you have an FPGA SPARC system, this might be interesting too, but we have no idea how much other stuff you need to implement to be able to benefit from Solaris.

Will you install Solaris? If so, tell us why. We are sure we won’t have to prompt you to tell us why not. In 2017, we thought we’d seen the end of Solaris, but apparently not. Maybe this will help those folks still on Solaris 9.

Laptop USB-C Charging Hack Lets You Leave The Brick At Home

At their best, laptops are a compromise design. Manufacturers go to great lengths to make the slimmest, lightest, whatever-est laptops possible, and the engineering that goes into doing so is truly amazing. But then they throw in the charger, which ends up being a huge brick with wire attached to it, and call it a day.

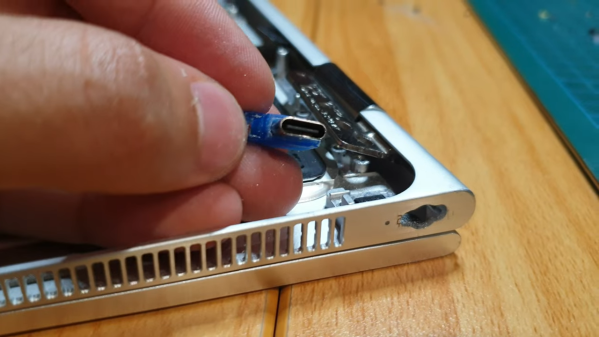
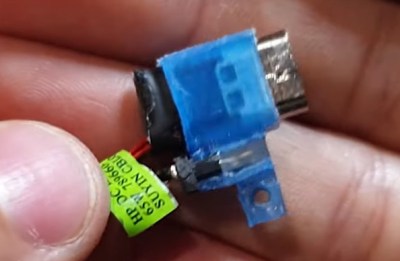
Does it have to be that way? Probably, but that doesn’t mean we can’t try to slim down the overall footprint of laptops at least a little. That’s what [Joe Gaz] did when he hacked his laptop to allow for USB-C charging. Tired of the charger anchoring down his HP X360, [Joe] realized that he could harvest the PCB from a USB-C charger adapter dongle and embed it inside his laptop. We’ve seen similar modifications made to Thinkpads in the past, and it’s good to see the process isn’t that far removed with other brands.

After popping open the laptop, which is always an adventure in reverse mechanical engineering, he found that removing the OEM charger jack left just enough room for the USB-C charger. Mounting the board required a 3D printed bracket, while enlarging the original hole in the side of the laptop case took some cringe-inducing work with a file. It looked like it was going to be pretty sloppy at first, but he ended up doing a pretty neat job in the end. The whole modification process is in the video below.

The end result is pretty slick — [Joe] can now carry a much more compact USB wall-wart-style charger, or eschew the charger altogether and rely on public USB charging stations. Either way, it sure beats lugging a brick around. If you’re interested in laptop hacking, or even if you just want to harvest the goodies from a defunct machine, check out this guide to laptop anatomy by our own [Arsenijs Picugins].

Continue reading “Laptop USB-C Charging Hack Lets You Leave The Brick At Home”