Vacuum Forming Key Cap Covers Doesn’t Quite Work Out

Retrocomputing is as much about physical preservation as it is about electronics and computer science. Plastic is an awful material when it comes to decade-long timescales, and the forces of sun, air and water are unrelenting on these materials. [Drygol] has long experimented with techniques to preserve and refresh keycaps, and decided to try some fun vacuum forming techniques for something new. It sadly didn’t go to plan, however.

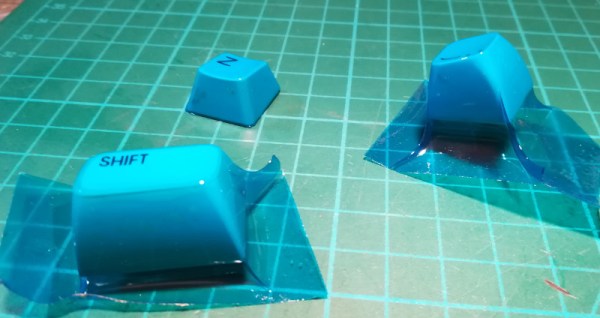
The basic idea was to use a vacuum-forming machine to coat keycaps in a thin layer of translucent plastic, for both aesthetic benefit and to preserve them from falling apart. Initial small-scale tests were promising, creating a key with a tight, form-fitting blue plastic wrap through which the original labels were still visible.

However, scaling up the process proved fraught. Uneven heating of the plastic film and a lack of rigidity in the carriage used to stretch it over the keycaps led to poor results. The final product showed many wrinkles and was distinctly unappealing.

[Drygol] isn’t giving up however, and plans to build a new vacuum table with greater performance. We can imagine this technique being an accessible way to colorize keycaps for a vintage cyberdeck or chiptune rig, without permanently modifying the keys. If you’ve got the inside knowledge on how to make this work, sound off in the comments.

We’ve seen [Drygol]’s work in this space before, too, like this extreme modded Amiga. If you’re executing your own retro repairs, be sure to drop us a line!

Tiny Motors Enable Experimental Piano Performance

Just when you think you’ve seen every possible way to play the piano, [Alessandro Perini] came up with a new one. In this piece, written for the percussionist [Irene Bianco], hand-held motors become a tangible interface between composer, electronic music equipment, and the performer.

The performance involved ten small disc motors, held above the strings by a wooden frame. The motors are controlled by a Arduino Nano, which turns the motors on or off based on MIDI commands from a computer. However, the performance is not entirely automated. [Irene] wears a pair of contact microphones on her fingers, which she moves around inside the piano to capture the sounds of the strings vibrating in harmony with the motors themselves.

[Alessandro] has been kind enough to share a tutorial on how to recreate the hardware and software behind the performance for those keen to create similar work of their own. As with any musical endeavour, MIDI can always make it better. Video after the break.

Continue reading “Tiny Motors Enable Experimental Piano Performance”

Tesla Recalls Cars With EMMC Failures, Calls Part A ‘Wear Item’

It’s a problem familiar to anyone who’s spent a decent amount of time playing with a Raspberry Pi – over time, the flash in the SD card reaches its write cycle limits, and causes a cavalcade of confusing errors before failing entirely. While flash storage is fast, compact, and mechanically reliable, it has always had a writeable lifespan much shorter than magnetic technologies.

Flash storage failures in the computer behind Tesla’s famous touch screen are causing headaches for drivers.

Of course, with proper wear levelling techniques and careful use, these issues can be mitigated successfully. The surprising thing is when a major automaker fails to implement such basic features, as was the case with several Tesla models. Due to the car’s Linux operating system logging excessively to its 8 GB eMMC storage, the flash modules have been wearing out. This leads to widespread failures in the car, typically putting it into limp mode and disabling many features controlled via the touchscreen.

With the issue affecting important subsystems such as the heater, defroster, and warning systems, the NHTSA wrote to the automaker in January requesting a recall. Tesla’s response acquiesced to this request with some consternation, downplaying the severity of the issue. Now they are claiming that the eMMC chip, ball-grid soldered to the motherboard, inaccessible without disassembling the dash, and not specifically mentioned in the owner’s manual, should be considered a “wear item”, and thus should not be subject to such scrutiny. Continue reading “Tesla Recalls Cars With EMMC Failures, Calls Part A ‘Wear Item’”

3D Printed Turbocharger Boosts Pulsejet Performance

Pulsejets are a popular DIY build for the keen experimenter, much loved for their mechanical simplicity and powerful roar. However, it can be difficult to get them running smoothly and producing high amounts of thrust. In an ongoing quest to do just that, [Integza] has been iterating hard on his designs, recently adding an electric turbocharger to add some boost.

Like any combustion engine, adding more air means that more fuel can be burned for more power. The electric turbocharger is a perfect way to do this, using a powerful brushless motor to turn a radial compressor wheel to force high-pressure air into the pulse jet’s combustion chamber. [Integza] used a resin printer to produce the turbocharger compressor wheel and housing, which made producing the complex geometry a cinch.

Initial results were positive, with the pulsejet maintaining better combustion with the turbocharger activated. It does come with the drawback of requiring battery power to run, but it may be worth the tradeoff for added thrust. However, the fragile setup requires more refinement before a thrust test can be carried out. Up until now, [Integza] has made do with a set of bathroom scales; we imagine a spring force gauge or strain gauge might be in order. If you’re keen to build your own pulsejet without welding, consider the carbon fiber method used in this project. Video after the break.

Continue reading “3D Printed Turbocharger Boosts Pulsejet Performance”

Android 10 Ported To The Nintendo Switch

Nintendo’s Switch is perhaps most famous for blurring the lines between handheld consoles and those you plug into a TV. However, the tablet-esque device can also run Android if you’re so inclined, and it recently got an upgrade to version 10.

It’s an upgrade that brings many new features to the table, most of which you might consider must haves for regular use. The newer port brings support for USB Power Delivery, as well as deep sleep modes that enable the unit’s battery to last for several weeks. There’s also support for over-the-air updates which should ease ongoing maintenance, and improvements for Bluetooth compatibility and the touch screen as well.

Like most console hacks to run custom code, you’ve got to have the right hardware version with the right firmware, as Nintendo have been regularly iterating to try and lock out hacks where possible. The install has a few hurdles to jump through, but nothing too strenuous that would scare away the average Hackaday reader. Just be sure to not attempt this on a cherished console, as there’s always the chance that it all ends in tears. If you pull it off, you can then go about turning your Nintendo Switch into a networking switch. Net…tendo… Switch? Come up with a better pun in the comments. Continue reading “Android 10 Ported To The Nintendo Switch”

Reverse Engineering USB Protocols On A Function Generator

When working with test equipment such as oscilloscopes and function generators, it can be useful to take a screen capture. Historically this was done with Polaroid cameras that were bolted in place, but these days it can be done over a simple USB connection. [Majenko] didn’t like the Windows-only software that shipped with their Tenma 72-14110 function generator, however, and set about reverse engineering the USB protocol to create their own.

The hack was pulled off by running the original software in a Windows VM, while running Wireshark in the host Linux OS to capture the USB traffic. Once enough data had been captured, [Majenko] set about figuring out how the function generator formatted the screen data when sending it to the PC. Based on the fact that the data changed in length depending on what was on the display, it was surmised that the data was not raw, but compressed somehow. A hunch suggested it was probably some form of Run-Length Encoding, and this proved to be correct. With a little more digging and experimentation, [Majenko] was able to put together some code that netted a clear image from the device.

It’s a useful guide for reverse engineering image data, one that could prove useful if you’re tackling a similar problem on other hardware. We’ve seen some great reverse engineering efforts over the years, on everything from old video hardware to the Sega Saturn. If you’ve been diving deep into the secrets of software or hardware yourself, be sure to drop us a line.

3D Printed Butterfly Valve Helps Automate Fume Extraction

It’s not something we always think about, but there’s plenty of hazardous fumes in the average workshop that can be deleterious to human health. Whether its soldering, lasercutting, or 3D printing, all of these processes release nasty chemicals into the air that are best filtered for health reasons. To help build out a working filtration system, [Fab] needed some valves, so set about printing some of his own.

[Fab] went with a simple butterfly valve design, similar to the throttle valve in most gasoline-powered cars. The butterfly vane rotates to vary the flow, turned by a small SG90 servo. A Wemos D1 Mini is used to run a pair of the valves, which are paired with a Y-adapter to connect both a soldering station and 3D printer to the fume extraction system. As a nice touch, a WiFi-enabled outlet is hooked up to the soldering iron which notifies the D1 Mini when it’s switched on, flipping the valve open to automatically start fume extraction.

It’s a tidy system that will enable [Fab] to breath easy in the workshop for years to come. Files are available for those wishing to print a set of butterfly valves for themselves. We’ve seen some other smart fume extractors before, too. Video after the break.

Continue reading “3D Printed Butterfly Valve Helps Automate Fume Extraction”