Manual Pick And Place Turntable Makes Board Assembly Easier

Surface mount devices were once upon a time considered a huge imposition for the electronics hobbyist. Tiny, difficult to solder by hand, and barely even labelled, many wondered whether the pastime was about to hit a brick wall entirely. Instead, enterprising hackers and makers set about learning new tricks and techniques to work with the technology, and we’ve never looked back since. [Seon] is one such enthusiast, and has built a useful turntable for making manually picking and placing boards easier. (Video, embedded below.)

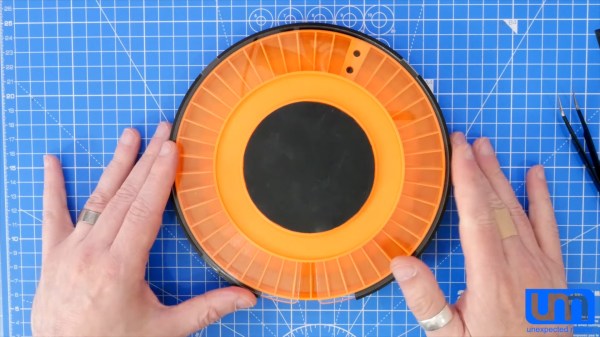
The design is something [Seon] has refined gradually over time, having built two initial versions of the turntable before finally feeling ready to do a wider public release with version 3. It consists of a rotating caddy that has radial slots that hold all the tiny SMD parts, that can be labelled for easy parts identification. There’s also an acrylic window that ensures only one segment of the caddy is open at a time, to avoid accidentally dropping similar, tiny looking parts into adjacent slots – a big improvement over the first design. There’s then a smaller rotating central pad upon which a PCB can be placed, ready to receive parts.

Files are available on Github for those wanting to build their own. [Seon] does a great job explaining how the final design came about, after populating hundreds of boards on his earlier designs and learning their limitations. If doing it by hand just doesn’t cut it for you, though, you can always built a fully automated PnP.

Continue reading “Manual Pick And Place Turntable Makes Board Assembly Easier”

Arducam Now Working With The RPi Pico

The Raspberry Pi Pico came out of absolutely nowhere, and has taken the maker world by storm. At the low, low cost of $4, packing some seriously grunty original silicon, and even available free on the cover of magazines, it’s already got a legion of fans. As with any new popular platform, there’s a scramble to get everything under the sun running on the hardware. Already, ArduCAM is up and running on the Raspberry Pi Pico!

Based on the OV2640 image sensor, the ArduCAM is useful for microcontroller applications thanks to its onboard JPEG encoder. This limits the amount of RAM needed onboard the microcontroller to deal with the images fed from the camera. With the Pico now on the market, the team behind ArduCAM set about writing a library to get everything playing nicely with the SPI camera. It’s available on Github, complete with an example program so you can check everything is functional right out of the box. The easiest way to get up and running is from a Raspberry Pi environment, but the Pico acts as a USB Mass Storage device so can be programmed from virtually anywhere.

We’ll likely see the whole cavalcade of microcontroller bits and pieces ported to the Pico in the coming months, along with plenty of interesting uses of the special IO features. Video after the break.

Continue reading “Arducam Now Working With The RPi Pico”

Building An Ultrasonic Levitation Rig

Levitation may sound like magic, but there are a wide variety of physical phenomena that can be manipulated to generate the desired effect. In this case, [Mirko Pavleski] has built a rig capable of levitating small, lightweight particles through the use of ultrasound.

The rig uses a 60W ultrasonic transducer, operating at approximately 40 KHz, to generate a standing wave in combination with a reflector – essentially a rigid piece of material off which sound waves can be bounced. The interaction between the sound waves as they are emitted from the transducer and bounce off the reflector creates what is known as a standing wave, wherein there are areas of high and low amplitude that do not move in space. These areas correspond to the wavelength of the emission from the transducer, and allow lightweight pieces of styrofoam to be placed in to the low amplitude areas, where they are held in place by the wave.

It’s quite astounding the first time you see it in action, as the tiny particles appear to simply float in the air apropos of nothing. We’ve explored deeper applications of the technique before, too. Video after the break.

Continue reading “Building An Ultrasonic Levitation Rig”

Simple 3D Printed Seven-Segment Displays

7-segment LED displays were revolutionary, finally providing a clear, readable and low-power numerical display solution. We’ve got plenty of other cheap display options now, but sometimes you just need the old nought-through-nine, and in a big, visible package, to boot. For those circumstances, consider whipping up a set of these 3D-printed seven-segment displays.

The build consists of a 3D printed frame, with each segment containing two WS2812B addressable LEDs. Each 7-segment assembly is then wired so they can be daisy chained, passing on data to the next digit in the chain. Paper is used to diffuse the LEDs for a smoother look, and a white 3D printed cover is printed for each digit to further spread the light and give a clean finish.

Being based on the WS2812Bs, it’s easy to drive such displays with just about any microcontroller or GPIO-equipped Linux board out there. We love big, beautiful displays – and the more artistic, the better. Video after the break.

Continue reading “Simple 3D Printed Seven-Segment Displays”

Upgrading The Batteries In A BMW I3

The BMW i3 debuted on the market in late 2013, one of the brand’s first electric cars. Also available with an optional range-extending engine, early models featured a 60 Ah battery providing up to 130km range on a full charge. However, times have changed, and over the years, BMW have updated the model with larger capacity batteries over the years. So what does it take to retrofit an older model with the newer, fatter, juicer 120 Ah pack?

It’s all helpfully laid out in a video by [Daniel], who notes that it’s not a job for the faint of heart or poorly equipped. The good news is that, mechanically, the newer batteries have the same external dimensions as the older packs, meaning they can be bolted in without requiring any cutting, welding or, adapters. But that’s about it for the good news. The batteries are cooled by the air conditioning system, meaning that removal and replacement means draining the system of refrigerant using highly expensive specialised hardware. Additionally, many batteries in crashed cars are disabled when the airbags are triggered for safety reasons, requiring unlocking through BMW’s proprietary software or replacement of the internal battery controller. Then there’s the usual laundry list of gradual changes that happen across any automotive line, meaning that certain model years and trim packages can have incompatible plugs and connectors or other features.

Overall, it can be quite a bit of work to do, and with the tools required, something that needs the services of a dedicated mechanic’s workshop. However, find an experienced shop that regularly works with EVs, and you might find they can facilitate the upgrade for you without too much fuss. We’ve seen [Daniel] tackle upgrades before, such as a much easier swap on the Nissan Leaf. Video after the break.

Continue reading “Upgrading The Batteries In A BMW I3”

Adding Remote Control To An Old Stereo

Sometimes, the best hifi gear is the gear you’ve already got. This is particularly the case in the cassette world, as high quality decks are long out of production. [Nick] liked his current rig, but wanted to be able to use it with a remote from across the room. Naturally, he set to hacking the feature in.

The cassette deck in question, a Yamaha K-220, was old enough to lack a remote, but thankfully new enough to use a computer-controlled tape transport. This meant that the basic features of play, stop, rewind and fast forward can all be controlled with simple digital buttons rather than mechanical ones. This made it easy to interface an ATmega328P to the stereo’s original circuitry. Digital IO pins are hooked up to the buttons, held as high-impedance inputs most of the time, only toggling to ground when necessary to trigger a button press. It was then a simple job to hook up an IR receiver to the chip and program it with some Arduino libraries to work with a typical stereo remote control [Nick] had laying around.

It’s a tidy build, and with more cool cassette releases coming out every year, we’re sure [Nick]’s going to put some miles on the setup. If you find IR too cumbersome though, you can go a step further and replace it with a web app instead. If you’ve been tinkering with similar things in your own workshop, be sure to drop us a line!

Randonaut Device Tells You Where To Be And When

Randonauting is the pastime of using random numbers to generate a destination to visit, in the pursuit of adventure. Of course, anything that can be done on a website with a script is even cooler with custom hardware, so [Decker] built a rig for the job. 

The device uses a USB hardware random number generator to produce truly random numbers through quantum effects; at least, according to our best theories of the universe. These numbers are then used to pick a random set of GPS coordinates and a time in which to be there, a fun twist on traditional Randonauting of [Decker]’s own creation.

At its heart, it’s a random number generator pumped through some Python scripts. Where this build elevates itself is not in the mechanics, but the presentation. The rig runs on a Raspberry Pi, inside a bell jar, with a vacuum fluorsecent display, fairy lights and plumbing components. It plays on the cyberpunk aesthetic, and it’s so much harder to ignore one’s mission when the time and place are given in glowing numerals by an enigmatic, mysterious machine.

It looks like great fun, though beware the dangers of randonauting – some participants have found more then they bargained for. It’s not dissimilar to the old geohashing craze. Video after the break.

Continue reading “Randonaut Device Tells You Where To Be And When”