Upgrading The Batteries In A BMW I3

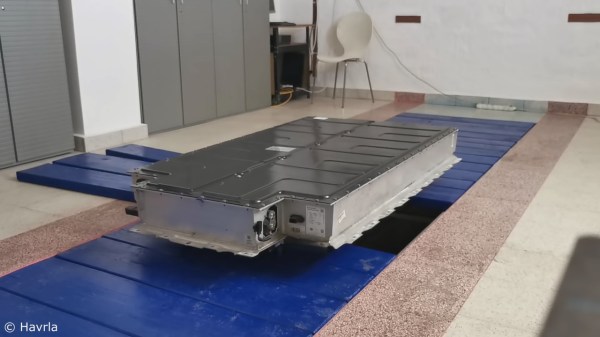
The BMW i3 debuted on the market in late 2013, one of the brand’s first electric cars. Also available with an optional range-extending engine, early models featured a 60 Ah battery providing up to 130km range on a full charge. However, times have changed, and over the years, BMW have updated the model with larger capacity batteries over the years. So what does it take to retrofit an older model with the newer, fatter, juicer 120 Ah pack?

It’s all helpfully laid out in a video by [Daniel], who notes that it’s not a job for the faint of heart or poorly equipped. The good news is that, mechanically, the newer batteries have the same external dimensions as the older packs, meaning they can be bolted in without requiring any cutting, welding or, adapters. But that’s about it for the good news. The batteries are cooled by the air conditioning system, meaning that removal and replacement means draining the system of refrigerant using highly expensive specialised hardware. Additionally, many batteries in crashed cars are disabled when the airbags are triggered for safety reasons, requiring unlocking through BMW’s proprietary software or replacement of the internal battery controller. Then there’s the usual laundry list of gradual changes that happen across any automotive line, meaning that certain model years and trim packages can have incompatible plugs and connectors or other features.

Overall, it can be quite a bit of work to do, and with the tools required, something that needs the services of a dedicated mechanic’s workshop. However, find an experienced shop that regularly works with EVs, and you might find they can facilitate the upgrade for you without too much fuss. We’ve seen [Daniel] tackle upgrades before, such as a much easier swap on the Nissan Leaf. Video after the break.

Continue reading “Upgrading The Batteries In A BMW I3”

This Isn’t Your Father’s Yellow Card

As the global vaccination effort rolls out in many countries, people will increasingly be required to provide evidence for various reasons, especially travelers. Earlier this month a coalition which includes Microsoft, the Mayo Clinic, Oracle, MITRE, and others announced an effort to establish digital vaccination records called the Vaccination Credential Initiative (VCI). This isn’t going to be a brand new thing, but rather an initiative to provide digital proof-of-vaccination to people who want it, using existing open standards:

  • Verifiable Credentials, per World Wide Web Consortium Recommendation (VC Data Model 1.0)
  • Industry standard format and security, per the Health Level Seven International (HL7) FHIR standard

In addition, the World Health Organization formed the Smart Vaccination Certificate Working Group in December. Various other countries and organizations also have technical solutions in the works or already deployed. If a consensus doesn’t form soon, we can see this quickly becoming a can of worms. Imagine having to obtain multiple certifications of your vaccination because of non-uniform requirements between countries, organizations, and/or purposes.

Older readers and international travelers may be wondering, “don’t we already have a vaccination card system?” Indeed we do: the Carte Jaune or Yellow Card. The concept of a “vaccination passport” was conceived and agreed upon at the International Sanitary Convention for Aerial Navigation in 1933. Over the years the names and diseases of interest have changed, but since 2007 it has been formally called the International Certificate of Vaccination or Prophylaxis (ICVP). In recent times, yellow fever was the only vaccination of interest to travelers, but other vaccinations or booster shots can be recorded as well. One problem with the paper Yellow Card is that it is ridiculously easy to forge. Nefarious or lazy travelers could download it from the WHO site, print it on appropriate yellow card stock, and forge a doctor’s signature. The push for a more secure ICVP is not completely unreasonable.

Reading the instructions on the Yellow Card brings up a couple of interesting points:

  • This certificate is valid only if the vaccine or prophylaxis used has been approved by the World Health Organization — Currently the Pfizer vaccine is the only one to be approved by WHO, and even that is only an emergency approval. If you receive a non-Pfizer vaccination, what then?
  • The only disease specifically designated in the International Health Regulations (2005) for which proof of vaccination or prophylaxis may be required as a condition of entry to a State Party, is yellow fever — This one is interesting, and suggests that member states cannot require proof of Covid19 vaccination as an entry requirement, a situation that will no doubt be quickly revised or ignored.

Note: This writeup is about vaccinations, not about immunity. While immunity certificates have been used from time to time throughout modern history, the concept of an international immunity passport is not well established like the ICVP.

Upgrading An Old MIG Welder Wire Feeder With Arduino

Older industrial equipment is often a great option if you’re on a budget, and you might even be able to add some premium features yourself. [Brett] from [Theoretically Practical] has done with his old MIG welder, adding premium control features with the help of an Arduino.

The main features [Brett] were after is pre-flow, post-flow, and a spot welding timer. Pre-flow starts the flow of shielding gas a moment before energizing the filler wire, while post-flow keeps the gas going after the weld is complete. This reduces the chances of oxygen contaminating the welds. A spot welding timer automatically limits welding time, enabling consistent and repeatable spot welds.

The Miller S-22A wire feeder can have these features, but it requires an expensive and difficult to find control unit. All it does is time the activation of the relays that control the gas flow, power, and wire feeder, so [Brett] decided to use an Arduino instead. The welders control circuit runs at 24V, so an optoisolator receives the trigger signal, and relays are used for outputs. Potentiometers were added to the original control panel, and all the wiring was neatly fitted behind it. The upgrade worked perfectly and allowed [Brett] to increase the quality of his welds. See the video after the break for the full details.

Inverter welders can be picked up for ridiculously cheap prices, if you’re willing to live with the trade-offs. We’ve also seen some other DIY welder upgrades, on small and large machines.

Handy Tool Drains 18650 Cells So You Don’t Have To

Draining a battery is easy. Just put a load across the terminals, maybe an incandescent bulb or a beefy power resistor, and wait. What’s quite a bit trickier is doing so safely. Put too large a load on, or leave it connected for longer than necessary, and you can end up doing damage to the cell. Not convinced he’d always remember to pull the battery out of his jury-rigged discharger at the opportune moment, [Jasper Sikken] decided to come up with a simple tool that could automatically handle the process with the cold and calculating precision of silicon.

V4 used the protection module from a pouch battery.

At a glance we can see the major components you’d expect in a discharger: a fairly simple PCB, four ceramic power resistors, a holder for a single 18650 cell, and a rocker switch to connect it all together. But wait, what’s that a TP4056 charging module doing in there?

While its presence technically makes this device a battery charger, [Jasper] is actually using it for the onboard protection IC. With the charging module between the cell and the power resistors, it will cut the connection when the voltage drops to 2.4 V. Oh yeah, and it can charge the battery back up if you connect up a USB cable.

[Jasper] says his little tool works great, with the resistor array putting just enough load on the battery to pull it down quickly without getting so hot that they’re dangerous to have exposed. He estimates the BOM for this gadget runs around $2 USD, and is considering offering it as a kit on Tindie in the near future.

If you’re looking for something a bit more advanced, [Jasper] built a programmable load a few years back that can discharge batteries and test power supplies all while logging the data to your computer for later analysis.

Continue reading “Handy Tool Drains 18650 Cells So You Don’t Have To”

All The Best Computers From Cambridge Boot To Basic

The Raspberry Pi is a fine machine that appears in many a retrocomputing project, but its custom Linux distribution lacks one thing. It boots into a GNU/Linux shell or a fully-featured desktop GUI rather than as proper computers should, to a BASIC interpreter. This vexed [Alan Pope], who yearned for his early days of ROM BASIC, so he set out to create a Raspberry Pi 400 that delivers the user straight to BASIC. What follows goes well beyond the Pi, as he takes something of a “State of the BASIC” look at the various available interpreters for the simple-to-code language. Almost every major flavour you could imagine has an interpreter, but as is a appropriate for a computer from Cambridge running an ARM processor, he opts for one that delivers BBC BASIC.

It would certainly be possible to write a bare-metal image that took the user straight to a native ARM BASIC interpreter, but instead he opts for the safer route of running the interpreter on top of a minimalist Linux image. Here he takes the unexpected step of using an Ubuntu distribution rather than Raspberry Pi OS, this is done through familiarity with its quirks. Eventually he settled upon a BBC BASIC interpreter that allowed him to do all the graphical tricks via the SDL library without a hint of X or a compositor, meaning that at last he had a Pi that boots to BASIC. Assuming that it’s an interpreter rather than an emulator it should be significantly faster than the original, but he doesn’t share that information with us.

This isn’t the first boot-to-BASIC machine we’ve shown you.

Header image:  A real BBC Micro BASIC prompt. Thanks [Claire Osborne] for the picture.

It Costs WHAT?! A Sounding Into Hearing Aids

We are accustomed to medical devices being expensive, but sometimes the costs seem to far exceed reasonable expectations. At its most simplistic, a hearing aid should just be a battery, microphone, amplifier, and speaker, all wrapped in an enclosure, right? These kinds of parts can be had for a few dimes, so why do modern hearing aids cost thousands of dollars, and why can’t they seem to go down in price?

Continue reading “It Costs WHAT?! A Sounding Into Hearing Aids”

Mechanical Timekeeping Hack Chat With Clickspring

Join us on Wednesday, February 3 at noon Pacific for the Mechanical Timekeeping Hack Chat with Clickspring!

The reckoning of the passage of time has been of vital importance to humans pretty much for all our history, but for most of that time we were stuck looking at the movements of heavenly bodies or noting the changing of the seasons to answer questions of time. The search for mechanical aids to mark the passage of time began surprisingly early, though, pretty much from the time our ancestors first learned to work with metals.

Timekeeping devices were often created to please a potentate or to satisfy a religious imperative, but whatever the reason for their invention, these early clocks and calendars were key to a ton of discoveries. Timekeeping devices were among the first precision mechanisms, and as such formed the basis of much of our mechanical world. A mechanical representation of the passage of time also gave us some of the first precise observations of the physical world, which led to an enormous number of discoveries about the nature of the universe, not to mention practical skills such as navigation, which allowed us to explore the world with greater confidence.

In our era, precision timekeeping has moved beyond the mechanical realm into the subatomic world, and mechanisms built to please a prince are relegated to museums and collectors. That’s not to say there isn’t plenty to learn from the building of mechanical timepieces, as anyone who has watched any of the videos on Clickspring’s YouTube channel can attest. Clickspring not only makes some magnificent modern timepieces, like his famous open-frame clock, but recently he’s also branched out into the timekeeping mechanisms of the ancients. He built a reproduction Byzantine sundial-calendar, and tackled a reproduction of the famous Antikythera mechanism. The latter was undertaken using only the tools and materials that would have been available to the original maker. That led to an unexpected discovery and a detour into the world of scholarly publishing.

Clickspring has been busy lately, but he made some time to stop by the Hack Chat and talk about mechanical timepieces. We’ll talk about his modern builds, his forays into the mechanisms of antiquity, and his serendipitous discovery. On the way we’re likely to talk about what it takes to build precision mechanisms in a small shop, and whatever else that crops up.

join-hack-chatOur Hack Chats are live community events in the Hackaday.io Hack Chat group messaging. This week we’ll be sitting down on Wednesday, February 3 at 12:00 PM Pacific time. If time zones have you tied up, we have a handy time zone converter.

Click that speech bubble to the right, and you’ll be taken directly to the Hack Chat group on Hackaday.io. You don’t have to wait until Wednesday; join whenever you want and you can see what the community is talking about.

Continue reading “Mechanical Timekeeping Hack Chat With Clickspring”