Pulling Out Burger Flavor With A Magnet

If you’re vegetarian or don’t eat beef, you are probably already familiar with Impossible. Impossible meat tastes like beef and cooks like beef while being plant-based. They achieved this with significant R&D and a few special patents. But if you don’t want to pay Impossible prices, [Sauce Stash] has been trying to recreate some of the tricks that Impossible uses. (Video, embedded below.)

[Sauce Stash] starts with the ingredients list and tries to reason what would be suitable substitutes. However, even following the ingredients list, adding iron is one crucial trick that takes your vegetarian beef much closer to tasting like proper beef. Impossible has a special patent process for creating leghemoglobin (or heme), the iron molecule we associate with red meat’s taste. It makes the meat seem to bleed as it cooks and dramatically changes the flavor. Impossible genetically engineered yeast to produce the compound to get heme on an industrial scale. But they state on their website that the molecule can be found in many plants, including soy. With a magnet and soy in hand, he tried to pull the iron out overnight but didn’t get anything substantial. Unfortunately, the heme is in the root of the soy plant, not in the milk, so it was back to the drawing board.

There are a few other sources: breakfast cereals, black olives (often treated with iron gluconate), and the roots of other legumes. However, [Sauce Stash] took a more leisurely route and crushed a soy-based iron tablet. However, being a supplement, there were other ingredients that he didn’t want in his burger. So he used the magnet to extract the iron to include. After that, it was easy sailing, and he was very proud of the vegan burger he had created.

Creating something that tastes and feels like something else is a complex and tricky endeavor, and hacks like these are always interesting to think about. We’d take texture pea protein over an insect burger, but perhaps that is just something we need to get over. Video after the break.

Continue reading “Pulling Out Burger Flavor With A Magnet”

A Math Based Personality For Games

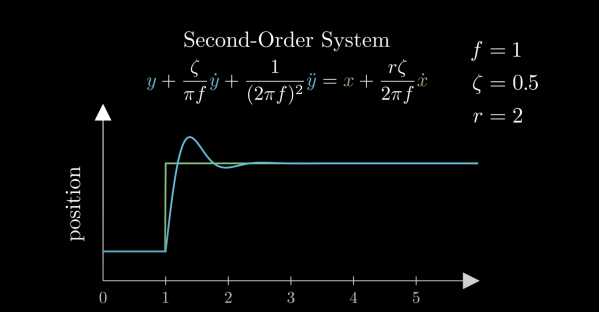
We make no apologies for being hardware focused here at Hackaday, but that doesn’t mean we aren’t occasionally impressed by a particularly inspired feat of bit wrangling. For example, [t3ssel8r] has taken a break from his game to discuss his procedural animation system and the beautiful math behind it.

Sometimes, rather than having specific keyframes, games will instead use procedural animation. This means that the position is determined on the fly rather than a predetermined set of positions. Developers can use the combination of IK or FK (inverse or forward kinematics) to solve for rotation and positions of the joints that will place the end at a specific position. Particularly with crawling multi-limb things, it’s pretty easy to put a limb on the ground and keep it there until it’s too far away, pick a new spot, and move it there. It’s simple code to write and looks convincing. It can handle complex terrain and situations with different limb positions.

However, it doesn’t offer the chance to inject some life or personality into the movement as keyframes do. [t3ssel8r] goes through the equations and reasoning behind his semi-implicit Euler solver-based system. There are some fantastic explanations in the video, but the short version is that he has three parameters to control the system’s frequency, dampening, and initial response. This allows him to tweak the behavior in a somewhat intuitive manner. One problem is stability; if the timesteps get too large, the position quickly explodes outwards. Using eigenvalues (who ever thought you’d use those) to determine the minimum timestep allows the system to remain stable and take multiple smaller steps when needed or just bound the change temporarily.

If you’re looking for more animation, this blender plugin renders your PCB traces in a new light.

Continue reading “A Math Based Personality For Games”

Owen with his laser cutter

A Home Made Laser Cutter For $700

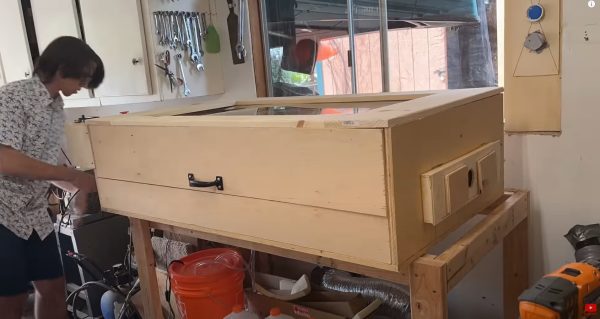
While some decent lasers are out there for under $400 USD, they tend to be a little small. What if you wanted something a little nicer but didn’t want to jump to the $2,000 category? The answer for [Owen Schafer] was to build it with parts he had lying around and a few strategic purchases.

While he was initially planning on using a diode laser, doing anything more than engraving is tricky. He purchased a cheap 40 W CO2 laser tube, but it meant that he needed water cooling, mirrors, and more complex stuff that a diode doesn’t need. The frame is aluminum extrusion held together with 3D printed plates. Given there was a powerful laser bouncing around with mirrors, a plywood box formed the enclosure.

The stepper controller is an Arduino Mega running the Marlaser firmware, though [Owen] admits perhaps a laser cutter-specific driver board would have been better as he spent many hours trying to get the Arduino to do what he wanted. Air ventilation is a tube with a fan that vents out a nearby window. Water cooling is just a bucket of water with a pump in it. A simple nylon hose connected to a compressor with a maximum airflow valve provides an air assist while cutting. Finally, we’re happy to report that [Owen] bought safety glasses specific to his laser to protect his eyes and researched how to ground the high voltages generated.

We particularly loved seeing all of [Owen’s] test cuts. He proudly displayed his boxes, sharks, and lamp shades like anyone with their new laser cutter is wont to do. If you’re looking to upgrade your laser, there’s an add-on for detecting materials optically or a relatively cheap laser bed you can throw in your laser.

Continue reading “A Home Made Laser Cutter For $700”

Lenses: From Fire Starters To Smart Phones And VR

In antiquity, we see examples of magnifying crystals formed into a biconvex shape as early as the 7th century BC. Whether the people of that period used them either for fire-starting purposes or vision is unclear. Still, it is famously said that Emperor Nero of Rome watched gladiator games through an emerald.

Needless to say, the views we get through modern lenses are a lot more realistic. So how did we get from simple magnifying systems to the complex lens systems we see today? We start with a quick journey through the history of the camera and the lens, and we’ll end up with the cutting edge in lens design for smartphone cameras and VR headsets.

Continue reading “Lenses: From Fire Starters To Smart Phones And VR”

The Prints Don’t Stop With This Prusa I3 MK3 Mod

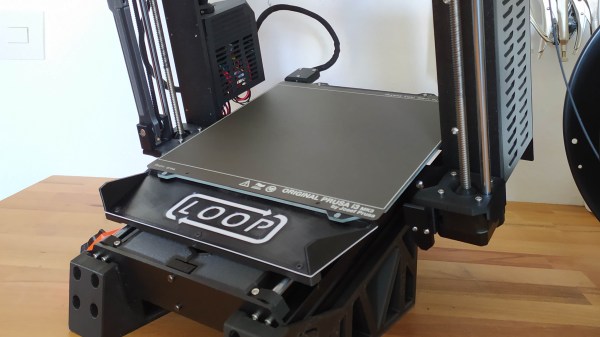
One of the issues with 3D printing is that when a print is done, you need to go back and pull the print off the bed to reset it for the next one. What if you needed to print 600 little parts for whatever reason? Most people might say get lots of printers and queue them up. Not [Pierre Trappe], as he decided that his Prusa i3 MK3S+ would print continuously.

The setup was dubbed Loop and consisted of a few parts. First, there’s an arm that sweeps the build plate to clear the printed pieces, a slide for the pieces to descend on, and a stand for the printer to sit on that puts it at an angle. The next step is to modify OctoPrint to allow a continuous print queue. The slicer needs to change as [Pierre] provides some G-code to reset the printer and clear the print.

We were especially impressed with the attention to detail in the documentation for this one. There’s extensive guidance on getting the bed adhesion just right, as you can’t have it come off mid-print, but you need it to detach cleanly and easily when the arm sweeps across the bed. Calibrating that first layer is essential, and he provides handy instructions to dial it in. Additionally, temperature and material play a crucial role, and [Pierre] documented the different materials and temperatures he used while developing Loop.

While continuous belt printers are arguably the “correct” answer to the question of printing 600 little parts, they come with their own baggage. Being able to pull off something similar on a printer as reliable and well supported as the Prusa i3 makes for a compelling alternative.

Continue reading “The Prints Don’t Stop With This Prusa I3 MK3 Mod”

Putting A Little More Juice In Your Emulation Station

After you’ve built a snazzy Raspberry Pi-powered retro gaming console, you might be wondering if you could have just a wee bit more power and run some of those other games you might remember, such as Xbox, Wii, or PS3. Perhaps in the future, a later revision of an RPi could handle it but currently, to emulate the 6th/7th generation of consoles, you need something a little beefier. Luckily, [Zac] got his hands on an old gaming laptop and turned it into his own game console.

The first step was to take the laptop apart and discard the parts not needed. [Zac] stripped away the battery, Bluray drive, and spinning hard disk. That left him with a much smaller PCB that could fit into a small case. The power button was integrated into the keyboard but came into the motherboard by the flat cable keyboard connection. So by bridging a few pins, he could power up the laptop. Next, he upgraded the RAM, wifi card, an NVMe drive, and redid all the thermal paste and putty to try and keep things cool while overclocking the GPU.

The case for the machine heavily used his CNC as it was walnut with a mid-section made of plywood. The top has a gorgeous cast acrylic window to see inside. The part the [Zac] was dreading with the fine pitch soldering. Ultimately he got both wires connected with good connections and no bridging. Because it’s just a PC at its heart, almost every game is on the table. Emulation, some more moderate PC games, streaming from his office PC, and cloud gaming services allow him to access most games made. We love the concept and the idea.

We love the aesthetic of the build but if you prefer to keep your consoles looking a little more faithful, why not put your mini PC inside of an actual N64 case? Video after the break.

Continue reading “Putting A Little More Juice In Your Emulation Station”

Edging Ahead When Learning On The Edge

“With the power of edge AI in the palm of your hand, your business will be unstoppable.

That’s what the marketing seems to read like for artificial intelligence companies. Everyone seems to have cloud-scale AI-powered business intelligence analytics at the edge. While sounding impressive, we’re not convinced that marketing mumbo jumbo means anything. But what does AI on edge devices look like these days?

Being on the edge just means that the actual AI evaluation and maybe even fine-tuning runs locally on a user’s device rather than in some cloud environment. This is a double win, both for the business and for the user. Privacy can more easily be preserved as less information is transmitted back to a central location. Additionally, the AI can work in scenarios where a server somewhere might not be accessible or provide a response quickly enough.

Google and Apple have their own AI libraries, ML Kit and Core ML, respectively. There are tools to convert Tensorflow, PyTorch, XGBoost, and LibSVM models into formats that CoreML and ML Kit understand. But other solutions try to provide a platform-agnostic layer for training and evaluation. We’ve also previously covered Tensorflow Lite (TFL), a trimmed-down version of Tensorflow, which has matured considerably since 2017.

For this article, we’ll be looking at PyTorch Live (PTL), a slimmed-down framework for adding PyTorch models to smartphones. Unlike TFL (which can run on RPi and in a browser), PTL is focused entirely on Android and iOS and offers tight integration. It uses a react-native backed environment which means that it is heavily geared towards the node.js world.

Continue reading “Edging Ahead When Learning On The Edge”